

Welcome back to another special guest feature. Leathanam recently wrote an incredible and highly detailed guide to Myari’s Purifiers, which in the four weeks since it was published has already been read by over 600 people and was subsequently translated into another language by a reader to spread the message further. Phenomenal stuff that’s absolutely worth a read if you’re competitive in the slightest. One of the decks he cooked up for that article was a Rimelocked Relics build, which allows for an effective flex-hold gameplan that the Purifiers can do quite well with. Putting his money where his mouth is, Leathanam took them to a tournament, and his report is below. Read on to see inside a Perfect Mind as we explore “Rime of the Ancient Myari”

Recently, the Northbeast hosted a Nemesis event in Brooklyn. We had 9 players. Because of time considerations, we played three best-of-three matches with a sudden death final match of best-of-one. I brought Myari’s Purifiers with Rimelock Relics. This event was pre-Wintermaw so Deadly Depths and Nethermaze boards were permitted, but no Skinnerkin, Brethren, Rimewyrms, or Parasites. I am often organizing and judging events in Connecticut. So, I was really glad to be able to bring my Purifiers to a competitive event and show everyone what they can do. A big thanks to my friend George (Kyros at Path to Glory) for organizing and running the event and to The Brooklyn Strategist for hosting us. If you’re ever in the NYC metro area, Tuesday evenings are Underworlds night—come out and say hi!
Why Rimelocked Relics?
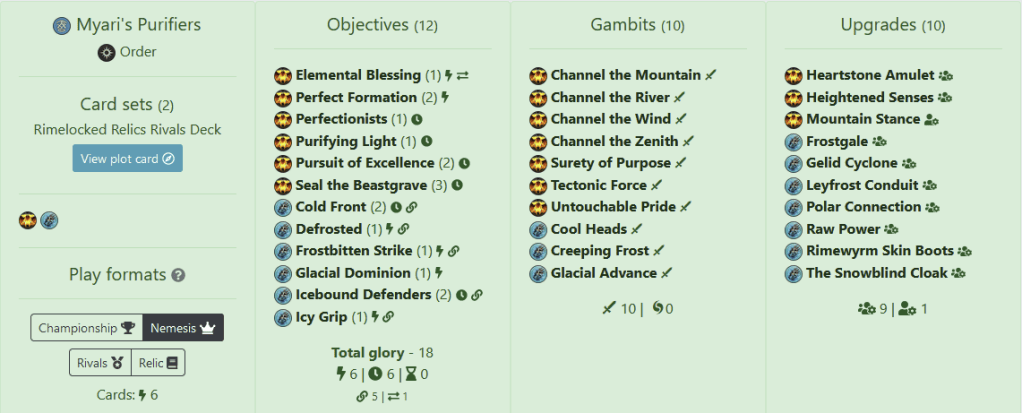
As soon as Rimelocked Relics was revealed, I rejoiced. At last, we had a viable hold-and-fight Universal Rivals deck for Nemesis. I started testing with Purifiers immediately. What makes this deck so attractive is its exceptionally smooth surge package with some two- and even three- glory payoffs in the end phases for holding objectives and, what’s more, such payoffs do not require you to hold those objectives in dangerous zones of the board like no one’s territory as, say, Fearsome Fortress does. Additionally, the Rimelocked upgrades themselves are almost all very good and the non-Rimelocked upgrades are some of the best. The weakness of the deck is the gambits, which interplay mostly with thaw counters. Accordingly, they can be quite difficult to use well. Take Fractured Steps, for example: I love pushes and so do the Purifiers, especially Bahannar, but having to time that push to the two power steps after you give the upgrade is too narrow. Fortunately, Purifiers can bring a lot of powerful gambits of their own. At least six are included in our scaffold. As you will see in the deck below, I opted to add only three gambits from Rimelocked Relics and included Untouchable Pride for access to heal to help with Cold Front, an end phase that wants more held objectives but fewer wounded fighters.


The game plan is to hold two objectives safely in my territory (usually with Myari and Senaela because their range lets them contribute solid attacks while having move tokens) and, depending on the matchup, to use Ailenn or Bahannar or both to hold one in no one’s territory. In almost every matchup, you will need to have either (or both!) hold-three objectives in your opening hand in the first round. Scoring these early mitigates against losing two fighters and failing to score them later. In every game I won in this event, I scored both of these. Scoring my own hold-threes along with the smooth hold surges from Rimelocked Relics meant I was building strong glory leads and forcing opponents to come after me on my terms—meaning Bahannar counterpunches them hard or everyone simply runs safely away.
Now, I was concerned about matching up against other hold-and-fight warbands or the three revised hold-three warbands (new Sepulchral Guard, new Thorns of the Briar Queen, new Zarbag’s Gitz). Gratefully, no one brought them! In these matchups, Purifiers nearly always have to play the beatdown, and that can be quite difficult because these revised warbands not only bring more bodies than the Purifiers but also pack a formidable wallop of their own! They are also just so hard to deny. Guard can multi-move and raise their fighters, Thorns can multi-push and teleport, and Gitz have a new scurry that lets them spread across the board and never leave a feature empty.
I was not as concerned about invading aggro strategies because, despite their threat of overwhelming attack dice, I had solid denial gameplans for them, as you will see below. But first, the deck:
Rimelocked Purifiers
Matches
Match 1: v. Jimmy playing Khagra’s Ravagers + Voidcursed Thralls
Jimmy is a great player. He recently won an event I organized in Connecticut with Crimson Court + Daring Delvers. When I saw he brought Voidcursed Ravagers, I was a little worried because the curse can shut down my ranged fighters, even rendering Senaela unable to make attack actions because my deck does not include her Vanari Dagger upgrade. I also knew that Khagra and friends must get inspired through desecration to be dangerous. So, I planned to keep them off objective tokens in their territory with ranged attacks and Tectonic Force and hold tokens in no one’s and my territory for myself. Let’s see if it works!


In game 1, Jimmy set up the boards square, but I was able to keep two tokens very far back and one in no one’s. He kept two tokens for himself to get inspiration from desecration. I hard mulliganed for Tectonic Force so that I could push Razek/Cragan off of objectives tokens in the final power step, but he had move tech to get back into position. Fortunately, I was able to basically play very defensive using only Bahannar to tank hits from Ravagers while Senaela sits within four hexes of the tokens he plans to desecrate and Myari and Ailenn hold the back two safe objectives. I eventually get such a glory lead he concedes.
In game 2, I set the boards so that I can have a chokepoint with Visceral Coil. Again I try to hard mulligan for Tectonic Force and try to hold that chokepoint. But, once again, he has the push tech to stop me from denying his inspire. I risk Senaela holding an objective and, alas, she gets voidcursed! I build a slight lead but my defense dice can’t hold off cleaving Ravagers and I get tabled, losing by 4.
Game 3 is almost a repeat of Game 1. He sets boards square again and doesn’t deny me the safe objectives in the back rank. After two failed attempts at denying inspiration I decide to keep a good opening hand and am able to build a huge lead, surging Perfect Formation into more Rimelock hold surges and finishing with Seal the Beastgrave. Bahannar becomes a dangerous threat with Heightened Senses, Gelid Cyclone, and Mountain Stance, and is able to one-shot all the Chaos Warriors, leaving only Zarshia to try to knock me off tokens. This is the only game, as it turns out, where Cool Heads prevents a push and allows me to score several end phases to Seal the Beastgrave, game, and match.
Match 2: v. Brian playing new Spiteclaw’s Swarm + Breakneck Slaughter
Brian is a skilled player who loves his Skaven. He likes to play them as invading aggro and so the revision of Skritch with Breakneck Slaughter called to him. I had not played this matchup much, but I knew that I would need to get rid of Skritch and Krrk, and I also knew I would need to deny charges as much as possible.
In game 1, I lost the roll-off and so chose Katophrane’s Reliquary, which gave me the best chance for a far back deployment. Unfortunately, I would have to deny Fastest Around at the end of the rounds and so move up and take position in enemy territory if he had fully invaded. One key denial strategy against Breakneck Slaughter is to always push his fighters with momentum back into no-one’s or enemy territory when resolving Impetus. This helps deny Fastest Around. But even more importantly, by never staggering them you can deny Out of Control. This is key because most Breakneck Slaughter players keep this surge, and if you continually deny it and make them score it the harder way, you will clog the flow of their surges. This is just what I did to Brian. He did not score it the entire match. As expected he invaded me but I was able to inspire both Ailenn and Bahannar from defence rolls. This allowed me to counterpunch Krrk and take him out with Channel the Wind. I built a big lead scoring through my hold end phases. Brian nearly came back though, taking out all but Myari, but with Myari safely on an objective, I was able to hold off Brian’s comeback and win by one glory!


Game 2 was more comfortable for me. I built a chokepoint using Mistmarsh Triangle with its blocked hex making a virtual three-hex off-set. Accordingly, I safely held two objective tokens in the back while Bahannar equipped with Snowblind Cloak held no-one’s. Skritch and Krrk came for me again, but this time the Skaven defence dice completely abandoned them and the aelf counterpunch was too much for the rats.
Match 3: v. Ellie playing Hexbane’s Hunters + Fearsome Fortress
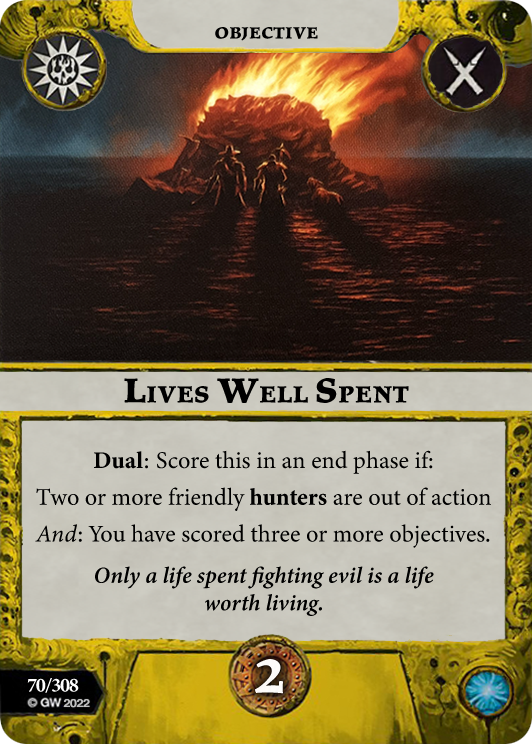
Ellie is a really innovative player. She is always trying out a new combo. This time she was innovating a new way to crush us with those mean dogs and their buddies. Her pairing was Hexbane’s Hunters with Fearsome Fortress, which can be difficult for a few reasons. First, accurate ranged attacks can keep my aelves off objectives and, second, Fearsome Fortress wants to put its own fighters on tokens in the center of the board. However, of the matchups I played, I have played often against Hexbane and so I made a solid plan for dealing with him. The strategy is this: deny Lives Well Spent by only taking out the two dogs and one hunter. This only yields two glory from kills but it denies them two. Additionally, without the dogs, Hexbane has less accuracy and cannot put bodies onto features in no one’s for a big Conquered Domain score. When it comes to choosing a hunter to take out, usually I prefer to get rid of Brydget or Hexbane. I want to reduce the number of ranged attacks from charged-out fighters after the dogs are dispatched.

In game 1, I lost roll-off and placed Katophrane’s Reliquary. Ellie set the boards square. My first objective placement was in no one’s. She placed a second in no one’s. This makes sense since she’s playing Fearsome Fortress, but this also meant that I would be able to place my second or third in my territory fairly far back and safe from hunters. In fact, I was able to place both as far back as possible. Here’s also an example where objective numbers do matter: 5 and 1 were far back in my territory where I could safely control them with Myari and Senaela. 2 and 4 were in no one’s and 3 was in Ellie’s territory. This was very advantageous for me. If I kept her hunters off of 4, then she could not score Stockpile without moving far into my territory. For deployment against Hexbane, I always place Ailenn in the front with Bahannar not far away as back up in the center. Because Ailenn is the nearest target and Hexbane needs to make attacks to score surges, I can usually get her inspired with her re-rolls against ranged attacks. Once inspired, two-block defence with full re-rolls is very hard to hit. Offensively three smash with cleave against one-block fighters is also very accurate. This is exactly how it played out. Ailenn got inspired early, held objective four in no one’s and chopped up Brydget and the dogs. While Ellie was kept busy with Ailenn, I set up to hold three objective tokens and cycled through surges quickly. I built a very large glory lead, and although Aemos made a valiant effort to hack through my remaining aelves, leaving only Myari standing, the glory lead was insurmountable.
Game 2 allowed me to set up a four-offset using Mistmarsh Triangle and limit Ellie’s Fearsome Fortress tokens in no one’s. In this game, Ellie avoided Ailenn because her defensive re-rolls were too much and instead took shots at Bahannar, since again he was the only other available target. Fortunately, I drew into Mountain’s Stance which made Bahannar immune to cleave and not a moment too soon because Ellie was able to inspire Aemos with Lead the Crusade, which gives him an additional attack die and cleave. This brings us to the decisive moment of the game at the end of round two. I am defending three objectives. Bahannar holds the furthest forward objective in no one’s. Ellie has an inspired Aemos with Woodcutter’s Strength but no dogs for support because I’ve taken them out. If she can use Aemos to take out Bahannar she will deny me Seal the Beastgrave and score some of her own surges. But the odds are not in her favor: three smash into two block with a re-roll—remember Bahannar is immune to cleave and has his aetherquartz—is only about 40% chance to hit. The dice are cast! Bahannar rolls double crits and defends! This effectively ends the game. I score a seven-glory end phase and Ellie concedes the game and match. At first glance, it may seem like dice carried Bahannar, but remember our Purifiers’ strategy: We want to force the opponent into taking bad attacks into Bahannar. If the opponent has to make low probability attacks against us, we are doing well. Besides, Ailenn was nearby to help if Bahannar went down.
Sudden Death Final: v. Mike playing Gryselle’s Arenai + Breakneck Slaughter
Sudden death! I was 3-0 (6-1) going into the final round. My potential opponents all already had one loss. This means that to take home the glass, I need to win this best of one or at least keep the game close to come out ahead on glory differential. We used Swiss pairings so I could have paired against either Madmob + Breakneck Slaughter or Arenai + Breakneck Slaughter. Both are terrifying, but for different reasons. Madmob is a bunch of tough, four-wound savage orruks with some tough-to-deny end phases. Arenai roll a lot of dice, especially with all the combo attack-action upgrades. Shadeglass paired me against Mike with his murder aelves for sudden death. I was starting to sweat. If Mike’s dice are hot in a best-of-one, even my best defence dice won’t save me. Mike really enjoys his aggro, not long ago he won an event with Cursebreakers + Breakneck Slaughter. So, I knew I was in for buckets of dice and aelves moving nine from the back of the board. Gratefully, I had a lot of experience against Breakneck from my practice matches and already had played against Brian’s Breakneck Skaven earlier. Also, I won roll-off so I was able to use another four-offset with my favorite chokepoint on Mistmarsh Triangle. Unfortunately, Mike had experience playing Purifiers and knew to place the first objective just across into his territory. This effectively blocks out no one’s for me and means I have to move forward to get that third objective for Perfect Formation and Seal the Beastgrave—oof! I do draw into Perfect Formation and some handy pushes for my opening hand. However, Mike plays Slick Ice in the first power step.
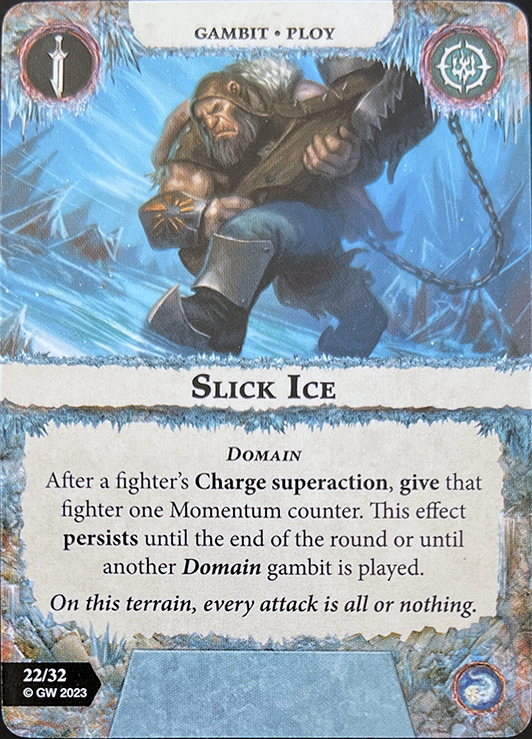
This is a dangerous card for us aelves. We want to hold. With momentum after a charge superaction, our opponent will push us off. It also means that if we do charge, our opponent scores Out of Control. I decided it’s better to deny Out of Control and to get onto the objectives I need than make attacks. So, I simply don’t charge at all in round 1. As a result, I didn’t make any attacks, but I did roll a lot of defence dice and inspired relatively easy. Indeed, no one was successfully hit or taken out in the first round! That’s a good result for us Purifiers. I was also fortunate enough to score Perfect Formation and draw into Seal the Beastgrave, which I scored at the end of round 1. While Mike was charging into my territory putting lots of momentum counters onto his fighters, he kept asking me if I wanted to stagger his fighters, and I told him that I was going to keep denying him Out of Control and always push his fighters away. Accordingly, at the end of round 1, he discarded it! This leads us up to the four most decisive points of the game.
Gryselle Charges Like a Whirlwind!
Up to this point in the match Gryselle has not yet been involved. She uses momentum to charge from very far away, looking for crits or a combo swing to kill Bahannar who is defending the chokepoint in my territory. She lands adjacent swings and hits for two but no crit. She then swings combo and misses, but Bahannar inspires. I can breath again—phew! If Bahannar goes down here, the game probably goes poorly for me. Remember Mike has discarded Out of Control, so now I am able to stagger Gryselle. I push her into an edge hex so that she is staggered and trapped.
Bahannar Bonks Back—Or, Does He?
Bahannar gets Mountain Stance in the power step. So, he is now on two smash with a re-roll and four damage against Gryselle who is trapped. He rolls and hits! But! Gryselle rolls one dodge which reduces lethal damage to three! She survives, no kill glory for me, and Bahannar is vulnerable. Mike sends in another murder aelf with a plus-dice gambit to finish off my heroic mountain aelf.
Myari versus Gryselle
Gryselle has to go down here. If she sticks around for round three, I may be tabled. Although she is vulnerable, Myari is not inspired and he is carrying two wound counters from weathering an earlier attack. So, his magic attack only does one damage. I decide to mitigate against Gryselle’s damage reduction by playing Surety of Purpose in the power step. Myari charges into position so that he can take advantage of the edge hex to trap her. He rolls into crit hit! Gryselle rolls a crit dodge! But! She is trapped so Myari gets one more success. But!! The dodge reduces the damage by one. BUT!!! Surety of Purpose adds one more damage on charge. So, at last Gryselle goes down. At last I can breathe. The murder queen is dead. Also, the final thaw counter goes onto Myari’s Rimelocked upgrade revealing Gelid Cyclone, which he uses to teleport to an objective token in enemy territory far away from all the little murder daughters in my territory.


The Laws of the Purifying Confirmed
The final activations of round three have Ailenn and Myari in enemy territory. Myari has teleported there with Gelid Cyclone. Ailenn has been holding most of the match. Both are vulnerable. Ailenn has delved an objective and gone on guard to rid herself of the stagger. The delving was to prepare enemy territory to score Ice Bound Defenders that requires holding two and all in one territory. Ailenn is a very hardened target, rolling two block, on guard, in cover, with supports from Myari’s Leyfrost Conduit. So, Mike opts to try to take out Myari with his last activation. He’s rolling three smash into two dodge with a re-roll—odds are roughly 50-50. Mike gets several successes. Myari rolls no successes. I gulp. I remove the aetherquartz from his card. Announce that he will re-roll. One defence die. Looking for a crit. I roll — by Teclis! It’s a crit! — Myari survives! With my last activation I move Ailenn onto an objective and score three in the end phase, but Mike scores six because of so many wound counters and charge tokens! The game ends very close 19-17 with the Purifiers ahead. If the attack lands at the end, Arenai come out on top. Friends, this is why we follow the Laws of Purifying! Save your aetherquartz for precisely these situations.
Conclusions
Having survived sudden death, Myari’s Purifiers finish the day with four match wins and the shadeglass trophy! The matches were close and exciting, and my opponents were all excellent. It was truly a blast to pilot the Purifiers to victory. Living the aetherquartz life is good!
But, what conclusions should we draw from this: Are we entering a new Rimelocked meta? Are Myari’s Purifiers cracking into the A-tier? The answers to these questions are probably—alas!—no—although Rimelocked has filled an important deck-building lacuna that surely benefits hold-and-fight warbands like the Purifiers. Additionally, what I do hope this report shows is that when you put in the time practicing and thinking through how to best use your favorite warband and make a plan for its success, including thinking carefully about deck-building, board and objective placement, fighter deployment, and game play, you can do really well and bring your beloveds to the podium. So, I hope that seeing how I think and play Underworlds will give you confidence that you too can win with your favorite warband! (And, maybe you can write a Love Letter about it!)
Thank you again to Leathanam for yet another banger of an article – so glad to have you sharing knowledge to the community. Having played a lot of Breakneck Arenai myself I can say it’s a strong combination and can really ruin a four fighter warband’s day, so props for surviving those gladiators. If you’re inspired by this writeup and want to share something of your own, I’m more than happy to chat and see what we can’t put out there for folks to read. Check out this Invitation for Love Letters, which spawned this post and others like it, and then email me what you’re working on at SpentGlory@gmail.com and we’ll make it happen! Until next time, don’t forget to spend some glory (and play Rimelocked Relics, it’s pretty fun)





Leave a Reply