
Welcome to the first installment of Custom Rules on Spent Glory!

Emberstone shatters and Warbands flee in terror as the Smoulder-mad Gargant rampages through the tunnels of Embergard. Unable to escape the cursed mines, the crazed monster leaves devastation in its wake. Only the foolhardy (or the especially brave) dare fight it.

The original Glass-mad Gargant game mode was created in the December 2018 White Dwarf by none other than John Bracken. It was his first ever foray into game design as a Games Developer, and he went on to helm Warhammer Underworlds as a whole for several years. To honor the great fun I’ve had with this mode in the past, as well as honor the enormous amount of effort that went into our beautiful game on John’s part for so long, I would like to turn an eye to updating this game mode, however clumsily, for use in Embergard/Second Edition.

Most games set in Embergard focus on the exploits of warbands trying to plunder its ruined tunnels for precious Embestone shards or other treasures. However, these fighters are by no means the only denizens of that ill-fated city or its mines. Many were trapped in the ruins, and many more have made the nightmare journey into its dark tunnels, only to become hopelessly lost in the labyrinthine depths.
The Smoulder-mad Gargant is one such cursed soul who has stumbled into Emberagrd through misfortune. He has swiftly been driven completely insane – beyond that which is normal for such an abomination, – by the constant heat and pressures of the hot and dark tunnels that plague its every step.
The maddened Gargant has wasted no time in making itself both seen and heard. A monster on a completely different scale than most warbands are accustomed to, it is far too dangerous to attack alone. Unlikely alliances are swiftly brokered (and swiftly shattered) by those both eager and desperate to gather the Emberstone shards unearthed by the behemoth’s rampage.
This game is for two players. You will need a copy of the Embergard core game and rulebook, and a Chaos Gargant (or similar monstrous model) mounted on a 90mm x 50 mm oval base – or something suitable to occupy two hexes at once.
Setting Up the Game
Use the following changes to the Warhammer Underworlds Core Rules:
- Players do not build an Objective deck – slaying the Gargant is the only objective.
- Once all fighters are placed on starting hexes, before rolling to see who takes the first activation, place a Chaos Gargant model on two hexes as close to the middle of the board as possible and entirely in neutral territory. Players roll off to determine who places the Gargant in which two hexes. The model will take up a little more than two spaces on the board (it’s a large model!) – make sure to be clear which two hexes are occupied each time it is placed or moved.
Playing the Game
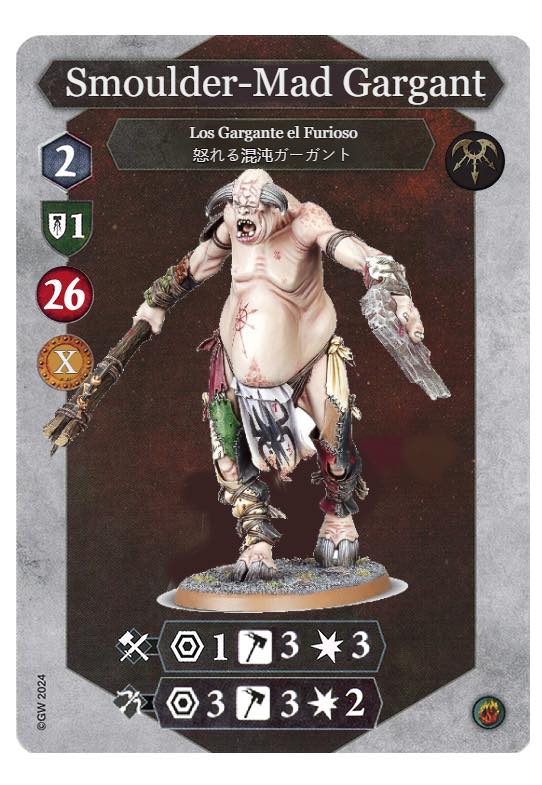
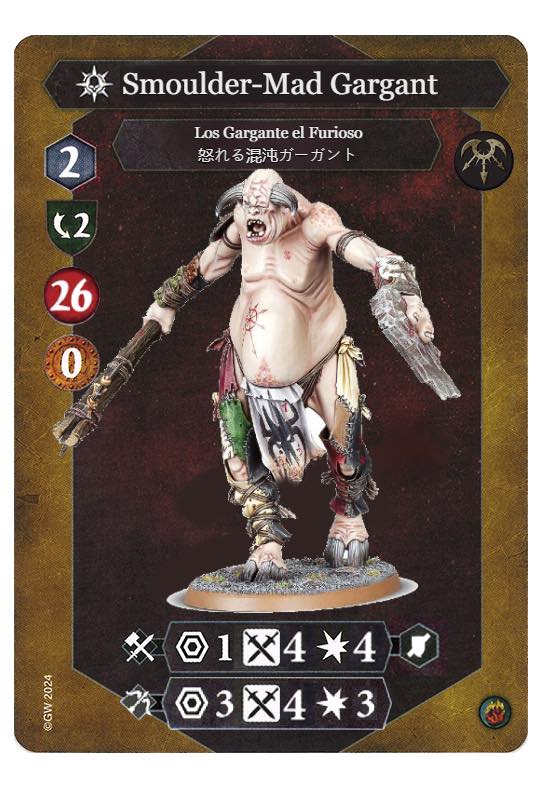
Thank you to Jamie Eden for improving these fighter cards
- Treat the Gargant as an additional player/warband/fighter. While it will be controlled by one of the two players, actions it takes do not satisfy conditions for either warband as it is not a friendly fighter for either player.
- The game lasts for four rounds (one longer than a standard game!). Play the fourth in the same fashion as the previous three.
- Keep track of the Gargant’s activations using a third set of activation tokens, or an alternative if you do not have a third set of tokens.
- After the fourth End Phase, if the Gargant is not slain, then both players lose.
- If the Gargant is slain by the beginning of an End Phase, the game ends immediately and the player with the most glory points wins the game. Glory points are scored by dealing damage to the Gargant as described below:
- While the Gargant is uninspired, they are an Impossible Foe. Each time a warband deals damage to the uninsipred Gargant, they gain a number of Glory points equal to the damage caused.
- The Gargant inspires after it has 13 or more damage counters. While the Gargant is inspired, it is Weakening! Each time a warband deals any amount of damage to an inspired Gargant, the warband gains one Glory point.
- While the Gargant is uninspired, they are an Impossible Foe. Each time a warband deals damage to the uninsipred Gargant, they gain a number of Glory points equal to the damage caused.
- When a player-controlled fighter from either warband is slain, the other warband receives glory points equal to its bounty characteristic as per usual. This is true whether the opposing warband took them out of action or the Gargant took them out of action.
The Chaos Gargant’s Action Phase
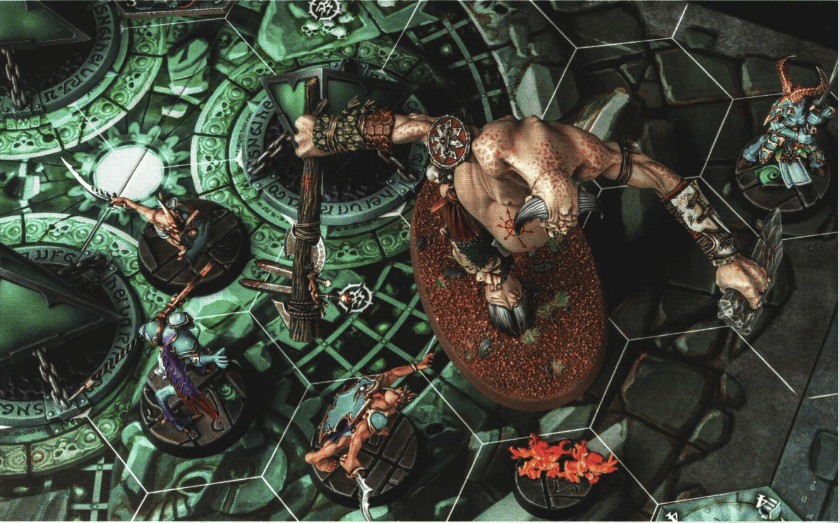
- The Gargant is always assumed to activate first in every round, regardless of which player wins the roll off for priority.
- The Gargant is activated like a normal fighter, save that it does not have a controlling player. When the Gargant is activated, follow the below sequence, always starting with the Thickening Hide action.
- Note the Gargant has no power deck and automatically passes its chance to play cards in the power step.
Thickening Hide
- If the Gargant is not on Guard, place the Gargant on guard. If it is on Guard, it will perform the Rampage action sequence below.
Rampage
- If one player has no surviving fighters, they are the controlling player for the round. If both players have surviving fighters, they roll off (with Underdog as tiebreaker if applicable). The winning player becomes the controlling player for this round. Once the controlling player is determined, proceed to the next bullet point.
- The controlling player may choose one fighter adjacent to the Gargant. That fighter gets kicked by the mad Gargant’s huge feet as it stumbles around. The controlling player pushes that unfortunate fighter one hex (if possible) and that fighter suffers one damage. Then proceed to the next bullet point.
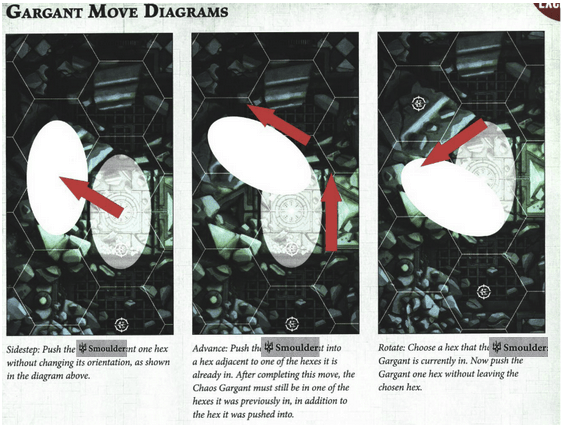
- The controlling player then performs any of the actions in the Gargant Move Diagrams twice (in any combination) as pictured above. Each of these counts as a single push. The Gargant cannot be pushed through other fighters or blocked hexes. If the Gargant cannot be pushed (because of a lack of space or a Ploy, for instance), the Rampage sequence ends and the Gargant performs the Bellow of Outrage action as described below. Otherwise, proceed to the next bullet point.
- The controlling player can then choose a single fighter within range of one of the Gargant’s attack actions on its fighter card and resolves that attack against the target fighter, after which the Rampage sequence ends. Otherwise, proceed to the next bullet point
- If there are no fighters within range of the Gargant’s attack actions, the Gargant performs the Abominable Regeneration action as described below. If the Gargant in inspired, it performs the Bellow of Outrage action instead. After resolving either action, the Rampage sequence ends.
Abominable Regeneration
The controlling player rolls 4 defense dice. for every Shield or Crit, heal the Gargant.
Bellow of Outrage
Deal one damage to every fighter on the board other than the Gargant.
That’s it! I am done butchering this game mode now. If you give it a spin, let me know! I’d love to hear how well it ports into second edition and whether any stat changes need to be made.
Enjoy spending the Gargant’s Glory!






Leave a Reply