Today’s special article is part of the Custom Rules series. Click here to see other custom rules we’ve put together!
Previously, we published a multiplayer free-for-all rule set to solve the issue of disconnected boards in Embergard/second edition. Today, we will expand on that concept, specifically focusing on 2 on 2 team games. With the concept of the ‘Stagger Tunnel’ solving the separate boards issue, we can create a special ruleset for teams of two players to work together across two battlefields with a shared set of cards.
Ever wanted to know what might happen if the Jaws of Itzl took to the field alongside Ephilim’s Pandaemonium, as allies?! Well, there are tons of Minions, for one, and if a warscroll simply mentions a friendly minion, and your buddy’s warband happens to have one too, the possibilities are… enticing. Change a saurus, and flank with Kindlefinger? Ping from every friendly minion (including the venomites) with Ephilim’s ability? Tasty.
Maybe you love playing three fighter elite strike and are sick of having to save one of them for babysitting a treasure token to block Strip the Realm. Your teammate squatting on one will solve that problem for both of you, freeing your trio up to do what they do best – collect some bounty on the move.
With your teammate’s fighters counting as ‘friendly’ (but not ‘yours’), a huge number of play lines open up through warscrolls, power cards, and objectives. Interested in seeing what you can cook up in the team kitchen? Let’s get our Wombo Combo on in the Embergard, as Spent Glory presents:
The Underworlds 2v2 Team Multiplayer Game Mode
Board Setup
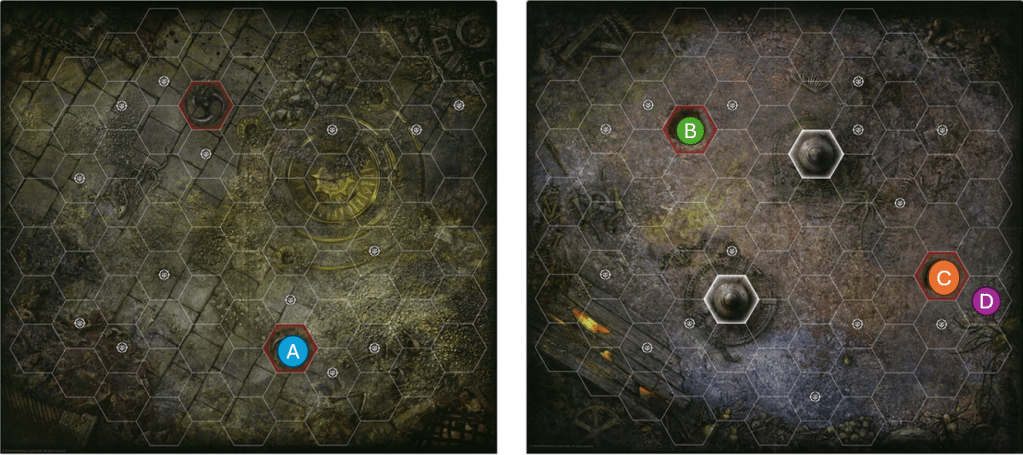
For Multiplayer games of Embergard, you will use two separate game boards. One will be the ‘open’ side with no blocked hexes, while the other will be using the blocked hexes side.
Players roll off using the standard roll-off rules. Each team will have only one player perform the die roll, and their team as a whole will be determined the winner or loser.
The winning team of the roll-off chooses one of the two boards, and orients that board to determine their home territory. The other team must select the other board, and orients it as they wish, selecting their home territory.
Token Placement
Token placement follows the usual rules for a given board. Both boards will have Treasure tokens 1-5 placed on them, and each territory must have at least 1 token with at least two hexes between each, as per the current WHU rules.
As each board has a team that oriented it and chose a home territory, that team will be placing two of the five tokens on that specific board. The team that did not orient a given board will place three feature tokens, and will place the first token on that given board. Teams may decide as a group where each token goes on each board. Complete placing all five tokens on one board before beginning the process for the second board.
Fighter Placement

Fighter placement will operate similarly to the standard rules in a four-player team setup, with the players who placed the last feature token placing the first fighter on a starting hex in friendly territory. However, as this is a multiplayer game, all four players will need to be aware of positioning on both boards (see The stagger ‘Tunnel” section later in the document).
As such, the first fighter will be placed by the team that lost the roll-off and did not get to choose which board they oriented. Fighters from either warband on a team can be placed on either board, but must be placed in a starting hex in their team’s territory.
Next, a fighter will be placed by the other team. Teams alternate placing fighters, one fighter per team. There are no limitations on which fighter or which board the teams would like to choose. Continue alternating, placing until both teams have placed all fighters on the board.
The only other requirement is that each friendly territory for a given team must contain at least one of that team’s fighters at the end of fighter placement. A team can not elect to deploy all of their fighters on a single board.
Initiative and Turn Order
Teams roll off again with one representative per team. The winning team of the roll-off may choose to either go first or last for the round. The losing team draws one additional power card per player.
For simplicity’s sake, the team taking the first action in a round will be called team 1. Each team contains two players, player A and player B. Teams can decide for themselves each round who is A and who is B – this will determine which of the two teammates will go first on a given team. Teammates roll off if they cannot decide. Team 1 chooses their A and B players first, and then Team 2 can choose their A and B players with this knowledge.

The turn order in a given battle round is 1A, 2A, 1B, 2B. Each player will get 4 actions and 4 power steps in a round.
The Stagger “Tunnel”
The defining feature of the Spent Glory multiplayer rules is the Stagger Tunnel. There are slight modifications to the Stagger Tunnel rules for team games – notably that you can only tunnel between ‘friendly’ territories. The Stagger hex in a given territory only connects to the Stagger Hex on the other board that is friendly to the same team, rather than both opposite-board Stagger Hexes. These Stagger Hexes are considered ‘Linked’, and the others are ‘Unlinked’.
- You can only travel between the boards through Stagger Hexes.
- It takes one hex of movement to travel from one Stagger Hex to another.
- Stagger Hexes on one board can ‘tunnel’ into either Stagger Hex on the other board. You can not tunnel from one territory on a board to the other territory on that same board.

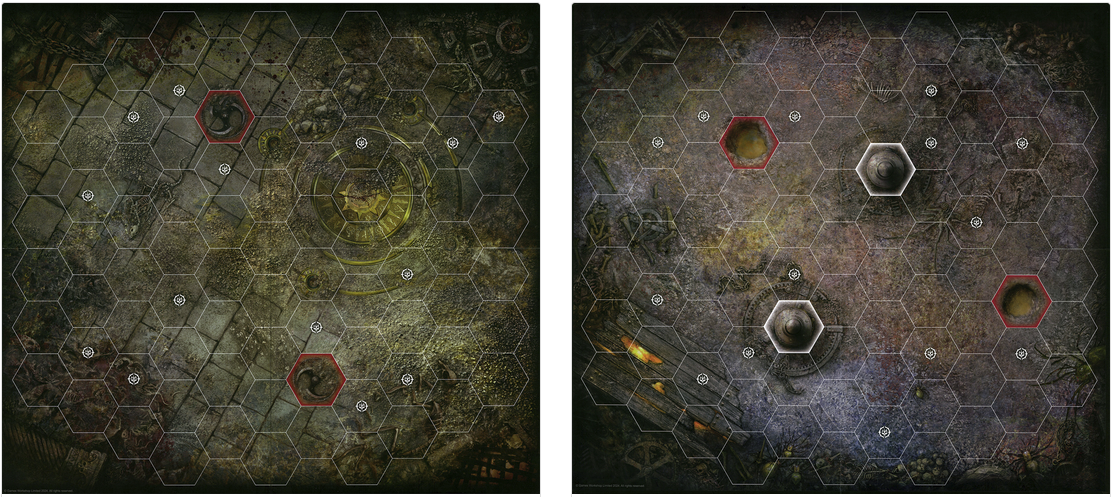
In this image, Fighter A resolves a 3-hex charge against Fighter B on the opposite board. The first hex of movement is into the Stagger Hex, the second is the tunneling move to appear in another Stagger Hex, and the third hex of movement is into adjacency with the charge target.
- Fighters performing Stagger Tunnel movements will be staggered and given a stagger token as usual, unless the fighter has Fly. A fighter who can not be staggered (via an Upgrade or other source) may still travel through a Stagger Tunnel. Fighters who are already staggered may still travel through a Stagger Tunnel.
- A fighter occupying a linked Stagger Hex can ‘block’ the path for another fighter, as the hex is occupied. Fighters with Fly or who otherwise can move through occupied hexes may still tunnel in this circumstance, but cannot end their movement in the occupied Stagger Hex.
- A fighter occupying a Stagger Hex can be attacked from the Linked Stagger Hex on the opposite board as though they were adjacent. A fighter who is attacked while occupying a Stagger Hex can be driven back as usual (unless that model can not be driven back).
- For any cards or abilities that operate based off of adjacency, a fighter occupying a Stagger Hex is considered to be adjacent the other Linked Stagger Hex. If that Stagger Hex is also occupied by a fighter, those fighters are considered adjacent.
In this figure, the bottom two Stagger hexes are Linked. The Upper hex with Fighter B is NOT part of this linked network.
Fighter A is adjacent to Fighter C. Fighter A can attack Fighter C, but not B or D. Fighter A is not within 2 hexes of D for their abilities and cards.
Fighter B can attack none of the other fighters from this position.
Fighter C could attack Fighters A or D, but not B.
Fighter D could attack Fighter A (with a range 2+ attack), or fighter C (with any attack), but not B. Fighter D is within 2 hexes of fighter A for their abilities and cards.
- For any cards or abilities that operate based off ‘within x hexes’, fighters on the other side of a Linked Stagger Tunnel and occupying a Stagger Hex can considered ‘within’ however many hexes are specified within the ability. The ‘within’ caveat does not extend past the second Stagger Hex.
- Should a melee attack trigger overrun, the attacking model can then occupy the new Linked Stagger Hex. Cards such as Duelist allow the attacker to ‘push through the tunnel’ as well.
- A ranged attack may originate from one board and hit a fighter who is occupying a Linked Stagger Hex on the other board. You must count the distance of both stagger hexes in the chain.
- In Figure 2, Fighter D could attack Fighter A with a range 2+ attack
- You cannot ‘shoot through’ Stagger Hexes. Any fighter not occupying a Linked Stagger Hex cannot be targeted by an attack from the board they are not occupying. Similarly, Cyreni’s Hammertide cannot pass beyond the Stagger Tunnel’s ‘exit’ as a straight line cannot be reasonably determined. They can choose to hit a fighter occupying a Linked Stagger Hex on the opposite board, however, should their Hammertide pass through a Stagger Hex. In this instance it would terminate there and not also continue ‘over’ the tunnel and beyond on the originating board.
- In Figure 2, if Fighter C was Cyreni of the Abyss, she could Hammertide any of the other three fighters. Her Hammertide could NOT hit any other fighters on the leftmost board.
- Cards that place a fighter in ‘an empty Stagger Hex’ (such as Canny Sapper or Tunneling Terror) may choose any open Stagger Hex on either board.
Underdog
While there are multiple players, Underdog status is determined by the team as a whole. As an example, even if a player is a ‘relative’ Underdog to their target model’s player, they cannot benefit from the additional attack die on Determined Effort unless their team as a combined unit is in fact the game’s overall Underdog.
Cards and the Power Step
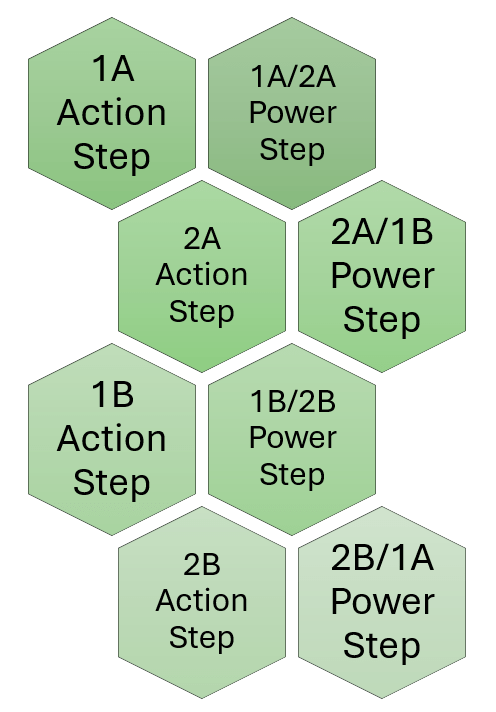
After a player’s action, it is their turn to play power cards as is usual in the Underworlds Rulebook. The team multiplayer exception to this is that only one other player – the one who is due to play next – can play cards in the power step as well. Following the first action in a round, play will pass from players 1A to 2A, so they both can play power cards at the end of or in preparation for their turn.
2A can then play cards again after their turn, as can 1B as their turn is next. The two players whose actions bookend a given power step alternate playing cards and passing until both players pass, and then it is the next player’s action. The other player(s) can not play cards in that power step nor use any warscroll abilities that take place in a power step, save for any appropriate reaction cards or surge abilities and objectives where the window’s conditions are met.
Cards and hands are open information between team members. You can see what power cards your teammate holds and what objectives they are trying to score – in a sense those are your cards as well.
Players accumulate glory independently. If your fighter took a one-bounty model out of action, your individual glory count increases by 1. This is important, because in this 2v2 teams mode, a player’s Upgrades can only be purchased with that player’s glory and applied only on that player’s fighters.
However, while Ploys and Objectives that say ‘your warband’ require models from that players’ warband, cards that refer to friendly fighter can refer to either warband on that player’s team. Abilities, cards, and so on that reference enemy fighters refer to fighters in either enemy warband. Both your friendly territory and your teammate’s friendly territories are friendly to you, and both of your opponent’s territories are enemy territories. As such, while Upgrades are ‘bound to the controlling players’ warband’, all other card types are not. A player can play Sidestep and push a model from their warband or their teammate’s (as it only references a friendly fighter), and a player can score Get Stick In when their teammate’s (friendly) model attacks an enemy in enemy territory, for example.
Domains
Seeing as this game mode uses two boards, there can exist two Domains in effect, though only one per board. When a player plays a Domain card, they must specify which of the two boards it is in effect for. The domain has no effect on the other board. If a second player plays a Domain and chooses the other board, both are in effect simultaneously, but only on their respective boards. Should the second player choose the board that already has an active Domain, it will override and discard the original Domain as usual.
Eliminated Players
Players themselves are never eliminated from the game. Even if every fighter in a given warband is slain, that warband’s player does not forfeit their turn. In a scenario where ‘only two players remain’, those two players do not alternate power steps like a usual 2-player game. The ‘eliminated’ players still receive their power steps, can take the Focus action, and have the opportunity to score Objectives despite having no models on the field of play.
Bounty
Normally, in a game of Warhammer Underworlds: Embergard, a slain fighter awards Bounty to the opponent regardless of how they were slain. In the Stagger Tunnel Multiplayer mode, each warband has multiple opponents. As such, Bounty for slain fighters will be awarded to the warband who slew the fighter, whether that was through an attack or power card effect.
Should a friendly fighter be slain as a result of their own controlling player’s or teammate’s power card (such as through Sunder the Realm, Sudden Collapse, Desperate Rage, Scream of Anger, Fault Lines, Volcanic Eruption, or Misfortune), only one player on the opposing team is awarded bounty, at that team’s discretion. Teammates may roll-off if they can not decide who should claim the bounty.
End Phase
End Phase scoring follows the same order as the turn sequence: the player who went first scores first, discards and draws up their new hand, and then the end phase passes along 1A, 2A, 1B, 2B until all players have completed their sequence.
Objective Card Scoring Conditions
If a card specifies a broad condition, it must be true across both boards. All opposing warbands are considered enemy fighters. As an example, the card Strip the Realm requires that no Treasure Tokens be held by enemy fighters – in a Multiplayer game this means none of the opposing fighters from any enemy warband can hold any Treasure tokens. A player does not score Strip the Realm if one opposing warband holds no Treasure Tokens while the other enemy warband does hold a Treasure Token. Similarly, a card such as Stay Close can only score if there are no fighters in Edge Hexes on either board. Stay Close does not score if one board has no fighters in edge hexes while the other does.
Cards that specify a numbered Treasure token can be met by tokens on either board. If a player is attempting to score “Hold Treasure Token 5”, they may do so by holding either Treasure Token 5 on either board – they do not need to hold both.
If a card specifies ‘you’, or ‘your warband’, the condition must be met by your cards and actions or with your models. You teammate cannot meet these conditions for you. If the card specifies a friendly fighter, then it can be true accounting for actions taken by and positions of teammate’s fighters as well.
Continuing the Game
After the first End Phase, teams roll off again to determine priority for the second round. Players do not need to keep their A and B designations across the game – your team chooses each round which of the two teammates is to take the first action for their team in a round.
In this version of the multiplayer rules, players will complete all three battle rounds, and each round will consist of all 4 activations. Do not use the truncated number of rounds or activations from first edition multiplayer rules. In the second and third battle rounds, the roll-off winner chooses whether their team will play first or last, the opposing players each draw a power card, and play progresses 1A, 2A, 1B, 2B as it did in round 1.
Determining the Winner
The winner of a game of 2v2 Team Multiplayer Underworlds follows the same method as outlined in the standard rulebook, with glory total taken as a sum of the teammate’s scores. The team with the highest Glory Total at the end of the Third End Phase wins the game, even if their team did not contain the player with the highest individual glory count.
Tiebreakers follow the usual method outlined in the Warhammer Underworlds rulebook. While there are ten total Treasure Tokens on the board, a tiebreaker comparing highest combined Treasure total is resolved as usual, simply adding them up in total across both boards. It is possible for the only two surviving fighters to both be holding a different Treasure Token 5. In this case it would be a True Tie between the two teams, assuming they were tied for the lead in Glory total.
Variant Rules
For those among you who find even this goofy game mode too boring, you can certainly play Multiplayer games with any one or more of these further twists:
Named Characters – Teammates cannot duplicate warbands
Narrative Purity – Teammates must choose warbands from the same Grand Alliance
Diverse Strategies – Teammates cannot duplicate Rivals decks – if playing Rivals, the team must use two different decks. If playing Nemesis, a team, must take four different decks.
Highlander – no duplicated cards within a given team; e.g. only one copy of Great Strength may be taken per team regardless of which deck it was sourced from
Glory Hog – The winning team is determined by which team has the player with the highest glory count, even if their team has the lower combined glory
Frenemies – Players operate in the team format, but only one of the four players will be awarded the win based on their personal glory count.
Wrap
This article was part of the Custom Rules series. Click here to see other custom rules we’ve put together!
What do you think? What modifications do you have to these proposed team rules? I would love to hear any and all feedback you have, as well as stories from your test games as we give these custom rules a trial together.
I’m particularly interested to hear what wild team combinations you come up with. Emberwatch and Headsmen’s Curse? Spiteclaw’s Swarm and Thorns of the Briar Queen? A different plot card for each teammate so we can finally see what a parody of Cataclysm/Edge might look like in practice? So many great choices.
Until next time, I hope you and your dynamic duo enjoy Spending Glory as a team friends in the Embergard!


Leave a comment