
Welcome back to Spent Glory’s product previews! This time around we have a very interesting Mastery warband in Thyrielle’s Zephyrites. If you like positional manipulation, giving your opponent a high mental burden, and making ranged attacks like a fancy aelf, this warband might just be for you. If you’re absolutely sick to death of opponents spamming pillage hordes, these guys might be for you as well. Failing those, you have some cool looking models including a cute little fox spirit, and who isn’t down with that?
One last little thing that I think is marvelous about this warband is that two of their fighters have access to crit grievous on their range 3 attacks. I spoke previously about how the game could benefit from 2 damage at range and am glad to see that the ability to shoot for real impact has come back to the game in another form, even if unreliably. Archery fans rejoice!
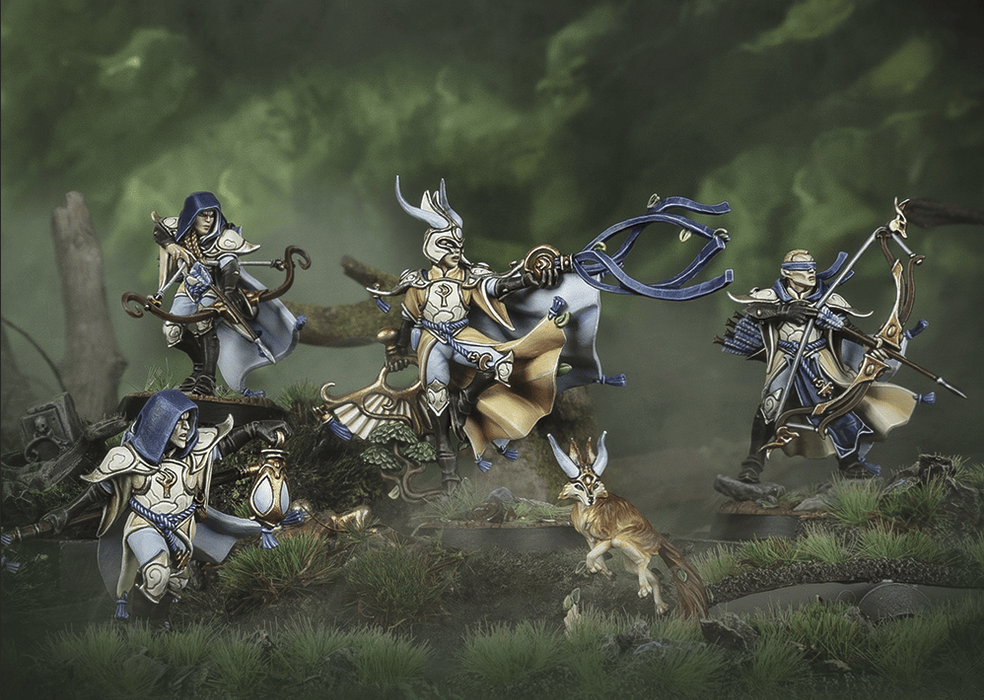
Thank you to Games Workshop for providing the page with an advance copy of this product for review and content creation.
Click here to see a Master List of all warbands in the game
Thyrielle’s Zephyrites: Lore
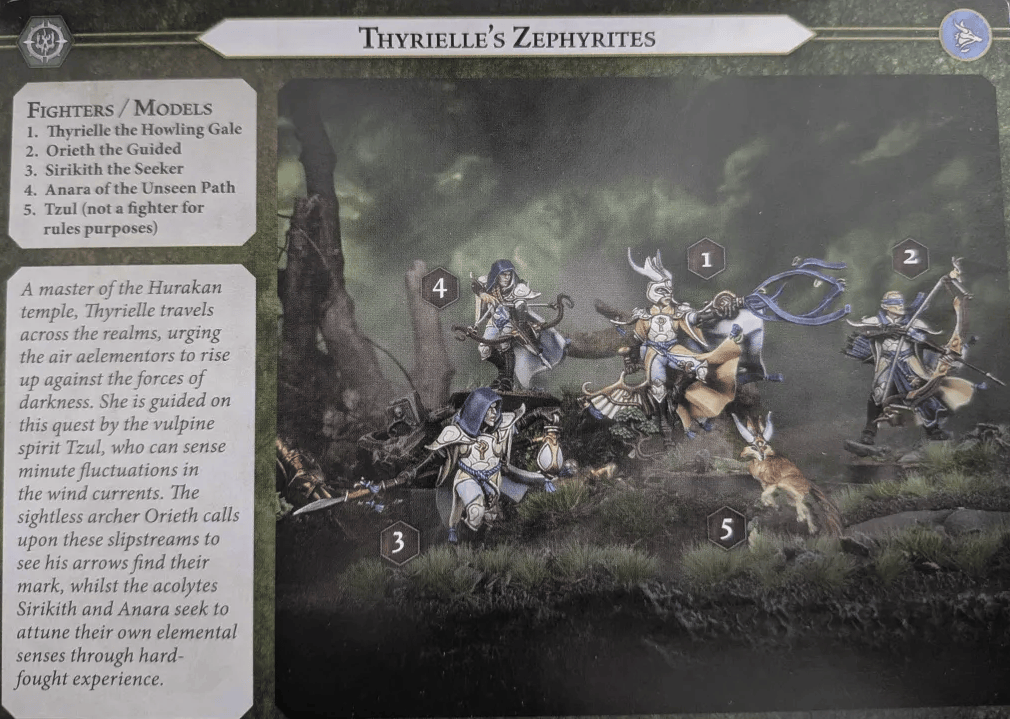
Since elvish folk are fancy-pants, everybody gets a title. Thyrielle is a master of the Hurakan/Hurricane temple where Lumineth learn the wind spirit magic, and as such she’s known as the Howling Gale. Her special mission is to travel the realms and talk to the aelementeiri (those aelves who serve in the temples of elemental spirits) and convince them to get busy fighting back instead of hanging out in their monasteries. She’s got a wind spirit fox by the name of Tzul who can detect and magnify the tiniest changes in wind currents to held her do her job, which actually looks a lot more like fighting than community organizing.
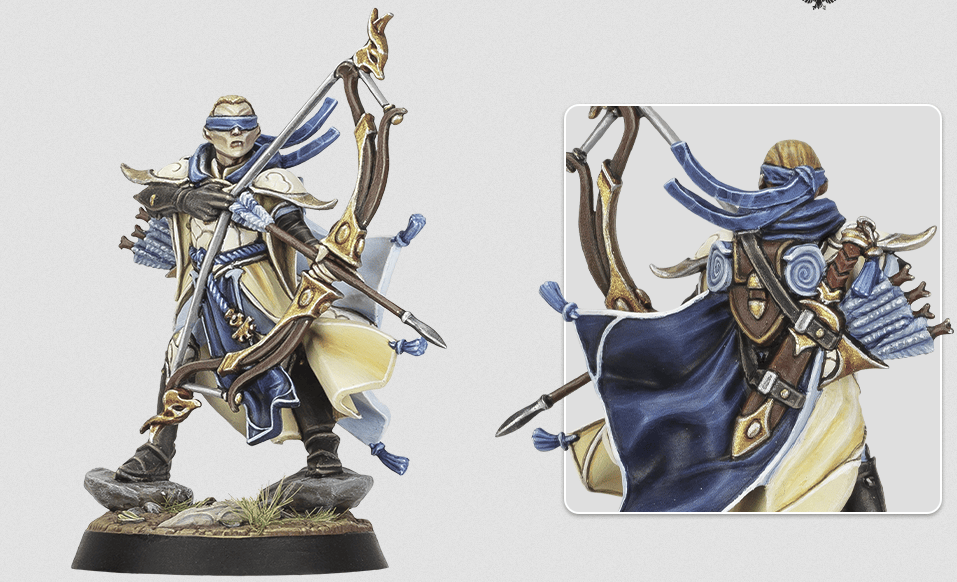
She has three followers on her quest. Orieth the Guided is your stereotypical blind archer, but fortunately he too can make use of these winds to guide his arrows and thus has no need for eyes anyway. Plus it looks way cooler to have a big blindfold on and still hit for 1-2 damage rolling 2-3 hammers and flanking. The other two, Sirikith the Seeker and Anara of the Unseen Path, are acolytes and wind-masters-in-training who are working on getting better at airbending like the avatar under Thyrielle’s tutelage while getting some hands-on practice in the field. Ends up having Tzul around makes that pretty easy!
Thyrielle’s Zephyrites: Warscroll
Inspire
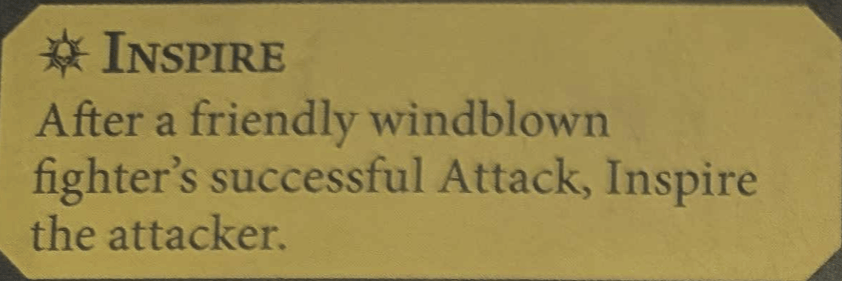
After a Friendly Windblown fighter’s successful attack, inspire that fighter. We’ll get to what windblown is in a second, but this is a relatively achievable condition. Considering it requires your fighter to be Windblown and not the opponent, you can place your fox spirit where you need it in order to give your preferred fighters that status and help them to get inspired. Of course, having the target be windblown will help you get that success. Just note that you’ll only inspire if the attacker is Windblown, and the target’s status doesn’t matter.
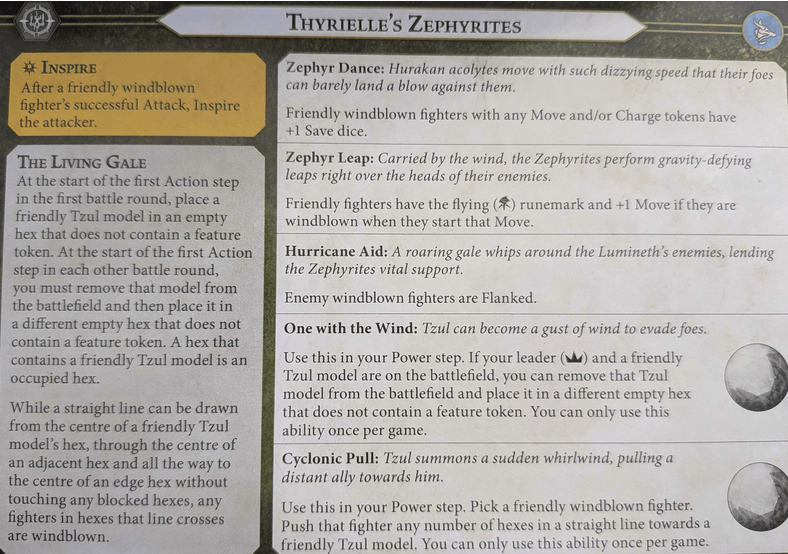
The Living Gale
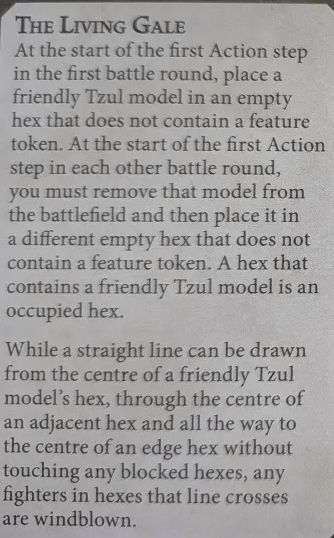
This one is meaty, but also defines nearly everything in this warscroll so it’s reasonable that the text is so long.
At the start of the first action step in the first round, you place your cute little fox in any empty hex (not including a feature token). If you draw a straight line from center to center of a hex all the way to the board edge (or until it hits a blocked hex), everybody in one of those hexes is considered Windblown. You draw the lines the same way you do for Cyreni’s Hammertide if you’re familiar with that geometry.
This will matter for a ton of stuff, so choosing that hex will be very important.
In rounds 2 and 3, you must take Tzul out of their hex and place them in a different empty hex at the start of the first action step. If you’ve picked the absolute perfect place, that’s too bad, it can’t stay there across rounds. However, it also gives you the opportunity to reposition each round if you find that conditions have changed and you need it somewhere else.
Two very interesting things I want to point out here that are going to matter: You place the fox at the start of the first action step. That means after all fighters are deployed, all treasures are down, and after you know who is taking the first action. This gives the Zephyrites player a ton of information to help pick the ‘right’ place for your wind spirit so that you can cover the right tokens or the right starting hexes, waystone hexes, etc with your wind path. Getting the location correct is going to be a total make-or-break thing for this warband’s success, so it’s nice that you have a better chance of doing that with this rule. Unfortunately as the opponent, you won’t be able to do some deceptive deployment and counterplay in the placing fighters step like you can when facing Cyreni’s Razors.
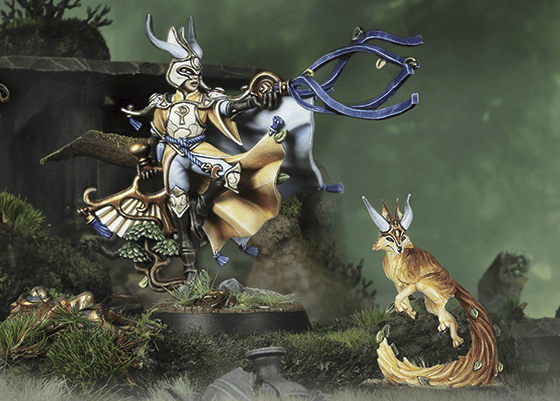
The second thing that can be substantially impactful to the game if utilized well is that While Tzul is NOT a fighter, does not have a card, can’t be attacked or activated etc, it DOES occupy a hex. Why is that important? Well, it means fighters cannot move through that hex – it blocks charge lanes, can create problems for people who want to stay United, and can make a token unable to be reached in a single move action. If your enemies do not have fly, especially if they have move 3, Tzul can become a gigantic roadblock that will ruin people’s day.
Long story short – tons to consider on where to place Tzul. You want to Windblow as many fighters as possible (not just where they start, but where you think they will eventually end up), want to use it as a blocking piece, and want to make some areas of the board ‘risky’ for enemies to land in. It’s going to take several reps to learn the best way to use it and where your playstyle and deck would like it to be, but once you have this mastered, you’ll be a terror on the battlefield.
I have a pretty lengthy discussion on where I think it’s good to place later in this article.
Zephyr Dance

Our first ‘what does windblown do’ effect on the warscroll is Zephyr Dance. Friendly fighters who end up along one of Tzul’s 6 windblown paths get +1 save dice with no limit on how high this can go. We will see in a minute that one of your fighters begins as 2 dodge and another inspires there, so you could be rocking 3 dodge if you land in the right spots. Your other fighters are sadly sitting on one dodge all game, but if they’re windblown they’ll be enjoying a 2 dodge save which isn’t bad at all. A few choice upgrades and/or guard tokens will make your fighters pretty tough to hit while they’re windblown, so it will be pretty important in some matchups to make sure you can get as many of your fighters in that status as possible. Whether you’re planning to hold tokens or you’re planning to scrap in a straight-up fight, you’ll be happy to enjoy this ability.
Zephyr Leap

Our second benefit that friendly fighters get from being Windblown comes as a part of the Zephyr Leap. Friendly fighters who begin their move/activation while windblown get +1 move and flying. Your fighters are already move 4, but going to move 5 with flying allows you to get to a lot of places, ideally ending in another windblown hex. With range 3 attacks on 3 of your fighters, your threat range becomes pretty impressive.
Another tasty wrinkle about this refers back to Tzul the wind spirit counting as occupying their hex. Enemy fighters can’t get past it without flying and have to take the long way around, reducing their effective move distance as well as potentially causing traffic jams. Your fighters are less likely to run into this issue as they’ll both be able to fly over it and get the extra 1 hex of movement it takes to do so.
In short, start your fighters in windblown hexes and end them in windblown hexes as often as you can and you’ll be fast, mobile, and tough to hit. Very aelvish. Very annoying.
Hurricane Aid

Windblown doesn’t just affect friendly fighters of course but also affects enemy ones. Hurricane Aid states that enemy windblown fighters count as being flanked, which can be huge for your accuracy. While several of your uninspired attack profiles are hitting on swords, flanking is going to do wonders for increasing your odds to hit. Remember, hitting a windblown enemy is also your inspire condition, but thankfully it is not that hard when you’re throwing 3 dice and flanking the enemy.
While it’s going to be difficult to make sure your fighters are windblown as well as their targets, if you can pull that off, you’ll be stat boosted as, well, the wind.
One with the Wind
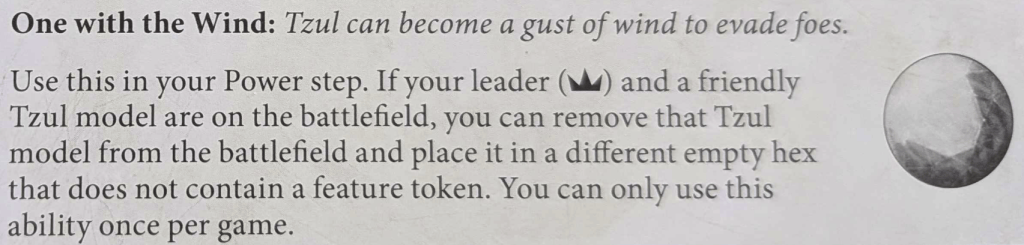
One of our two once per game abilities, One with the Wind allows you to, in the power step, pick up your Tzul model and place them in a different empty hex that does not contain a feature token. Your leader needs to be on the battlefield to do this, but this is a hugely flexible ability and knowing when and how to play it will make a big difference in some games.
Situationally you might find that a really important fighter is no longer windblown, thanks to drive back, Sidestep, Lure of Battle, or what have you. Maybe the place you put Tzul to begin the round was great, but things have changed heading into the end of the phase. If you really need +1 move and fly, +1 defense, or your target to be flanked, you can in a pinch find a new home for our little Fox and get those benefits in places your opponent wasn’t expecting.
Another cool trick I have though it is referencing The Living Gale rule. That states that at the start of round 2 and 3, you have to place Tzul in a different spot that than one they were in. It doesn’t get to occupy the original hex all game. Let’s imagine there really is that one AWESOME spot you’ve placed it in, and you are at the end of the round and you know you’d love to keep it there for next round. In the last power step, pop this ability, move them somewhere else, and then your golden Tzul parking space will be an empty hex at the start of the subsequent round, and you can put it right back where it was.
Cyclonic Pull
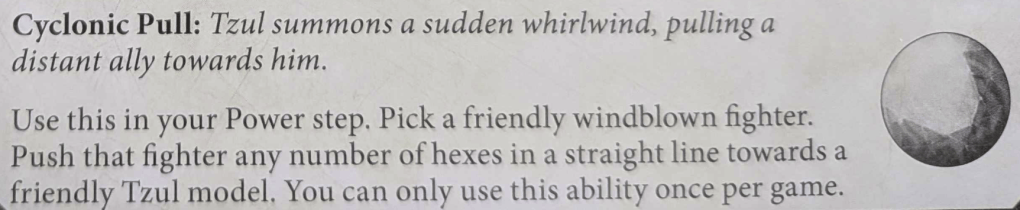
Our other once per game rule is a doozy. Pick a friendly windblown fighter in a power step and yank them any number of hexes in a straight line towards your Tzul model. The grappling hook has literally no distance limit, so there’s potential for a scenario where Tzul is in one corner and your fighter in another, you can push up to a theoretical NINE hexes with Cyclonic Pull.
The applications of this ability are bonkers. You do have to be windblown to start with, so it’s not wide open, but you can close the distance to an enemy and make a charged out attack. You can get out of danger. You can block or score positional objectives right at the end of a round. You can pull a friend onto a token from downtown. It’s incredible.
Combo this with the ability to reposition Tzul almost anywhere with One with the Wind, and just think about it; in a power step you can put the fox anywhere you want, granting windblown to any one of your fighters. Then in your next power play, you can pull that newly-windblown fighter an enormous distance toward it. This ability might not be best used in that fashion, but they combo to an effective teleport for any model assuming your leader is alive, and that teleported fighter now also has +1 defense in their new spot.
You are NOT safe anywhere on the board against Thyrielle and co until this ability has been played. You’ll not be able to score Strip the Realm, Alone in the Dark, Arena Mortis, you name it, but they will be able to score those against you. Insane power level for a smart player, and even if not used in combo with the fox’s repositioning it’s still a potential game-breaking ability.
Thyrielle’s Zephyrites: Fighter Cards
Thyrielle the Howling Gale
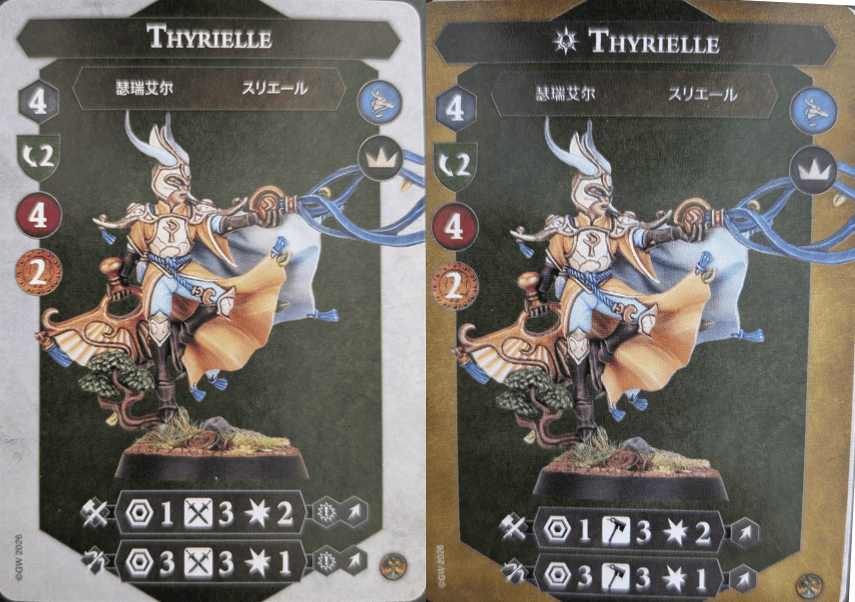
Our warband’s leader, rocking a respectable uninspired profile of 4 move and 4 health with 2 dodge for 2 bounty. She has a melee attack on 3 swords for 2 damage, and a range 3 with 3 swords for 1. Both attacks come with a crit grapple runemark. Inspired, her weapons jump from 3 swords to 3 hammers which is pretty great, and gets flat grapple rather than having to fish for crits to access it.
Generally I’m pretty low on grapple as an ability outside of a few niche applications in some mastery decks, but with this warband it’s quite nice since you’ll have an easier time making sure your opponent’s fighters become windblown.
While her stats are pretty good as-is, they’re all the better when you remember that for some of the game you’ll be getting +1 move, flying, + 1 defense and the benefit of attacking against flanked targets, which makes her a pretty frightening accuracy prospect if not a heavy damage dealer. She’ll be a great disruption piece and a real pain for your enemies to deal with. Or watch her equip Great Strength and LOOK OUT!
Anara of the Unseen Path
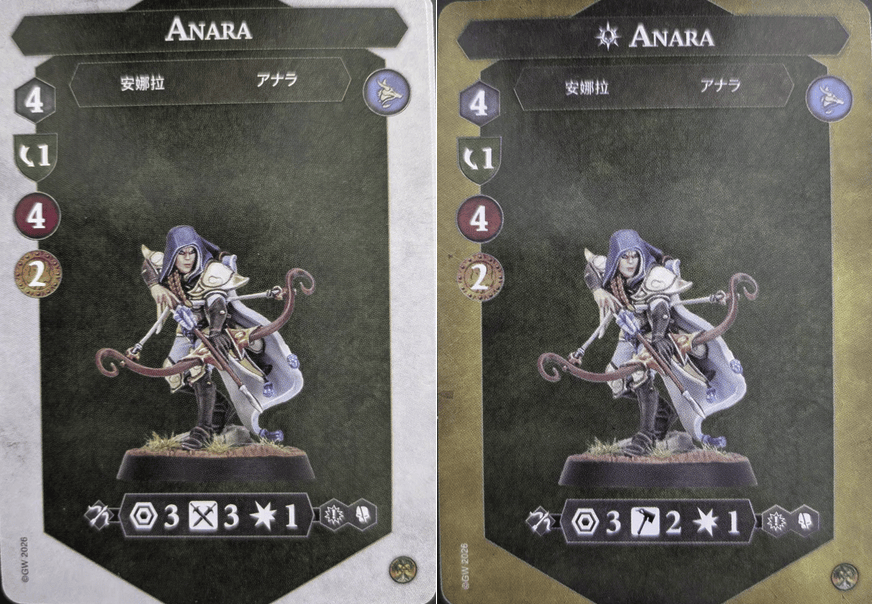
Anara is one of our two fighters who can do 2 damage at range, since her bow grants her crit grievous on 3 swords. As a result, you’ll love taking potshots at staggered opponents with her to fish for those crits and she’ll be a lovely weapon to deal with horde opponents, especially if they are playing Pillage and Plunder and do the staggering for you.
Unfortunately, while she is a good 4 health, she is only 1 dodge and stays that way while inspired while giving up 2 bounty. She also drops her 3 swords to 2 hammers while inspired, which is ‘slightly more accurate’ in a vaccum, but is actually WORSE when your target is windblown AND has fewer dice to access that crit grievous with.
There’s a legitimate strategy to avoid inspiring her and keeping her targets windblown while making sure she is not. That’s a bummer, because it means she won’t get +1 defense as often and will be easy pickings. She’s also lacking a melee attack which can get in the way of enjoying some upgrades and scoring some objectives.
Orieth the Guided
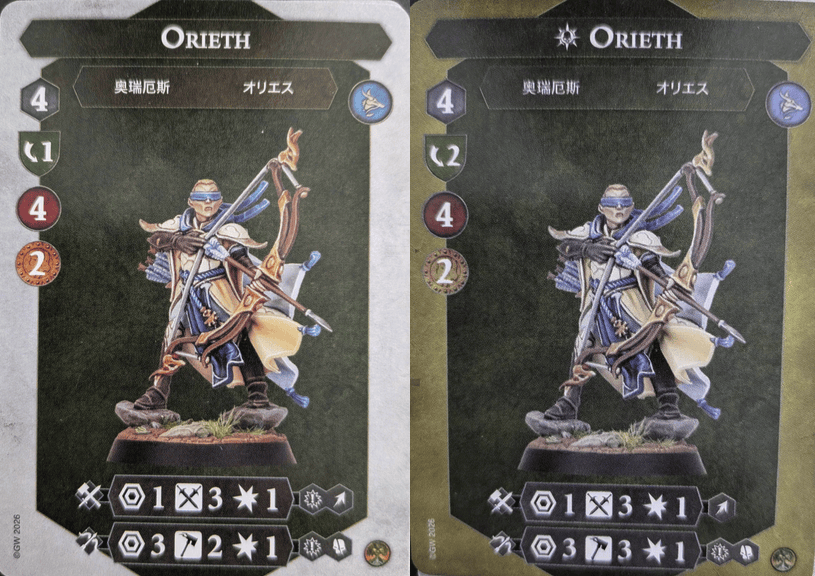
Now we’re talking. Orieth not only has the silly yet super awesome trope of Blindfolded Archer going on, but he also has a solid stat block once you get him inspired. His melee is 3 swords with crit grapple but only 1 damage, but his ranged attack has the 2 hammers crit grievous. Once inspired, he becomes 2 dodge which you love to see, and his ranged attack becomes a solid 3 hammers with crit grievous. He’s a pretty reliable accuracy threat at range especially against Windblown targets, and has coin flip odds to put out 2 damage at range 3 multiple times per game. Use him early and often if you can keep him safe, and get him inspired as soon as possible.
Sirikith the Seeker
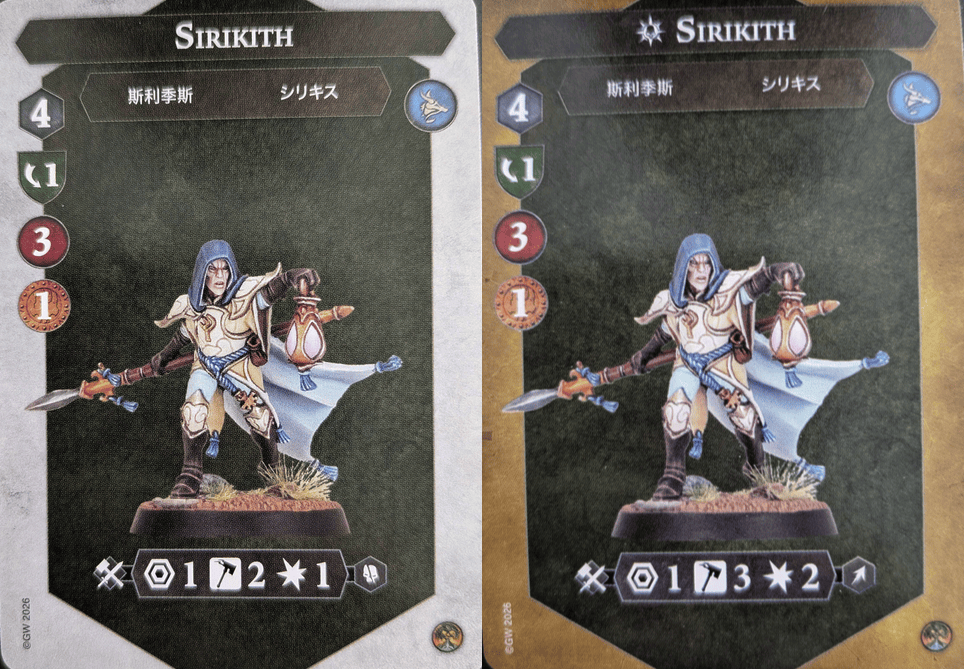
Our final fighter is Sirikith, who isn’t half bad for a 1 bounty fighter. The only one in the warband without a ranged attack, he has 2 hammers for 1 damage with grievous on his front side (for an effective 2 damage attack), which jumps to a great 3 hammers for 2 with grapple once inspired. Sadly, despite being a spearman, he only attacks at range 1. He’s also only 3 health and one dodge, so he’ll enjoy the protection of Windblown’s +1 defense as much as anybody. I’m not sure how best to make use of him, but if you need some reliable melee damage he’ll be a great one to consider inspiring, and you also won’t cry as much when he inevitably is slain as he only gives up the one bounty.
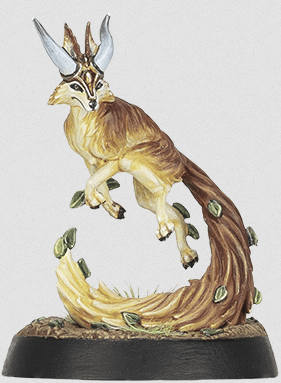
Tzul the (Not a Fighter for Rules Purposes)
In Practice Theorycrafting
Due to a mix-up in distribution for the Creator Programme (yet again) I didn’t receive this product until right before the deadline. As a result I haven’t played any games with them, nor do I have them painted for you yet. That means I can’t really comment on how well they play or what my experience has been. I’m guessing they’ll be pretty strong once you get the Windblown thing down, especially against Hold or Pillage playstyles where you can cover 2-4 tokens with the fox and be able to take enemies off of them with impunity. Staggered enemies due to delving will be all the easier to land the crit grievous against, so this warband might be quite good into delving hordes which is great to see! You could also invert the anti-token positioning into pro-token positioning for yourself if you’re interested in playing Hold or Delving yourself. Once I get mine put together I’ll see if I can make some magic happen.
In lieu of the usual battle reports, I’ll instead give you the pregame strategy I plan to employ if I am playing into a Hold or Pillage opponent. After tokens are placed, start thinking about which two feature tokens are going to be the most relevant to the game state in that round. You believe your opponent is going to move fighters onto those tokens, and it would be just fantastic if they were windblown when they did so. Triangulate from those two tokens and you’ll find you have a few places to go, with fewer and fewer spots the more tokens you’re trying to cover simultaneously.
The IDEAL place for your fox to go is going to depend on a lot of things such as your deck and playstyle as well as your opponent. Generally though I imagine you’re hoping to have several of the following:
- Coverage of a few critical tokens, the more the better
- Coverage of some enemy starting hexes for flanking alpha strikes
- Good windblown landing spots for your charges
- Good windblown starting hexes on your side for an immediate +1 save
- A nice spot to grappling hook to with Cyclonic Pull, especially if you can land on a token while you do it
- A nice obstructing spot to block enemy charge lanes, movement paths, or united clumps if facing Deadly Synergy
Let’s assess a situation where we believe our opponent will be playing a defensive hold strategy, perhaps a “Hold 2” style Emberstone/Cata or Emberstone/Nexus. After tokens are down, let’s imagine these two backfield tokens are the ones we’ve identified as the prime targets and we want to get flanking against fighters in those hexes. Overlapping lines identify 5 potential points to drop Tzul and still cover both of them. But which one do you pick?
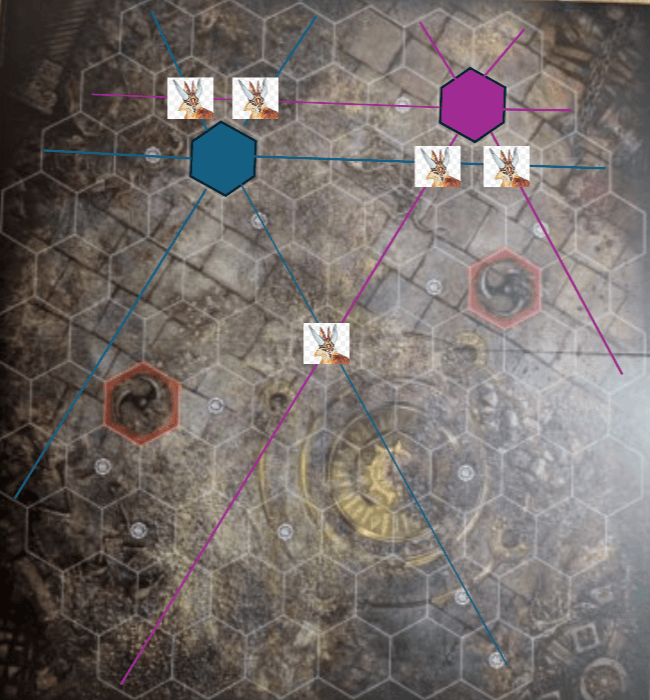
Above, we see the options for triangulation on Tzul’s landing spots that would windblow both of these priority tokens we have identified. Note that the upper left one occupies a starting hex, so if they have deployed a fighter there it is not a valid choice for us. Below, I’ll trace out the windblown paths the fox creates in these starting spots, color coding each one.
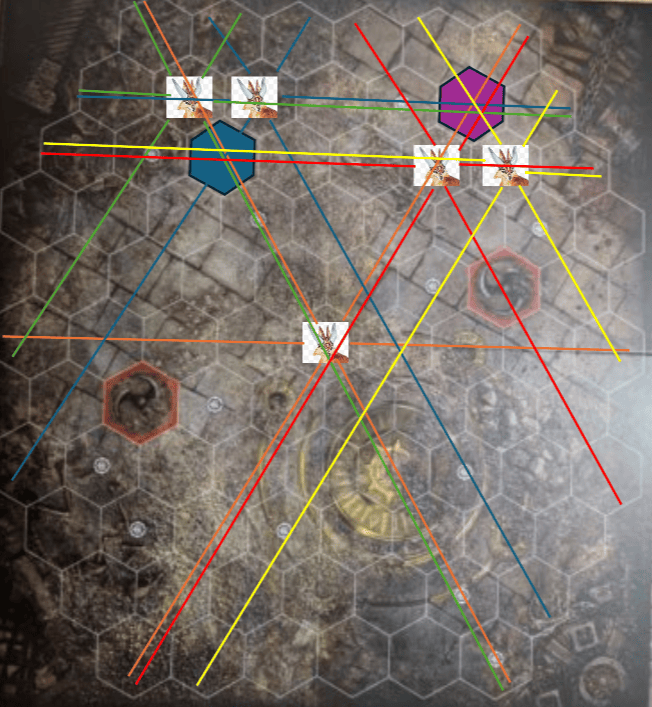
Let’s assess the fox position’s strengths:
- Orange is dead center which will give us the best ‘spread’ of windblowing board-wide. It also covers an enemy starting hex to help with some flanking, and two of yours in case you’ll be making standing attacks from there (though they’re far away).
- Red also hits an enemy starting hex, though a further back one. It looks to be pretty annoying as a move-path blocker for that starting hex though. It also crosses the enemy stagger hex, so even should you need to go into it, you’ll get the benefit of +1 save while there, negating some of the downside. Red also has the benefit of covering the most hexes that allow for range 3 attacks that can reach either token while being windblown (along with Yellow).
- Yellow covers three enemy starting hexes and potentially makes some movement onto the back token a little more difficult. It also covers one of your starting hexes, albeit a less exposed one without anyone in range to shoot at unless they also invade.
- Green is on an enemy starting hex, so there’s a chance we won’t even get to pick it. If we do though, it covers two enemy starting hexes and two of yours (both of which would be rocket fuel for the Cyclonic push). It presents basically no obstacles to their movement.
- Blue covers two backline enemy starting hexes as well as covering one of your starting hexes near the front, but doesn’t present very many move-path blocking opportunities for you. It does allow you to make a standing shot at an enemy starting hex to try and inspire before you wade into their zone if they present you with a target there.
These things would have me lean towards picking Red or Yellow as my initial choice for Tzul’s deployment. Your deck and what you draw in the opening hand can of course shift this for you, so you’ll have to be a… MASTER of mastery to adapt, adjust, get the most out of this warband.
If you are planning on playing a more defensive ‘Hold 2’ strategy yourself, just invert the above diagram and find ways to give more of your fighters +1 defense while on tokens and/or starting hexes while maximizing the ability to hit a flanked enemy when you charge onto said token. You can also put Tzul right in front of one of your tokens to create a more difficult situation for your opponent to charge you with a melee attack and thus a harder time displacing you from those tokens.
In a more aggro style matchup where your opponent is not going to be sitting on treasures, placing the fox closer to the midboard is likely to cover more potential targets and landing spots for you. If you’re playing a positional mastery style flexy thing, finding the’ right’ spot for Tzul may be much more varied. Fortunately, you’ll make the decision after you’ve drawn your cards for the round and can use those to guide your choice.
Potential Pairings
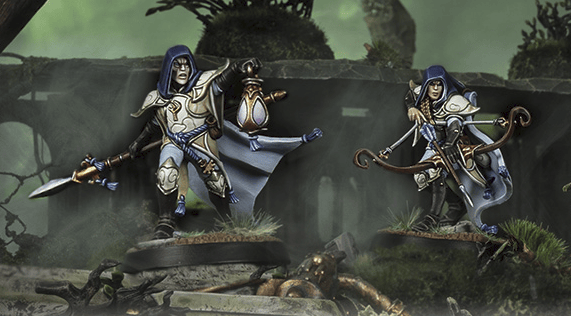
Blazing Assault is great for anybody, but this warband having solid mobility and huge threat ranges will appreciate the accuracy and damage boosts it provides, albeit with less benefit to their ranged attacks. Illusory Fighter makes them all the more re-position-able, and Lure of Battle will be killer if you can pull people into windblown status with it!
Emberstone Sentinels is an interesting choice as your warband has some tools to augment your defense with windblown and stay on tokens better, and you can use the Cyclonic Pull to hurtle towards a token when needed. Ranged attacks on 3 of your 4 fighters help you to keep dishing out damage while holding as well.
Countdown to Cataclysm should be a nasty pairing with this warband. The deck provides plenty of pings that can be finishers as well as sources of stagger to fish for crit grievous at range. Counter Charge and Violent Blast will both help get windblown status more reliably. Additionally, if you want to play a flex-hold gameplan and enjoy the defense benefit from windblown, CtC has a few hold cards in it as well in Shocking Assault and Set Explosives.
Reckless Fury interestingly has applications here, as your mobility and range will make charging quite easy to do. With 4 fighters you can charge them all, and you can reposition with Cyclonic Pull to score some of the positional objectives. The deck cares about charging more than kills, and you’ll be quite able to do this with the Zephyrites.
Wrack and Ruin will be a great choice as it grants lots of things this warband is looking for; the ability to push enemy models, rewards for dealing lower damage and not killing things in one hit, increases to accuracy, and the ability to stagger enemies to access your crit grievous at range.
Hunting Grounds is an option with their reasonable ranged profiles, and if Tzul is used well it might encourage people to either stay away from hard-to-reach areas in enemy territory or stay away from safe ‘middle spots’ in your territory to assist you with scoring Pinned.
Deadly Synergy actually has a role despite this being a ranged-centric warband. Your fighters largely hit on swords and defend on dodges, so flanking helps. Other cards care about enemies being flanked, and while the plot cards helps you there, you have yet another flanking option in Windblown. You can make ranged attacks to score some of the cards in DS, and since you may find you’re making conga lines with your fighters to stay windblown anyhow, you might as well enjoy the benefit of United while you’re at it.
Finally, Nexus of Power can be used with the Zephyrites if you’re a big brain genius. Positioning Tzul to cover the tokens you care about means getting covetous and staying covetous may be easier, and the mobility cards in that deck like Move at the Opening and Pilfer can help you both grab tokens as well as get back into the Windblown path. In a pinch, Cyclonic Pull can help you get to a token you need in the power step.
While at first glance it seems really tempting to go with Raging Slayers, remember that plot card only allows for converting an attack success to a crit when using a melee attack. That means no crit grievous freebies on your two archers, though occasioanlly you’ll enjoy some free grappling to force enemies into a Windblown state. That said, you’ll also have Poor Footing, and will consistently be taken out of Windblown yourself. I would recommend avoiding RS for this warband.
Wrap

Overall, I am very intrigued by this warband. I love the idea that they can potentially do 2 damage at range, and I especially like the challenges this presents to pillaging hordes which have consistently done well in the recent meta. I imagine it will take a good number of reps to become proficient with all the intricacies this warband presents, but positional flex play and disruption/control elements have been something that Second Edition has been a little bit lacking on, and hopefully this warband helps bring that to the fore. I’m going to be living in Wrack City for a while with these guys and look forward to what wild pairings the community cooks up in the coming months!
Whether the wind is at your back or bearing down on you, I hope you enjoy Spending Glory with and against Thyrielle’s Zephyrites in the Spitewood.
Be sure to check out Spent Glory’s other review articles here

Thanks again to Games Workshop for providing me with this product so that I can produce this review content.





Leave a Reply