
I am incredibly pleased to announce the following article written by Aelf enthusiast and stellar player Leathanam. This started out as a Love Letter, the Spent Glory series for reader-submitted deck guides and warband exploration, but has since evolved into so much more. Dare I say (I dare! I dare!) this is THE definitive guide to Myari’s Purifiers. Lethanam spent a considerable amount of time and effort writing this massive post, playing test games with several prominent and skilled players from around the world and collected feedback from many others. I promise you – it’s worth the read. The featured image here was selected by the author as a favorite example of an Iliatha color scheme, painted by Vincent Knotley on Twitter. Now let’s get on with our pursuit of excellence,, and enjoy this elemental blessing.
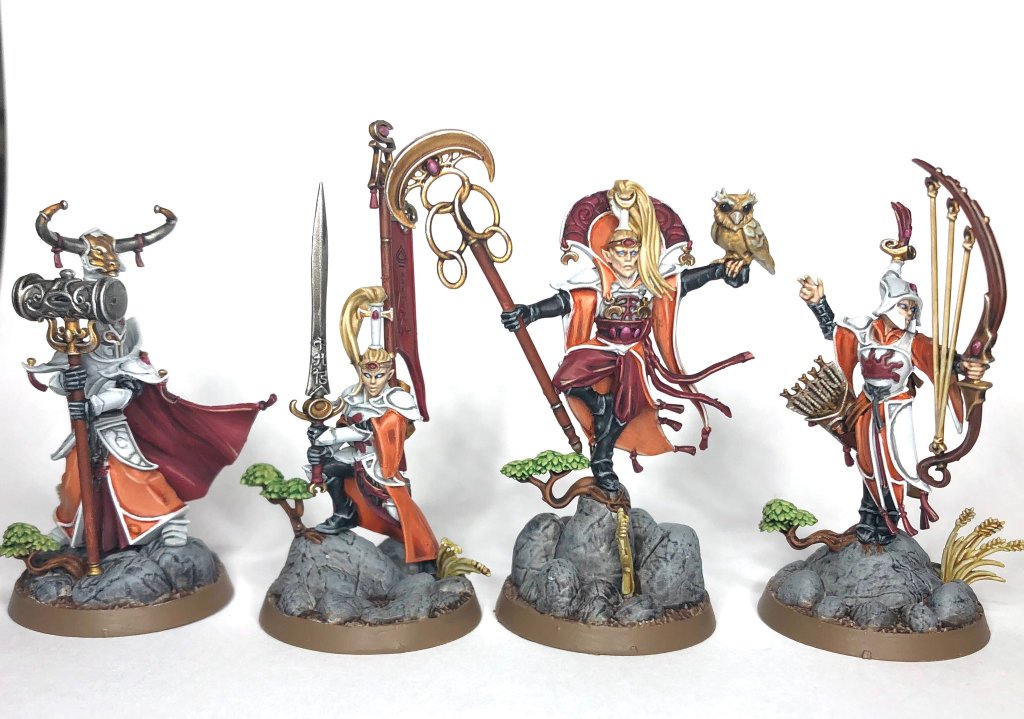
Ask the Underworlds crew here in the Northeast US, “What’s Leathanam’s favorite warband?” and they will correctly reply, “Leathanam? He’s a sucker for Morgwaeth! Everyone knows that!” And it’s true. Morgwaeth has a special place in my Underworlds heart. And it’s also true everyone knows that. But not everyone knows that I am also an aetherquartz aficionado. When those shadows of Ulgu get me down, you know what makes me glad? Spending aetherquartz to re-roll a defence die. That turns my single support into a crit every time! So, now, dear friend, I wish to share my love of aetherquartz with you: Whether it’s pinging two different fighters, pushing three, giving your whole warband guard tokens, inspiring to two defence dice, or just a vanilla re-roll, Myari’s Purifiers have an aetherquartz—and an aelf—for every situation.
By now you’re thinking, “Leathanam, tell me more: Where does one find this aetherquartz? Where does one find these aelves?” I’m glad you asked, let me introduce you to my friend, Myari Lightcaller, and his team of graceful aelves, Senaela and Ailenn, the Mind’s Edge, and—of course, how could I forget?—the Tectonic Force himself, Bahannar—less grace and more bonk, but don’t tell him I said that!
A Brief History of the Haughty Exemplars
Myari’s Purifiers are a four-fighter hold-and-fight finesse warband. They were released in the Direchasm core box alongside the dastardly Dread Pageant at the end of 2020. They made an immediate impact on the competitive scene right before pandemic lockdowns nearly ended Underworlds. Their strong defensive characteristics and ability to divide and conquer were an excellent response to those infamous big-boy warbands that were stomping everyone at that time, especially Mollog’s Mob. Against horde warbands, Myari’s two-damage range-three magic attack became a deadly turret, and with access to more noninteractive glory in the universal card pool, they could even play a denial gameplan. As Steffen Beier (the now retired SteveUndRund from Discord) put it in the Battle for Salvation Podcast (requiescant in pace, Max and Randall):
“They are like rock, paper, scissors in one warband. They can out-aggro objective-holding warbands, out-control aggressive warbands, and out-score control warbands.” They are truly “jack of all trades” and a “pandora’s box” for your opponent.
Indeed, each aelf is a specialist with a unique toolset and a savvy aetherquartz aficionado will be able to use each one in the right circumstances.
The competitive scene and the shape of the game, however, has changed significantly since Direchasm not only because of Games Workshop’s shift of competitive focus to the Nemesis format but also because of recent design choices. Fighters in newer releases are more accurate, and relatively easy access to plus-dice and plus-damage in the power deck means two block is not as defensive as it used to be, even with an aetherquartz re-roll. Similarly, three wounds across all fighters with no access to plus-wounds means a lucky critical hit—or even just vanilla two damage and a ping—can send even your toughest fighters out of action. But perhaps the most decisive change is the shift of the design-focus to the center of the board: There were fewer objectives that demanded positions in no-one’s territory, boards had more open hexes, and you used to be able place the last objective in an edge hex.
So, what’s a player in pursuit of excellence supposed to do? Purifiers still have the tools to win, even in Nemesis in which patching weaknesses is far more difficult because of the smaller card pool. That means to be successful, the Purifiers must lean hard into their strengths in defense, positional play, and fighting at range.
Diamond-Bright Souls
Let’s take a look at our protagonists’ fighter cards. One way to think about Myari’s Purifiers is like a Dungeons & Dragons party of adventurers. You have a powerful wizard, an immovable tank, a deadly melee specialist, and an keen-eyed archer:
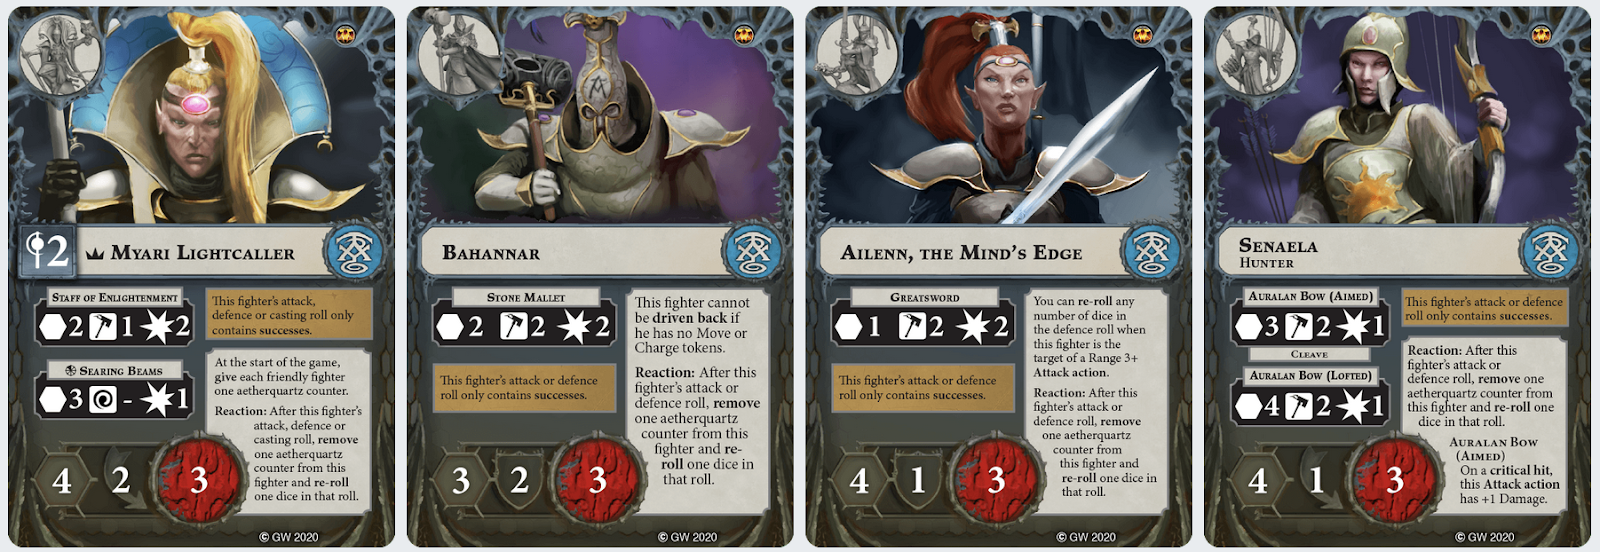
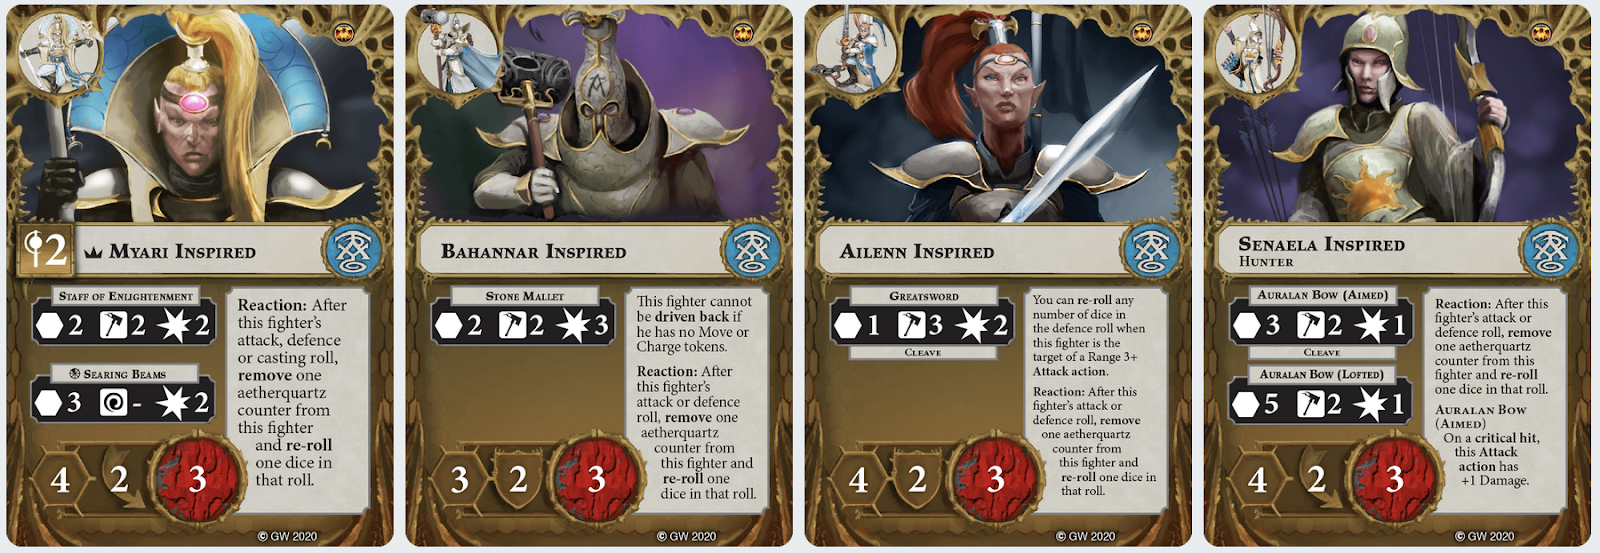
While each aelf is a specialist, the Purifiers share some characteristics among each other and with other aelf warbands. For example, they are all three wounds, and besides Bahannar they are all move four. Myari and Bahannar start on two defence dice, dodges and blocks respectively. Senaela and Ailenn start on one and inspire to two. One of the Purifiers’ unique features is their aetherquartz mechanic: After an attack or defence roll (or a casting roll for Myari), they may react. They remove their aetherquartz counter and may re-roll one die. This mechanic is very good. A re-roll on defence means you can often cheat death by rolling into a critical. Opponents must always think about this when charging into Purifiers in a good defensive formation. Additionally, aetherquartz counters interact with a set of four elemental gambits (Channel the River, Wind, Mountain, and Zenith), as well as four upgrades (Heightened Reflexes and Senses, Mountain’s Gift, and Speed of Hysh). These eight power cards give an additional way to gain benefits from holding or spending aetherquartz counters. There is no way to get more than one. So, hold or spend them wisely. Generally, a good rule of thumb is to save your quartz! (More on aetherquartz in the Laws of Purifying below)
Besides aetherquartz, the aelves also share an inspiration mechanic. Inspire only if you roll all successes on attack or defence (or casting for Myari). They’re perfectionists after all! This means that upgrades with re-rolls, such as Heightened Senses and Myari’s Balanced Soul, are very desirable and that enemy fighters with cleave and ensnare are quite frustrating. Supports are useful too by treating one or two additional faces of the die as successes. Senaela and Ailenn both have one defence die, which usually gives them 33% or 50% chance to inspire, respectively, provided they aren’t up against ensnare/cleave or lethal damage. Myari also has one smash on his non-magical attack, which can give him a 50% chance to inspire (and sometimes a cheeky two damage too!). So, while one die characteristics seem bad on three wound fighters, they are the trick to getting quick inspirations: So, always remember to roll those defence dice even if your opponent whiffs!
While the aelves have many similarities, each is a specialist. Myari is a power wizard who is very dangerous once inspired. Casting re-rolls means he is reliable with spells and rarely suffers backlash (Magical Boost also makes him immune to backlash), but without a guard token or upgrades to put him on guard such as Mountain’s Gift, he can be a soft target. Thankfully, ranged attacks allow him to sit farther back on your board, holding an objective token, of course, and still doing plenty of work for you.
Bahannar is your toughest and slowest, but most dangerous fighter. His Stone Mallet attack is range two and inspires to three damage. Provided he does not have a move or charge token, he cannot be driven back either. A faction upgrade, Mountain Stance, gives him an additional damage without move or charge tokens and immunity to cleave. With the introduction of the salvage mechanic during power step, you will put this in almost every deck. Bahannar also loves pushes and upgrades that let him push after attacks. Once inspired and Voltroned with upgrades, he can quickly surf through an enemy warband. Given his lower speed, he usually stays in the center of the formation where he can help his friends.
Ailenn is your most accurate fighter after inspiration moving from two smash to three smash cleave. She also can re-roll all defence dice against range-three-or-more attacks. So, placing her upfront against range-heavy warbands can yield a quick inspire and a big problem for your opponent. Because her attack is range one she can also be the first to charge, lending support to Bahannar or Senaela in subsequent attacks to improve their odds of hitting and inspiring.
Senaela has the longest range of your fighters, starting on range-four and inspiring to range-five! (Yes—five!) Her best ability, however, is her range-three aimed shot which adds cleave and grievous. If an opponent charges too close, she can take accurate supported attacks with the potential for two damage. Although Senaela appears to be your weakest fighter because she begins on one dodge, she can be exceptional late, being able to take shots at basically any enemy fighter on the board without having to charge. In later rounds after inspiration, give her a guard token and shoot at anyone from the center of the board.
Building and Playing Purifiers
Building the Perfect Formation
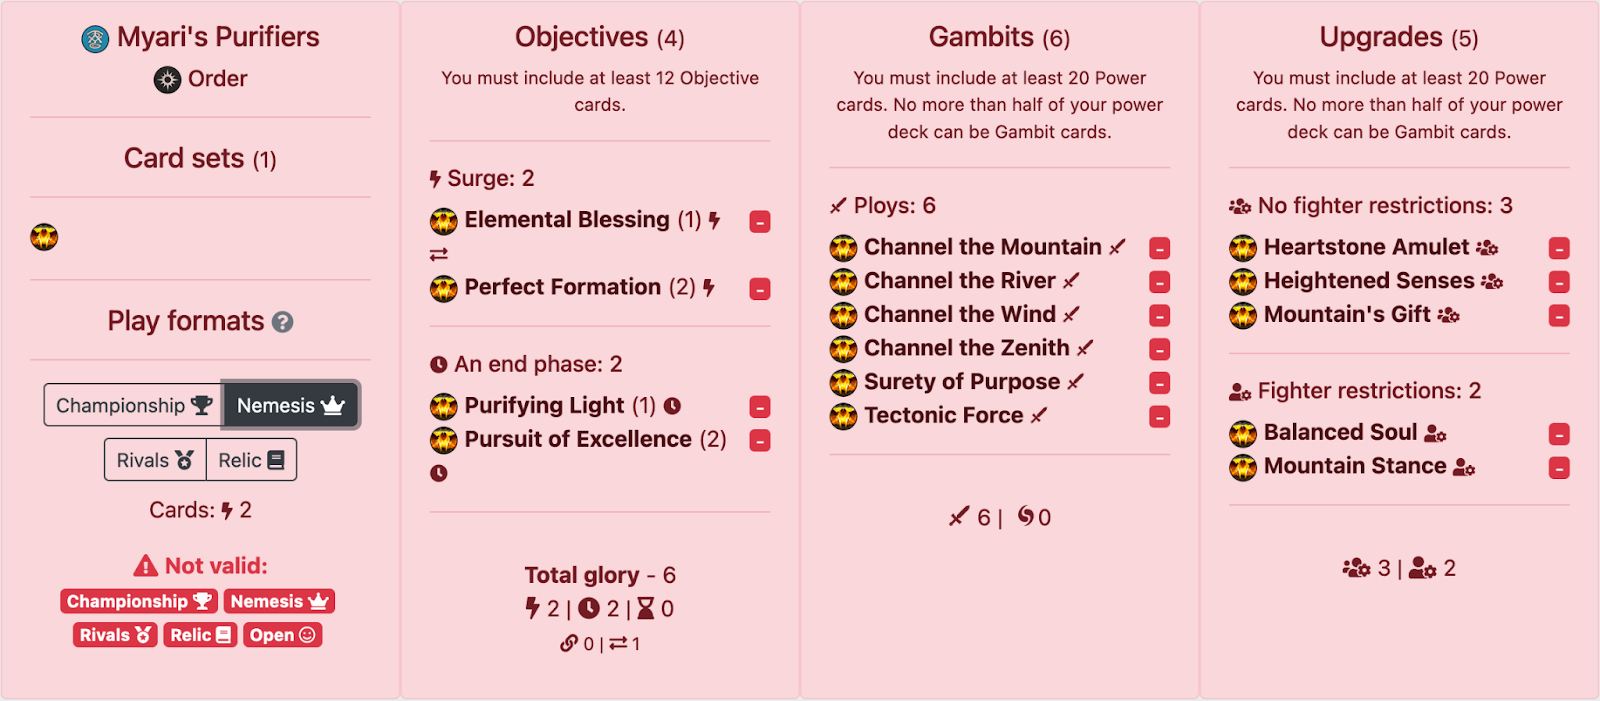
The best way to get a feel for a warband is to play their faction rivals deck a few times. As you play, you will discover certain cards that signal how the warband is designed and how you should play them. Call these “signal cards.” Many of these are your most reliable objectives. These objectives should, ideally, point to other cards you would like to include to support them. In this way you can build a scaffold of faction cards that will go in almost every deck you build. Let’s look at the Purifiers’ signal cards and build out that scaffold. Some players call these cards the “auto-includes.” The analysis below is for Nemesis format, but the principles also apply to Championship.
Objectives
The first cards to examine are objectives. Elemental Blessing is a surge for casting two spells in the same phase or spending an aetherquartz with one of the four elemental “Channel the x” gambits. This shows us that Myari is a central fighter and that he wants to make his magic attack. Accordingly, Purifiers can pair well with decks that bring spells such as Seismic Shock or Force of Frost. This surge also signals that we should bring our elemental gambits. All four are strong for various reasons, but River (push) and Wind (ping) go in every deck. Zenith (inspire) is generally more offensive for increasing Ailenn’s accuracy or Bahannar’s damage. Mountain (guard) is more defensive for obvious reasons. I wouldn’t include fewer than three unless you’re bringing a lot of spells and plan to score through casting. All four are great in Nemesis.
Perfection Formation is a second signaling surge. Score two glory after your activation step if you hold three objectives. Admittedly, this can be a difficult surge if it is drawn too late. However, it does show us an important part of the Purifiers’ game plan: They want to hold objective tokens. If you pair them with a deck that has pushes or out of sequence move actions such as Toxic Terrors (Keep the Forest at Bay, No Safe Ground), Path of Prophecy (Slinking in There, Tread the Path), or Rimelock Relics (Glacial Advance), you can score this pretty easily early—push or move two in your opponent’s power step and during your activation step move or charge onto the third, collect your two glory, and assemble Volton.
The Purifiers other surge objectives are playable but must be weighed against universal surges. Force of Avalanche is great against hordes but difficult against large fighters. Unsullied Hands can be difficult unless Myari gets inspired early. Patience of the Mountain is quite good but requires investment in guard token tech, which may take away room in your deck from a more proactive game plan. Many good upgrades also interfere with it, such as Armour of Ice in the Force of Frost deck. Even the Purifiers own Mountain’s Gift will prevent a vanilla guard action if your fighter is already on guard because you saved you aetherquartz.
The next signal cards are end phase objectives. Purifying Light scores one glory if Myari holds an objective token at the end of the round. Pursuit of Excellence scores two glory if at least one fighter has at least three upgrades at the end of the round. Once again, Purifying Light emphasizes the importance of Myari. Fortunately, he likes standing on tokens and using his magic attack. Pursuit of Excellence signals that we want our fighters to survive as long as possible and, ultimately, to Voltron one of them, usually Bahannar or Myari depending on the match up and how the game unfolds. This may seem obvious. After all, who doesn’t want to save their fighters as long as possible? But it means you cannot be too aggressive and you should generally avoid trading fighters with your opponent. So, a cagier game plan is usually the sounder strategy. Although Purifiers can pack an offensive wallop, especially with a Voltroned Bahannar or pings in hand, four three-wound aelves are rarely the beatdown.
Other faction end phases have some play but are quite dependent on your community. Do you face a lot of three-fighter elite warbands? Haughty Exemplars may be a free two glory for you. Similarly, if you’re not up against Skaven or Breakneck Slaughter often and are willing to take Heightened Reflexes or Speed of Hysh, then Vaunted Speed can work well. Diamond-bright Souls, however, is exceptionally difficult. There are few matches when you will have three inspired surviving fighters. If a universal rivals deck contains a power card that grants inspiration or guarantees all successes we can come back to it.
The last two end phases are possible but will require careful deck-building. Seal the Beastgrave is an end phase for holding three. This is a faction Supremacy (in Essential Cards Pack). If you’re playing a hold objective deck like Path of Prophecy you can play this successfully. In fact, it poses a question to your opponent. It says, “If I don’t stop them from holding, are these aelves going to get three glory in the end phase?” This demands a response. An opponent that lets you hold three into an end phase is asking for trouble. Perfectionists is the other end phase worth thinking about. It is easy in a way to score. Spend all your aetherquartz; get one glory. However, as I have mentioned and will emphasize below, you want to save to your aetherquartz! Perfectionists can be good late, but you never want to feel compelled to spend, spend, spend to get one glory. For this reason, I usually avoid this objective card.
Gambits
I’ve mentioned the power and importance of the elemental “Channel the x” gambits. All of them have a place in a Purifiers’ Nemesis deck. They each do a simple thing on their own and a more powerful thing when you spend your aetherquartz:
- River: Push one or spend quartz and push three
- Wind: Ping one enemy within two hexes or spend quartz and ping two enemies within two
- Zenith: Inspire for the round or spend quartz and inspire for the game
- Mountain: Guard token or spend quartz and guard tokens to all friendlies within one hex
Generally, you should not spend for the bigger effect unless you are gaining a significant benefit on the board, e.g., taking out two fighters with Channel the Wind. Especially do not be tempted by Zenith. Instead, think of it as a boost to Ailenn or Bahannar for the round unless you will score Elemental Blessing by spending.
Two other important power cards are worth mentioning here: Tectonic Force is a versatile card because it allows you to push any enemy fighter away from Bahannar. That means you can save this for the final power step of a round and push an enemy off of an important token or out of your territory, or you can use it to push Bahannar onto a token or into position to bonk with his Stone Mallet. I especially like it to push enemies into an edge hex so that Bahannar gets a free success for trapped. The other important power card is Surety of Purpose: One additional damage from the next charge. Because Purifiers’ only damage boost is locked in on Bahannar you may need this to increase Ailenn’s damage or make Myari’s spell attack even more deadly. If you’re taking a more aggressive build it also helps you score Force of Avalanche by boosting damage.
There are other power cards that can be situationally useful but generally will not make it into even a Nemesis deck. Their relative lack of power helps to see the recent power creep in design since Gnarlwood. Take the Purifiers sole faction spell, Lambent Light: You gain what is effectively persistent stagger if you can roll two channels—ouch! If this spell were designed for Wyrdhollow or Deathgorge, it would be on one focus at the most, maybe even just a single channel.
Upgrades
Purifiers have excellent upgrades. Some of their best, however, are restricted. Let’s take these first since I have discussed them above. Mountain Stance is the Purifiers’ sole plus-damage upgrade, but it’s only for Bahannar and only if he has no move or charge tokens. This is a game state we want for him so that his counterpunches bonk for four-damage. The immunity to cleave that this grants is also exceptional. The designers hand out cleave rather freely in recent releases so the card goes in every Nemesis deck and probably most Championship decks because of the utility of salvage. Myari has three restricted upgrades but only Balanced Soul is in our scaffold. Balanced Soul gives him a re-roll on his magic attack and for casting spells. This is very good. It helps with inspire, accuracy, and avoiding backlash. The other two, Magical Boost and Scryowl Familiar, are only useful in niche decks that focus on spells and plundering a lot of blocked hexes. One last restricted upgrade is worth mentioning. That’s Senaela’s Vanari Dagger. This gives our favorite archer a three-smash range-one attack that can do three-damage on a critical hit. You can include it if your local community has too much Voidcursed Thralls. If Senaela gets cursed, she cannot make attacks without her dagger—oof!
The nonrestricted upgrades are all quite good too, but some are plainly better and will go in every deck whereas others are more situational. Heartstone Amulet reduces damage by one to a minimum of one. Notice that it uses the older “reduce” language. This means it is not a modifier. So, it will still work against unmodifiable attacks like Rippa’s wolf bites. This an excellent upgrade and can make your fighters a lot tougher. If you pair with Force of Frost, the Amulet with the Frostwyrm Cloak can make a fighter nearly unkillable.
The remaining four unrestricted upgrades, as I mentioned above, interact with your aetherquartz counters. Speed of Hysh is Great Speed with an upside. You gain an additional move if you still have aetherquartz. This upgrade goes in your deck only if you’re running Vaunted Speed. There are probably better choices, especially with the prevalence of Breakneck Slaughter. Heightened Reflexes is also Great Speed with an upside. It gives a reaction after any enemy fighter’s attack action. This reaction allows the fighter with the upgrade to remove their aetherquartz and make an attack against the attacker. There is no range restriction so Senaela can get the most work out of it, but she also doesn’t do as much damage. Generally, it’s not a great use of aetherquartz but it can deter an opponent’s attacks, especially with a wounded fighter and if they’re within two of a swing from Bahannar’s Stone Mallet.
Besides the Hearstone Amulet, the scaffold includes two excellent upgrades. Heightened Senses gives your fighter a re-roll and the ability to spend aetherquartz for both cleave and ensnare. This can force your opponent to roll a crit to survive. In most cases you’ll give this upgrade to Bahannar and spend in a later round to deliver an important killing blow. Remember that the reaction occurs before the opponent rolls. So, make sure you announce to your opponent that you may want to use it so that they don’t roll immediately and inadvertently give you unfair information for this choice. The third and final upgrade in our scaffold is Mountain’s Gift. Principally, you use this to give guard to a fighter with an aetherquartz counter, but you can also use it to make an attack, spend for a re-roll, take out the enemy fighter and get a guard token. It does run into a small problem when you spend aetherquartz to re-roll a defence die. When you do, you lose guard and change the results of your defence roll. So, be careful spending on defence.
Playing the Perfectionists
Boards Selection and Objective Placement
One of the strengths of the Purifiers is their ability to fight at range. This means they can hold objectives and still make plenty of attacks without having to charge. This also means when it comes to choosing boards that, all things being equal, they want open boards relatively free of hazard hexes with certain important locations for accommodating three safe objective tokens. These kinds of boards are dubbed “Δ” or “V” boards by Flavio at the Monkey’s Hex. Basically, you should look to place objective tokens in tight triangular formations by placing your first objective token at the top of the triangle pointed toward your opponent’s board.
If you can manage to place your tokens in equilateral triangles of exactly two hexes between each objective with adjacent starting hexes, then you will have created what WathLab, Vassal Discord’s maître des nains, calls a dwarven fortress, but elven citadel has a nice ring to it, don’t you think? While such citadels are ideal, usually a savvy opponent will work to disrupt them with their own placement. Accordingly, delta formation usually have wider based triangles. So, what should you look for?
Check out the Cursed Oubliette:
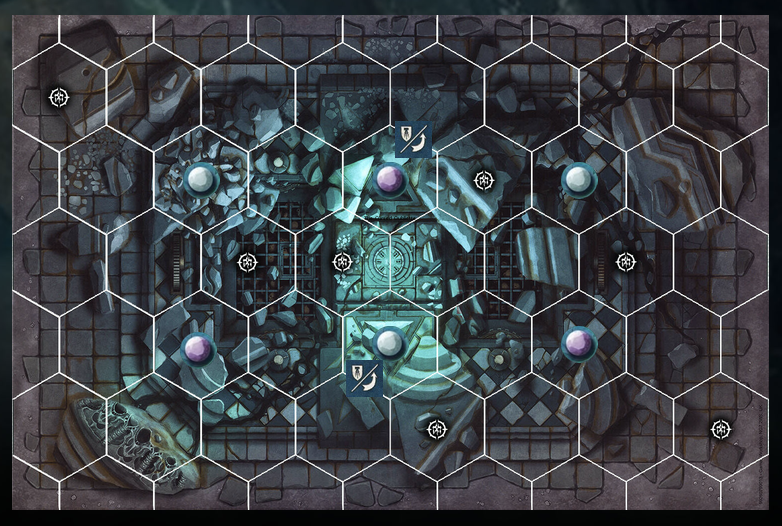
No matter the orientation, the Cursed Oubliette can accommodate a safe triangle of objective tokens provided you place first in one of the center two hexes marked with a guard token. Depending on whether your opponent intends to disrupt your structure or not, you can at least place three relatively safe in your territory. Because the Cursed Oubliette is so flexible, it is an excellent board when you must place first or if you want three objectives.
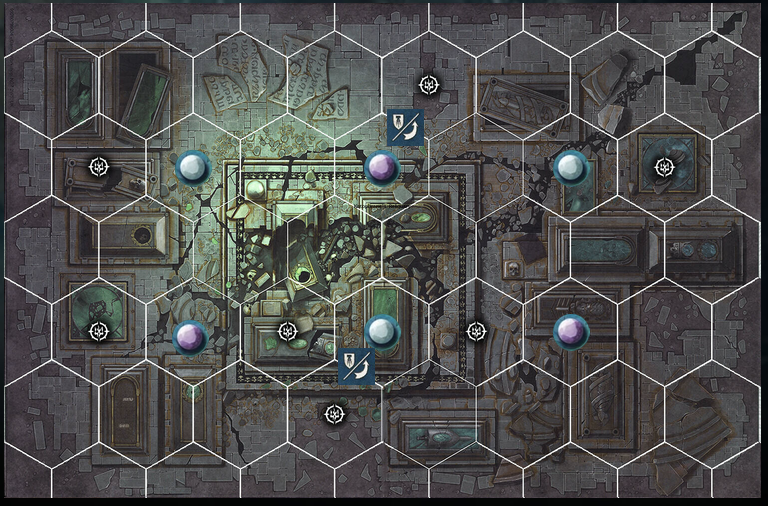
A second open board that’s orientation-agnostic is the Katophrane Reliquary. Its starting hexes, unfortunately, are not as balanced as the Cursed Oubliette, but it could be selected if you needed another open board against an opponent that always gives you three tokens or if you need to spread out against warbands that bring scything.
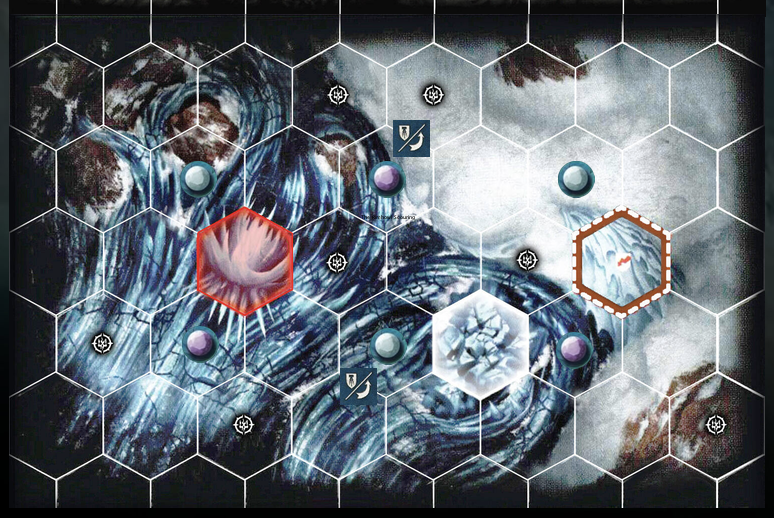
Another board under consideration if you believe you would need three tokens in every game of a match is the Rimehowl Scouring. This board can, nevertheless, be quite dangerous, however, because ideal objective token placements are near hazards, but it is orientation agnostic.
Given the resources for aggressive warbands in the current card pool, those of us in pursuit of excellence are far more likely to encounter warbands we want to slow down rather than take three objective tokens. So, when we win roll-off we are going to use a maximum offset set-up most of the time. But as a warband that still wants to hold objectives, we cannot just choose any board. There is a special pattern we are seeking: the destroyed outpost, as Flavio calls it. “Where’s this outpost?” and “Why does it need to be destroyed?” All important questions, indeed!
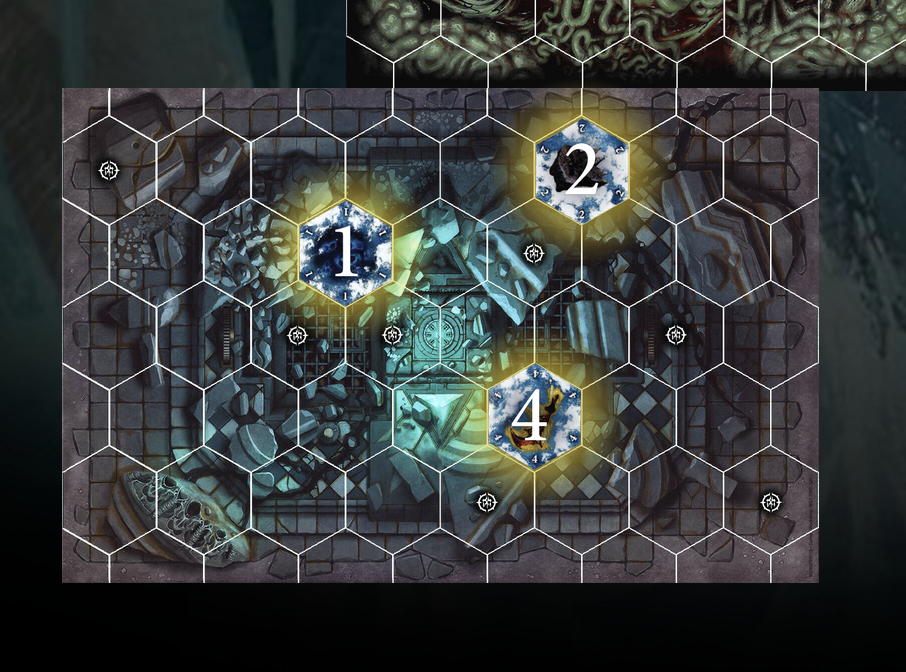
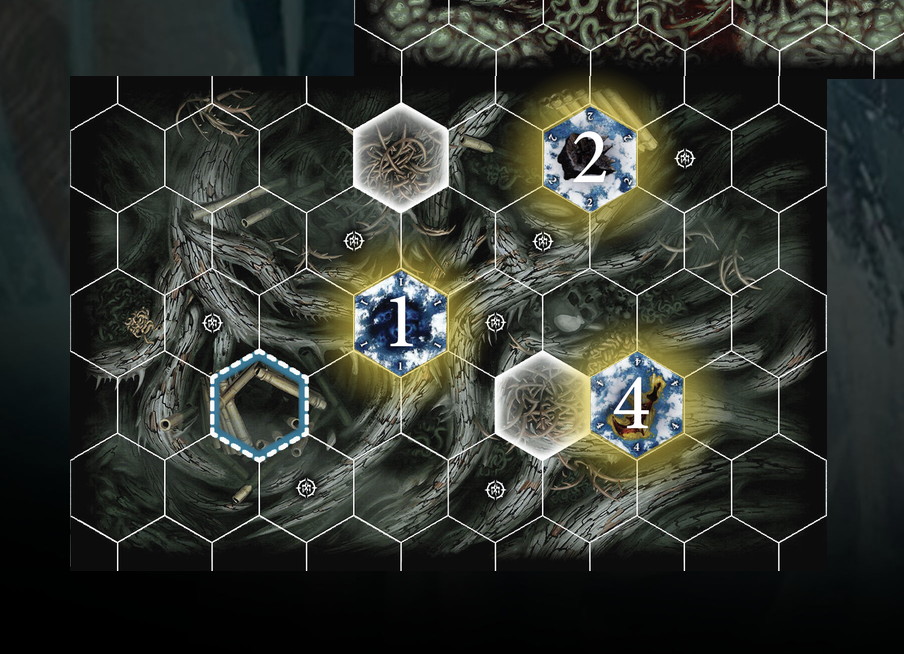
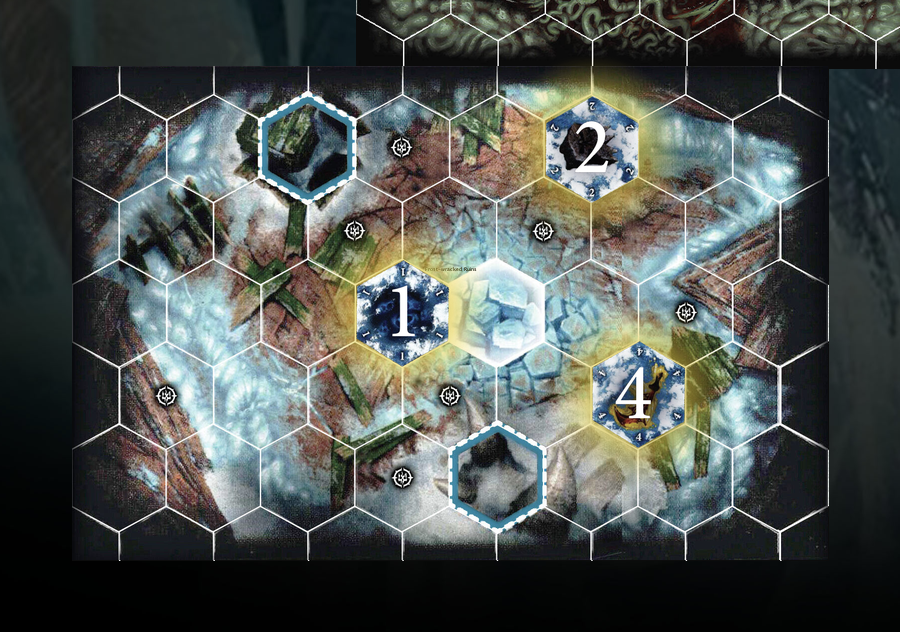
Locate the central four-hex diamond formation at the center of a board. Choose the top of the diamond and go one hex directly left or right in the direction of no-one’s territory. This is the outpost. There is a second outpost in the direction away from no-one’s territory, but it is less disruptive. Boards with destroyed outposts have some hazard hex or starting hex in the outpost which means your opponent cannot place their first objective token there. The Cursed Oubliette, as I’ve mentioned, has the outpost destroyed in one of its orientations. Two other boards, the Mistmarsh Triangle and the Frost-wracked Ruin, also have both outposts destroyed in one of their orientations. I will mark the central diamond patterns with counters and the destroyed outposts with stagger tokens.
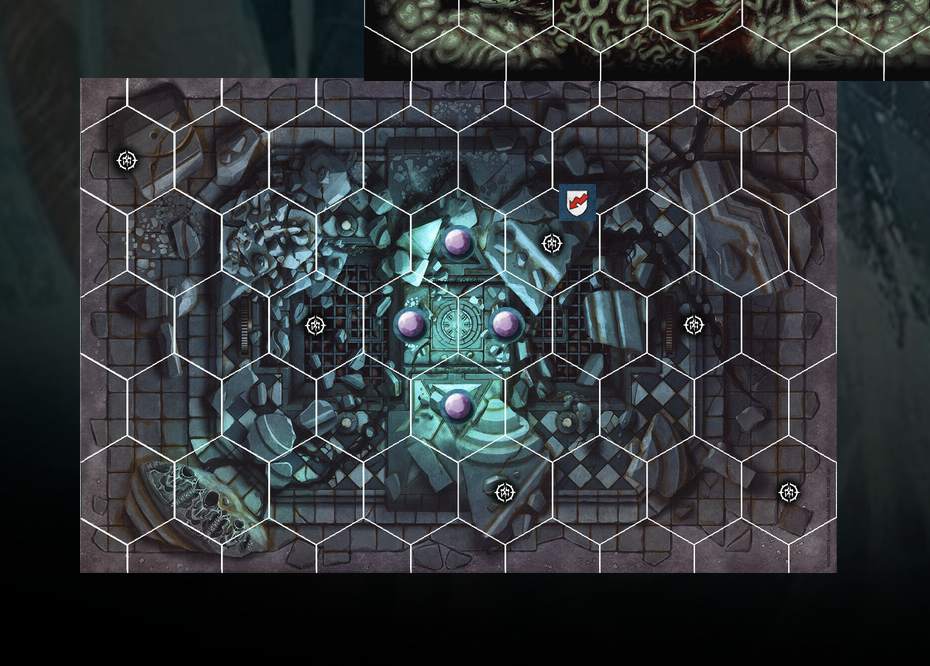
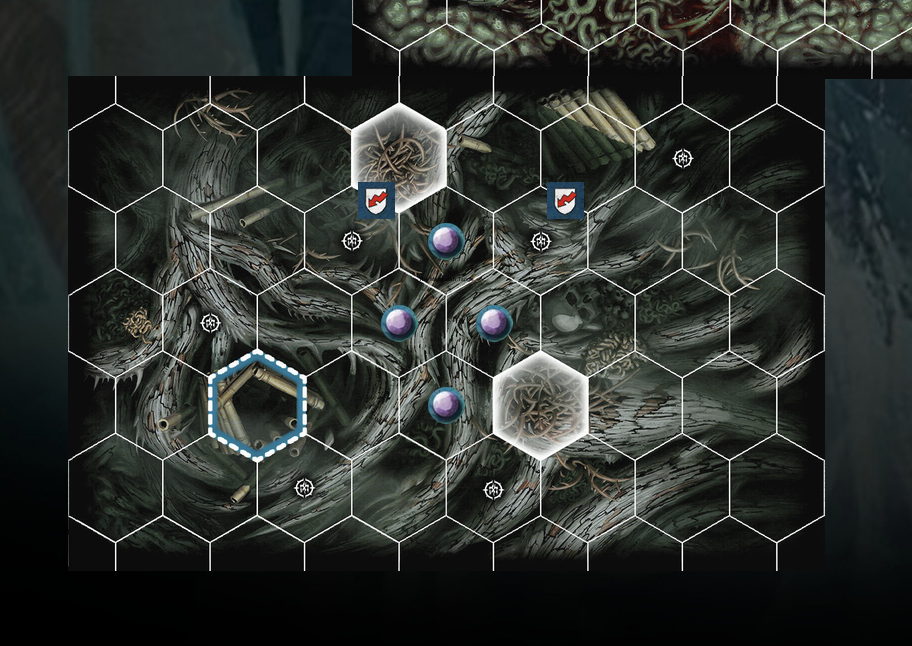
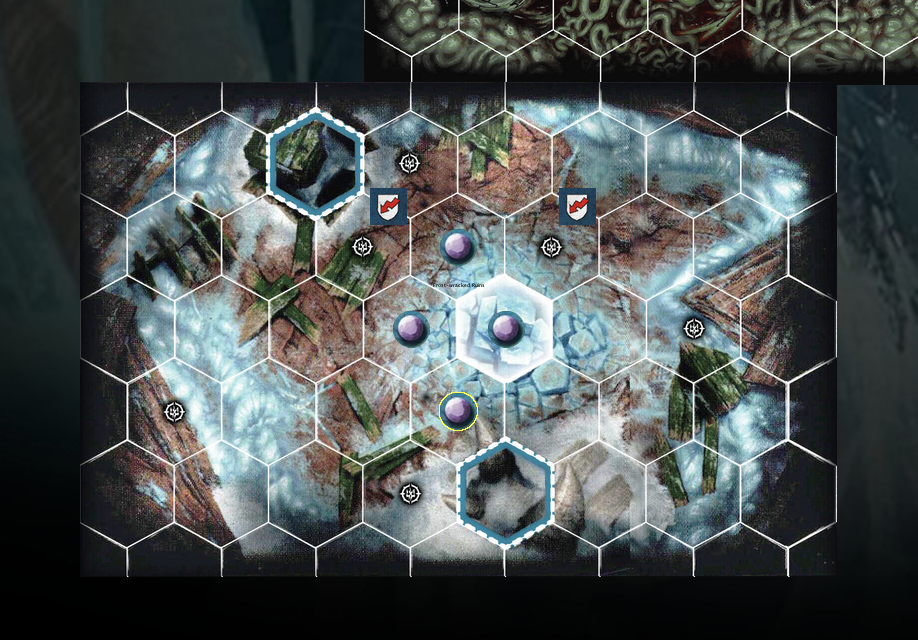
The strategy behind this board selection and orientation is that even if your opponent chooses the most disruptive location for an objective token, you can still place such that you have two relatively safe tokens in your territory. Consider the following set-ups. Objective number is the order of placement. In each case the opponent places the first objective to block off as much of the back of your offset as possible, but with the second objective token placement you protect the location of the fourth token. Notice also in nearly all cases you create a dwarven fortress elven citadel.
Another board strategy is managing chokepoints. This involves setting up boards and objective placement so that the opponent must funnel their fighters into your defensible position. In this case, you may sometimes like to use a five-hex offset in order to guarantee a third token in no-one’s territory or your territory, depending on your deck’s approach—for example, Rimelocked Relics requires an accessible token in no-one’s or enemy territory.
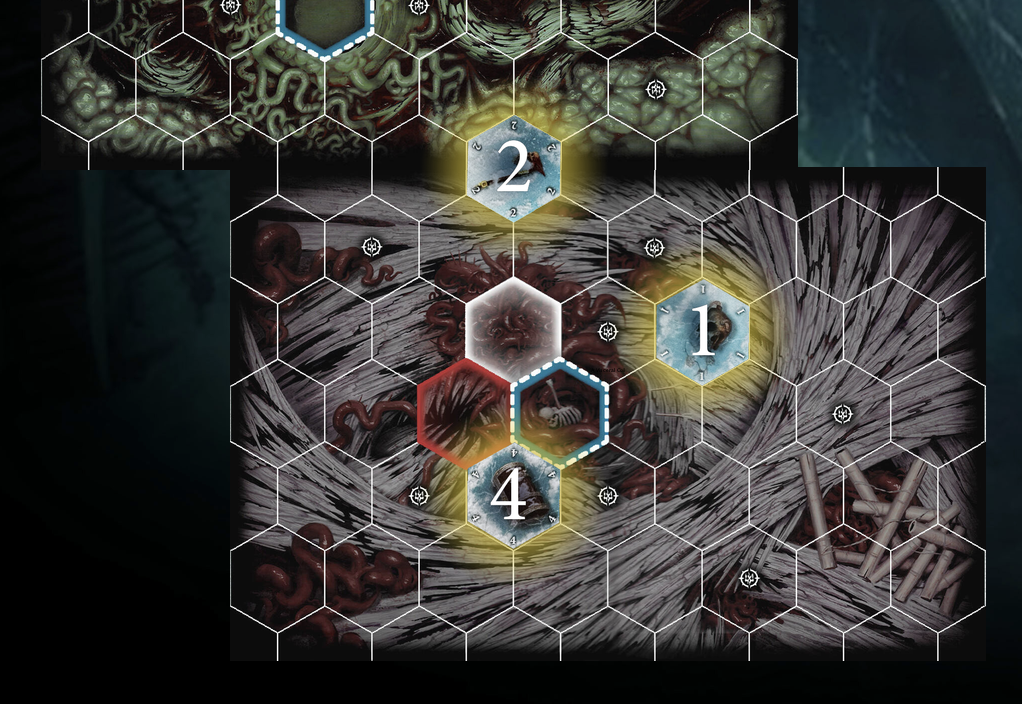
The cluster of hazards and blocking on the no-one’s side of your board provides protection from invading warbands (unless they have flying, of course!)
Fighter Deployment
The Purifiers deployment is highly match-up dependent. But there are some general principles that one can follow. Purifiers are rarely the beatdown in a match-up. (But remember: Rarely doesn’t mean never.) That means they usually want to deploy at the back of the board to eliminate a lucky critical hit on a charge from an enemy fighter starting on three-damage—your Gristlewels, Jedrans, Gorls, Rabidiuses, or similar. Deploying at the back also denies aggressive warbands their easy surges that require making attack actions or having charge tokens. The designers decided to release such easy surges for this kind of game plan, e.g., Embraced Savagery, Carve of Path, Gale Force, Feast of Violence, or similar. So, giving up few or no charge targets is a good rule of thumb. Additionally, every fighter should also be placed so they can at least move onto an objective token, or into a cover hex if pairing with Daring Delvers. That means Bahannar must be in the center of the formation because he can only move three hexes. You also want Bahannar in the center because his range-two attack is an excellent counterpunch. Against ranged opponents, Ailenn can also deploy with Bahannar to bait an early inspire from defensive re-rolls. Generally, you will place Senaela and Myari farther back because their range lets them make attacks without committing, and as we have observed above, our signal cards show us Myari is very important to our game plan. There are some occasions where you will put Senaela farther forward, e.g., you are against a noninteractive opponent and need to disrupt them with her range-four attack. If you’re pairing with Force of Frost, you may also need Myari forward to score Glacial Cool, but this can be quite risky without Channel the River in hand.
Strategic Play
The following may be understatement: Warhammer Underworlds is a complex game! There are many choices one can make at any point in the game. Learning not only the possible moves but the strategic moves is the challenging part. Perhaps this challenge explains the attraction of the A.B.C. (Always Be Charging) playstyle. It is certain that deploying that popular strategy with the Purifiers will end in disaster. So, you might wonder, “What are am I supposed to do, Leathanam?” There is no easy answer here, but I will give you a few common patterns that will give you some models of play to emulate.
- When in doubt, move onto objective tokens.
I received some sage advice about playing hold-and-fight finesse warbands: “Don’t hesitate to play strong and calm moves.” In other words, do not be in a rush to engage the opponent. Your first order of business is to get yourself into a defensible position that controls the objective tokens you want and satisfies your objectives. Sometimes that means simply moving one of your long-ranged fighters onto a back token. Moving Myari onto the token I want him to stand on at the end of the round is often my first play.
- Give your opponent low-probability attacks; only make high-probability attacks.
These strategies are two sides of the same coin: Don’t throw away activations making low-probability attacks, and make your opponent throw away their activations making low-probability attacks. Sometimes Purifier players get heartburn as they see Bahannar get charged, but in fact, you want your opponent to spend activations against him. Remember: he’s your tank! If your opponent is putting resources into trying to take him out and, ideally, you’ve made this hard for them, he’s doing his job, while your other aelves are busy locking down objective tokens you need for your end phase glory.
While Warhammer Underworlds is a dice game and we players often like to blame poor dice for poor performance, dice are something we can control. If your opponent is in too defensible position, don’t waste your activations throwing bad dice at him. But what’s bad dice? Here’s a quick, rough, nonexhaustive table of odds (for the Purifiers):
| 2 Smash | 2 Smash + 1 Support | 2 Smash + Re-roll | 3 Smash | |
| 1 Dodge | 60/40 | 70/30 | 75/25 | 75/25 |
| 1 Shield | 55/45 | 65/35 | 70/30 | 70/30 |
| 2 Dodge | 45/55 | 55/45 | 60/40 | 60/40 |
| 2 Shield | 40/60 | 45/55 | 55/45 | 55/45 |
| 2 On Guard | 30/70 | 40/60 | 45/55 | 50/50 |
- Play keep away.
Believe it or not: Sometimes the best move is a tactical retreat. As they say, “Discretion is the better part of valor.” If you can safely maintain a favorable board state by moving away, sometimes this is best. This is especially true when playing against warbands that take advantage of their own fighters going out of action (e.g., Hexbane’s Hunters). Often, against such warbands, after the opponent’s fighters have charged, I just move my aelves safely out of range and assure I can score my objectives. There’s no problem retreating an aelf from a charged-out fighter three or four activations in a row.
- If your position is favorable, don’t change it.
Suppose your aelves are safely in a defensible position and ready to score some surges from holding or fighting from an objective token. Great! This is the board state we want, you don’t need to feel compelled to make a charge or make attacks just to make them. Remember some opponents decks gain advantage from failed attacks (We’re one of them!). So, don’t feel bad if you just want to draw a card keeping your advantageous position and forcing your opponent to come to you.
- Denial, denial, denial!
This topic deserves a lengthy treatise. But as soon as you see your opponent’s warband or plot card, you should think about what common objectives they will be working toward and avoid giving them the opportunity to score them. Easier said than done, I agree. When you’re playing a warband like the Purifiers the more glory you can deny, the better. Better to score fewer glory yourself if you can deny even more to the opponent.
- Save your aetherquartz counters.
See The Laws of Purifying below!
The Laws of Purifying; Or, How to Use Aetherquartz
One challenge, perhaps even the most difficult challenge, of playing the Purifiers is managing your aetherquartz counters.
0. The Zeroth Law of Purifying
Save your aetherquartz.
1. The First Law of Purifying
Spend aetherquartz only if
—either a fighter will be taken out of action and you must re-roll for an additional success or critical defence (remember you get to see both rolls before you decide to spend) [N.B. this situation also arises when an opponent will do two damage and you have good reason to believe they have a ping in hand]
—or you have Elemental Blessing in hand and you can safely spend the aetherquartz for early glory.
2. The Second Law of Purifying
Do not put your fighters in a position in which you are tempted to spend aetherquartz to chase an offensive success for inspiration.
Sample Nemesis Decks
Paths of Prophecy
Rimelocked Relics
Acknowledgements
The Warhammer Underworlds community is the best. My enjoyment of the game has benefited so much from the community on the Warhammer Underworlds Vassal Discord and my local meta in New York Metro area and New England (“The Northbeast”). There are far too many to whom I owe many thanks, more than whom I can name here. However, I will mention a few:
Baconborne, Flaviuz, Filthy Kasual, Kyros, Mandarga, Shoobie, and Wathlab on Vassal Discord, Skylar (OmniOps) from What the Hex?!, and Dave from the UK, all of whom helped me reflect on playing Myari’s Purifiers and to think carefully about the best strategies and tactics. Their wisdom was invaluable to making this guide better. Whatever mistakes and errors remain are solely my own. I wish to express my gratitude to Spent Glory for hosting this guide and being such an excellent resource to the Warhammer Underworlds community.
That’s a wrap! Thank you so much to Leathanam for providing us with this guide and breathing life back into this old warband. Let me know if you give them a try! If you have a warband that you love and want to give them their moment in the sun, reach out to me. While there are a few more Love Letters in the works, there is always room for more. I’d love to hear your thoughts about an older or lesser or weird warband/pairing, what drove you to fall in love with it, and how you’ve piloted it to success – and especially piloting it to fun. If you have a warband you’d love to wax poetic about and serenade the wider community, let me know! I’m always accepting new submissions at SpentGlory@gmail.com – Until next time, grab your favorite warband, a couple friends, and Spend some Glory!





Leave a comment