Today’s article continues our Love Letters Series, in which readers of the page submit an ode to their favorite warband. The Love Letter Series was kicked off by this post encouraging people to play the warbands they love and tell others about the experience, inviting readers to contribute their passion to this website – if you have something to say, by all means let me know wherever you found this posted or by emailing me at SpentGlory@Gmail.com. This entry is by Anders, who recently won the Copenhagen Clash and punched his ticket to the World Championships of Warhammer with The Wurmspat paired with Rimewyrm’s Bite, against all expectations. Read on to see just how he did it, and what makes this stinky trio so delightful in his heart.
If you’d like a more concise overview of the deck’s approach, you can also read this deck guide on Battle Mallet.

Do you dream of relentlessly marching into your enemy, ignoring their feeble blows as you trample them underfoot? Do you laugh kindheartedly when your opponent’s best laid plans fall apart when they simply can’t stop your advance?? Do your triple-chins wiggle in delight at the thought of walking straight up to the biggest baddies roaming the Underworlds and punching them square in the face?!? Do you dream of… err… Can you live with a non-functioning faction deck with basically zero playable surges, slow fighters that are easier to avoid than the Sepulchral Guard, an elite warband with extremely basic stats when uninspired? Boy, do I have a warband for you!
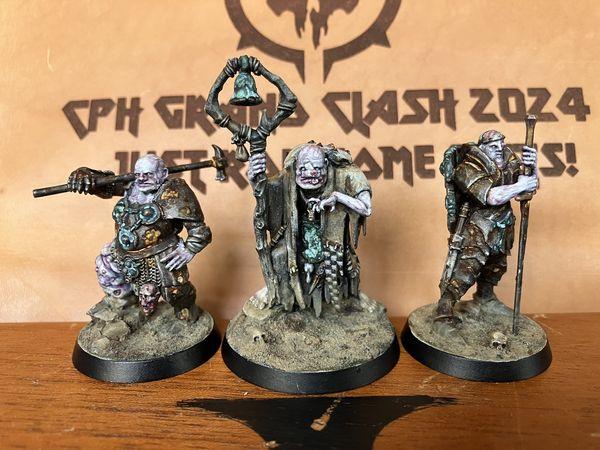
The Wurmspat is my favorite warband. It could be yours, too.
Oh, and I just won the 26-player Copenhagen Clash with them, so Fishmode roped me into explaining why I love them.
Who are you again?
My name is Anders, I’m from Copenhagen, Denmark, where I play WHU with a regular group of 10-15 extremely handsome players in our FLGS. I’ve first started playing WHU back in the late Shadespire days, very casual and just with a buddy or two – then we fell out of it a bit, got back into it a bit with Beastgrave, but still as a super casual side game to Warhammer Fantasy Battle, Mordheim (longbeards will know), board games… Then I made a truly horrible decision when it comes to playing games: I got a kid. So, all the big games go back to the closet, time to focus on a certain tight, bloody, strategic, quick, small-footprint game – one, even, that I could easily “participate in” in small moments of free time because of the deck building, which was a new aspect to me who didn’t play card games before (the sheer number of decks I’ve made on my phone while pushing a stroller with my sleeping son…). So, Warhammer Underworlds became my main game.
Let Chaos reign

I love Chaos in Warhammer, the models, the aesthetic, the lore, the vibe. I have an old Warriors of Chaos army for Warhammer Fantasy, long-slumbering in the basement. Mordheim? I ran the OG chaos warband in that setting. Underworlds? Dread Pageant, Garrek’s Reavers, Grashak’s Despoilers, Skabbik’s Plaguepack, some strange, converted versions of Ephilim’s Pandemonium and Gorechosen of Dromm. I’m working on converting Thricefold Discord now. To be fair, my first warband was Chosen Axes – though lovingly converted to Chaos Dwarfs (I have Da Kunnin’ Krew as well as I couldn’t resist their kunnin’ tricks, but, surprise, scratch-built chaos versions).
Point is, I love Chaos. And Nurgle and Wurmspat most of all. I love the grittiness and grimdarkness of Nurgle, their love of plagues, poxes and diseases, their toughness and inexorable marching forward, the grinding combats the Nurglites thrive in.
Name a more iconic trio; I’ll wait
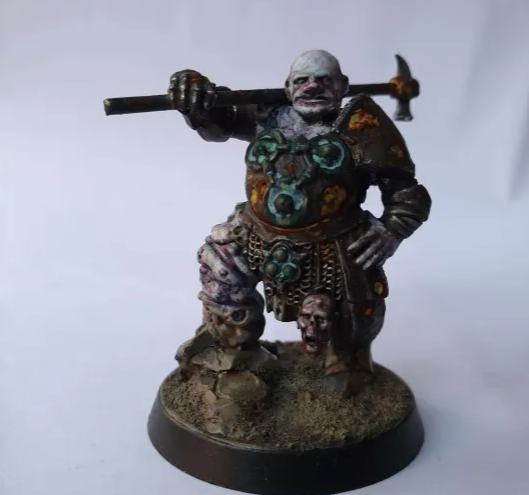
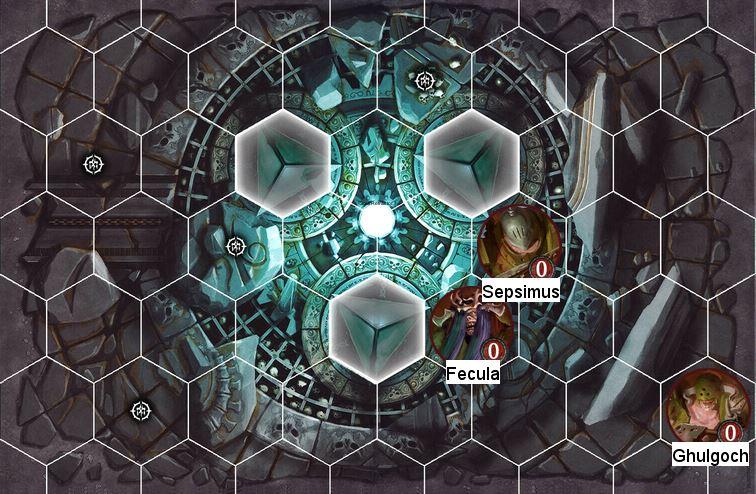
The Wurmspat is a three fighter warband from the Beastgrave season of Warhammer Underworlds. Fecula, the leader, is a wizard with a standard range 3 magic attack for 1 damage. Ghulgoch has an accurate 3 hammer attack, but just range 1 for 2 damage. Sepsimus rounds out the trio, brandishing his blighted spear with a standard 2 range/2 hammers/2 damage attack. All of them have 4 wounds, 3 move and 1 block defense un-inspired.
All of this sounds… supremely average, actually? Not very awe-inspiring. What’s the deal?
Agents of SHIELD

Luckily, there’s more. For each Block/Shield symbol (see above) they roll in defense, your fighters reduce 1 point of damage from the attack to a minimum of 1 damage (it even works if your opponent has cleave). And your two sluggers, Ghulgoch and Sepsimus, both go to 2 Block defense when inspired.
This is a fantastic ability. This makes them very, very hard to kill once inspired, especially when paired with defensive power cards that will just strengthen their survivability even more. You love, love, love to see those [Shields] when rolling your defense dice.
This, then, opens up their playstyle (to me at least, other people have run them with different strategies): Be as un-killable as possible and grind your opponent down with your strong inspired stats. Let your opponent waste their attacks, wailing uselessly on you, first break their spirit and then their fighters. Be the immovable object from that one Batman quote.
All the while, you punch them back. Sepsimus goes to 3 damage on his range 2 attack when inspired (and gets a decent scything attack to boot), and both Fecula and Ghulgoch become very accurate. Inspired, your boys and girlboss are incredible fighters – in my opinion, inspired Sepsimus is pound for pound one of the best fighters in the game. These guys are sick and prefer to stay that way – and as the old saying goes, a Sepsimus-sized hole in the enemy leader keeps the doctor away. With a couple of the right upgrades, my boi Seppy can tank all the damage whilst happily removing entire warbands by his lonesome.
So, the strategy is simple: You deny your opponent’s scoring by not dying. And then you deny their scoring even more by brutally killing their fighters (in practice there are a few more steps than this, but you get the idea). It’s a pretty unique mix of aggro/control in Underworlds.
That sounds fantastic if not downright broken, these guys must dominate then!?
I said it was simple, not easy.
Problem one. The observant reader might have noticed I specifically call out the inspired stats of the Wurmspat fighters. You start the game on the back foot: Uninspired, your fighter stats are pretty much equal to Xandire’s Truthseekers but without access to that all-important damage 3 that Dhoraz has (no support bird either). Sure, you have your [Shield] ability, but with 1 defense dice all-around it’s a 1/3 chance to reduce damage by 1 for each attack. You can’t rely on it.
This means that they risk getting blown apart in the early game by (fast) aggro opponents like Gnarlspirit Pack or Skittershank’s Clawpack. You can’t overextend (we’ll get back to this).
Consequently, your first priority is inspiring. Your second priority is inspiring. Your third priority is inspi… You get the idea.
Let’s take a look at their inspire condition then – they all share the same one. Three or more enemy fighters are out of action and/or have one or more wound tokens. This means two things. One: You need to engage – but as we just learnt, you must time your charges. Run in too early, you can just die before you power up (and, you have Move 3 and it doesn’t get better when you inspire. Before you can hit people you need to reach them). Two: You need pings to get three enemies wounded as quickly as possible.

Problem two. The Wurmspat faction deck is a festering carbuncle on the ass of Underworlds: Don’t touch it (too much). Their cards are notoriously bad, and especially the objectives are a never-ending parade of kicks to the groin. You get two 1 glory end phase objectives that are pretty reliable – but also very hard to score Round 1. You get 0 decent surges. The power cards are a bit better, but it’s a low bar to clear, and even then, no pings. Just crap objectives, and power cards that don’t provide the single most important tool you need.
This means that your glory ceiling is low, since you don’t have good faction cards to bulk out your objective deck. This means that high scoring decks (like horde warbands with a Hold Objectives strategy) can leave you in the dust. It also means you need to focus on denying your enemy’s scoring.
So, the bad faction deck means you rely on universal cards. In the Championship format, the pickings are rich, and Wurmspat can have a good time. You will never ever get a fully smooth objective deck, but you’ll get to build something decently usable and the power cards available in Champ will elevate your fighters even more. I love them in Championship, because you can actually play them in a way that makes sense.
This has not been the case in Nemesis. Since you rely so much on the cards from the rivals pairing, you need a pairing that more or less can do everything they need all at once: Surges, a few decent 2 glory end phase objectives, pings, defense/survivability cards, maybe even extra movement. Up until now -spoiler alert! – getting everything from this wish list in one single Rivals deck has been impossible. I’ve tried Breakneck Slaughter, Tooth and Claw, and Voidcursed Thralls without much success. They can kinda-sorta work with Toxic Terrors, and I’ve had some local success with that pairing, but the objectives are always awkward, and the upgrades are mostly horrible. Force of Frost can probably work ok-ish, but I’m not a big fan of magic in general and the deck was too ubiquitous to my taste, so I’ve actually never tried that particular pairing.

Enter Rimewyrm’s Bite
This new deck gives you a lot of the stuff you want for your burly boys and glorious gal. The first thing one notices is, of course, the strong ping cards. Then there is one great surge (Get Moving) and at least four more that are actually scorable, though they depend on either board state, card draw, or match up. You get several good 2 glory end phase cards (though none are “automatic” scores and can to a large degree be blocked by your opponent If they know what they’re doing). And then, finally, the deck has a plethora of cards that boost your survivability, from healing to ping immunity – including the fantastic upgrade Tough Enough which both lets your fighter ignore (most) ping damage cards and makes their native damage reduction crazy strong to boot (ahh, the sad realization on your opponent’s face when you roll 2 [Shield] in defense and reduces their damage 3 attack to 1, which you then ignore with Tough Enough).
The deck isn’t perfect. Most of the surges are clunky or at least very circumstantial, and there is a “Domain tax” where some substandard Domain cards are needed to unlock a surge and some of the more powerful upgrades, if you want to go that direction. But for Wurmspat it seemed miles better than the alternatives.
Worming my way to the top

With the then-inaugural Copenhagen Clash coming up, I decided to travel deep into worm territory and make a wurm/wyrm deck.
I managed to get four practice games with the Rimewyrm’s Bite pairing before the tournament, and results weren’t stellar: I lost three of them straight up and only “won” the last one because I made a rules mistake in my favour and we decided to just play through it when we realized. Not a great start. But it did mean that I got familiar with the Rimewyrm deck, which I had neither faced nor played with before the test games. And it meant that I thought long and hard about board choices and deployment against various potential opponents.
I won’t go through the tournament blow for blow, but it was a 1-day affair, Nemesis format, 5 matches of Best of 2 games (so 10 games in total), with 26 players from 3+ countries drawing swords in search of glory. I ended up winning 9 of my 10 games and losing 1 – which meant 4 match wins and a draw at the top table against my regular opponent and long-time nemesis Mads. This was enough for me to get the tournament win with Mads breathing down my neck.
The tournament was very well run by two heroes from my local group, Thomas and Jonas, and their prize board was incredibly stacked. I played some great opponents, battling it out against The Headsmen’s Curse with Tooth and Claw, The Headsmen’s Curse with Hungering Parasite, Drepur’s Wraithcreepers with Rimelocked Relics, Domitan’s Stormcoven with Seismic Shock and, in the finals, Cyreni’s Razors with Rimewyrm’s Bite.
This is what I ended up using in the Clash. I’ve named this deck:
Big Sick Energy
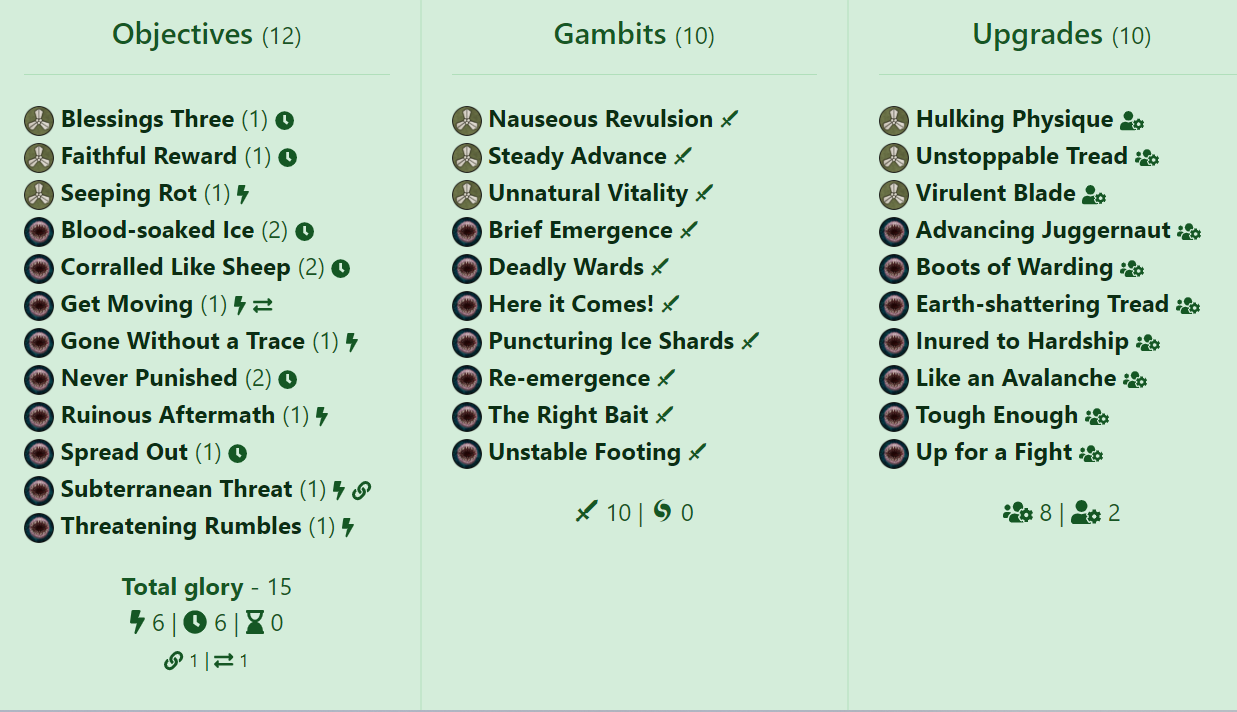
Most of my choices hopefully make sense after reading my general thoughts about running (“running”) Wurmspat. There is an argument to be made to drop the two Domain “tax” cards (Here it comes! and Unstable Footing) and then cleaning out the trigger-off-of-Domains cards (Ruinous Aftermath, Up for a Fight, Like an Avalanche) in order to get some of the decent-to-strong cards you’d like that maybe don’t have the same power spike potential of these cards, but are more reliable because you don’t have to draw and sometimes even chain your Domain cards to use them (I would love to fit in cards like Just Pure Luck, Gift of Contagion, Foetid Shroud, Living Plague, even Engulfing Shadow).
The weakest part of the deck is the surges. I never once scored Seeping Rot and will definitely change it for either Blessed Endurance (which is match-up dependent as not all warbands have access to damage 3 in Nemesis) or Deadly to All (which is very draw dependent) – I’ll have to experiment.
Most of the other surges are either very circumstantial or at least very hard to score early. This is something we must accept. On the other hand, this deck actually has 3,5 decent-to-great 2 glory end phases. Corralled like Sheep you’ll always need to have in mind and can be scored against most types of opponents: Hyper aggro opponents will maybe score it for you if they invade your territory from the start, very passive enemies might score it for you if they try to stay back, and if you’re brawling for the mid board, you have to consider this objective when prioritizing your targets. Blood-soaked Ice works perfectly with your overall aggro/grind them down-gameplan, but also meshes beautifully with your pings and overall need to spread damage out – though it’s obviously hard against hordes, at least in the early game. Never Punished goes hand in hand with Blood-Soaked Ice and the general tankiness of the Wurmspat, and a cheeky Inured to Hardship can really help score it. Spread Out is the last “2 glory” end phase as it can be score for either 1 or 2 glory. This one is very match up dependent but surprisingly scorable and, an even bigger surprise, I scored it for 2 glory quite a few times.
How to win fights and infect people
This leads us into the last part of the article – what all the things we’ve learnt so far about strengths and weaknesses, stats and deck mean on the table.
Slow and steady wins the race
The awkward surge pack, even with Rimewyrm’s Bite, and the all-encompassing need to inspire to access those juicy stats that will – hopefully – carry you to victory, brings with them a hard lesson any aspiring Nurgling needs to learn: You play the long game. You will have plenty of games where you don’t score any surges R1 and feel lucky if you get a single, or, blessed Nurgle, maybe even a couple of measly glory in the end phase while your opponent happily slams down casting surge after casting surge or score big end phase objectives for holding feature tokens. Don’t get tilted, don’t make desperate moves. Eyes on the inspiration, your end phases, and setting up future turns where you can crush them under your boot heel.
You must also accept that you have a low scoring deck and that you will often have to discard objectives. My deck ceiling is 16 (i.e. if I score every single objective in my deck, I score 16 glory), which isn’t terribly high to start – but across the 10 games of the tournament I never scored more than 9 glory from objectives in a single game. You can’t count on scoring all your objectives and you’ll have to make tough decisions on discarding cards to draw something that works better with the board state.
This also means denial is important for Wurmspat. If you can stop your opponent from scoring a glory, that’s almost as good as if you scored one. I’m by no means a master of this but knowing the overall game plan of your opponent – or even better their key objectives – and trying to throw a handful of spanners in their engine is definitely needed if this terrible trio needs to go the distance. This can be as simple as standing on objectives if you know that’s something your opponent actually needs to do, or prioritizing attacking their fighters on objectives for example – or as involved as remembering specific objectives from their faction and pairing decks so you can try to block them.

To rush or not to rush
As we learnt before, their relatively weak uninspired stats mean fast, hard aggro can potentially mess you up so much early that you won’t have enough gas in the tank to carry the day even if/when you manage to inspire. Conversely, horde warbands can let you inspire quickly since it should be easy to reach their fighters, but here your relatively weak objective deck comes into play: Your glory ceiling is low and some hordes will happily let you pulverize a few of their fighters while they set up their big end phase scores and simply just outscore you. And control/magic warbands that can play keep away will usually have a better objective deck than you, scoring passive glory while you waste activations trudging forward to set up something, anything, for round 2 or 3.
Wurmspat is great at counter-punching people coming into them and grinding it out in the middle of the board – but even then, it’s not clear cut when to engage. Run straight into Drepur, Madmob, or Headsmen early round 1 and you will have a bad time. Stay back too long and they run away with the game from you because of your bad objective deck, scoring their own deck and putting down their upgrades.
All this is to say, Wurmspat is one of those warbands that every game carefully needs to consider: Who is the beatdown? Of course, everyone should do that, but for many warbands, the answer is often the same most games. Not so for Wurmspat.
Choosing your battlefield
This also have bearing on your board choice and deployment. You can’t rely on the same deployment each and every game – sometimes you have to hide in the back of the board, other times go straight for the jugular, sometimes you don’t know if the opponent is coming to you or not, and you have to balance being back in safety or deploying forward enough to reach your enemy round 1 if it turns out they want to stay back. It depends on your opponent’s warband, pairing and strategy. Let’s look at a few simple examples.

But first I have to mention a specific card that can really impact board choice as well: Puncturing Ice Shards. This is a ping card that triggers off a fighter being within 1 hex of hazard hex (cover, lethal and stagger hexes) – but after it goes off the first time, both fighters within 1 hex of hazards AND objectives are eligible targets for a second ping damage. It’s a fantastic card for your inspiration (and just dealing damage in general), but it can hit your own fighters as well. This card alone means you must consider if and where your boards have hazards hexes.
A few guidelines: If you think you have to go forward into their board and bring the fight to a passive enemy (like Cyreni’s Razors), go with something like Glacial Tomb in the wide board figuration, this let you deploy forward with no obstacles. Alternatively, if you suspect you have to be the aggressor, but that the fight might spill over the center line (say, against Sepulchral Guard) – and you know for a fact your opponent doesn’t bring Rimewyrm’s Bite – deploy aggressively on a wide board with a hazard or two around the midboard where you think there is a chance they’ll get close to them: Boards like Icefall Pits, The Wyrmburrow, Fleshwrithe Vortex or Moltscape are good for this.
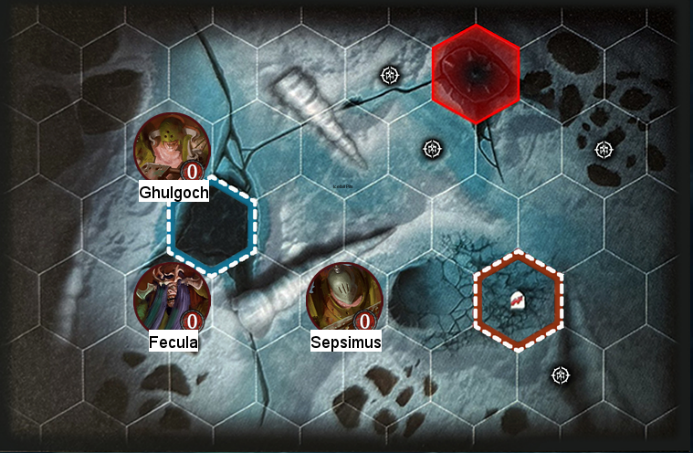
If you want to deploy aggressively and think you have to go straight into your enemy, you can choose empty boards in the wide set-up. If you expect you have be aggressive, but that the fight will happen in your territory as well, or just around the center line, a board like Icefall Pits can work well in the wide set up by pushing a hazard hex close to the enemy. The guard symbol show alternate placements – maybe you want to deploy a fighter or two out of charge range of the Champion from Sepulchral Guard or a similar fighter.
If you’re fighting aggro opponents like Gnarlspirit Pack, or, say, some flavours of Madmob or Crimson Court, that will need to come to you, pick a board with a lethal hex in their way – and don’t be afraid to off-set the boards to create a chokepoint they have to go through. Boards like the Wyrmburrow, Rimespawn Hatcheries, and Moltscape can be used for these – some of them are very good against opponents that want to brawl in the middle as well – stuff like Madmob with Fearsome Fortress, Drepur’s Wraithcreepers, Headsmen’s Curse.
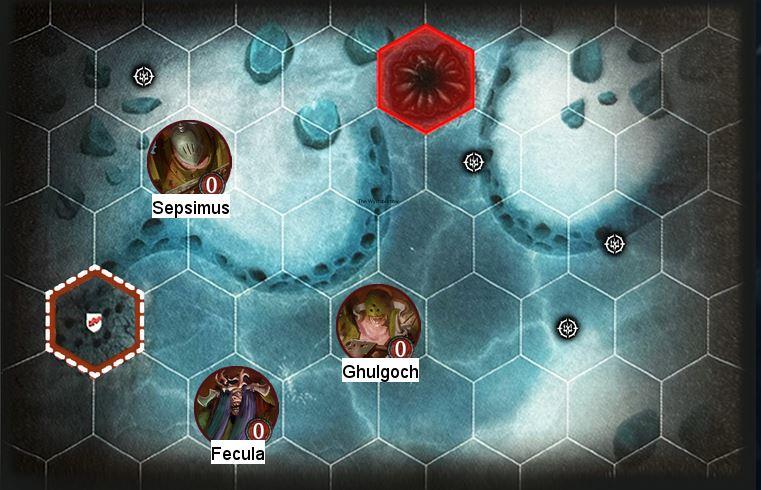
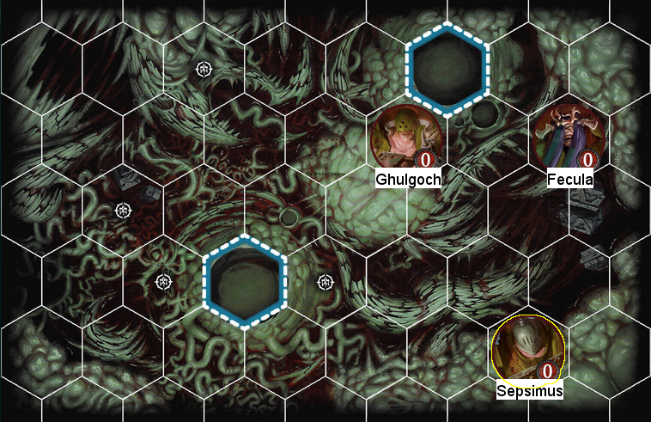
Here are some defensive examples against hard aggro teams. Imagine the boards are off-set: In the left example (The Wyrmburrow) the enemy’s board should be connected to your top right. In the example of the right (Moltscape), imagine the enemy’s board is connected to your top left, creating a dangerous chokepoint.
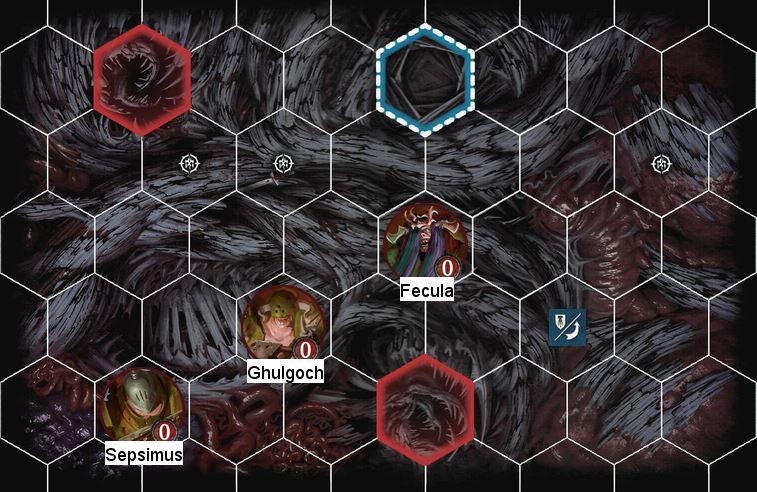
When you have to place boards first against warbands that (you suspect will) come forward to fight you in a wide set-up, I like to use boards like Moltscape or A Fleshwrithe Vortex both of which has a lethal hex on both long sides, which means that as long as they place it in a wide set-up they’ll end up with a lethal hex somewhere in the center line.
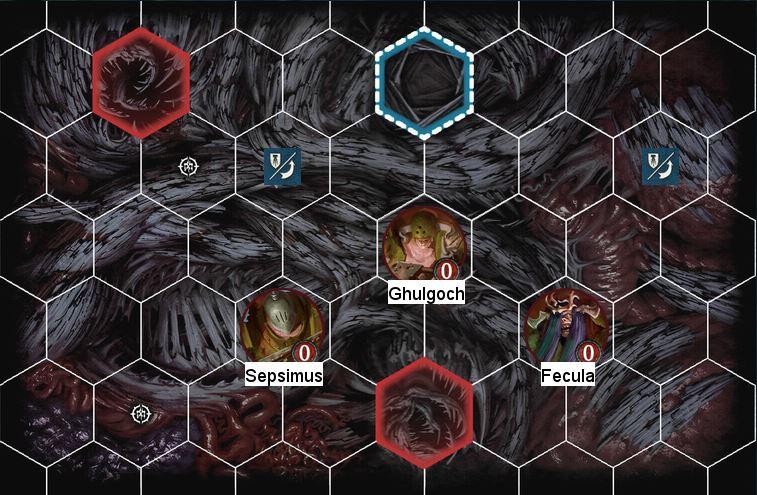
Moltscape again, but placed as a first board this time. If the enemy want to go wide, there will be at least one hazard in the center line – which might just be the key to unlock Puncturing Ice Shards.
Before we round off the board selection, remember Puncturing Ice Shards? If you think your opponent is running Rimewyrm’s Bite themselves – and if they don’t have a plot card you better suspect it, especially if you’re up against warbands with ping synergies or passive warbands like Cyreni’s Razors, Thricefold Discord, Gorechosen of Dromm – don’t make their lives easier by choosing a board with hazard hexes yourself that lets them drop Puncturing Ice Shards on you.

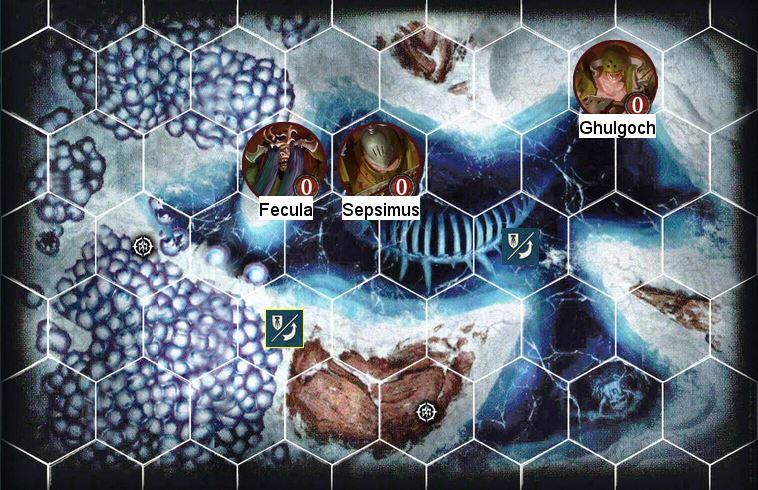
Finally, if you expect the enemy might longboard you while they stay as far back as possible and ping you with Rimewyrm’s Bite, there aren’t many fantastic options for a first board for our move 3 fighters (though I don’t have much hands-on experience in this particular Rimewyrm-mirror-with-a-longboard match up). Both Soul Refractor, Katophrane’s Reliquary and to a lesser extent The Cursed Oubliette can kinda work, I’ve put the Soul Refractor down as an example. But apart from that, I’m going to immediately contradict myself from just before and mention The Stricken Swamp – even if you’ll have to deploy a fighter next to a hazard hex. I think it might be worth the risk of your opponent drawing Puncturing Ice Shards in their first hand to be able to start at close as possible to the enemy – just remember to move whoever is starting next to a cover hex asap! (I won my 1 game in the finals in the Copenhagen Clash with the deployment shown here on The Stricken Swamp against Rimewyrm Cyreni, but I was very lucky with my first hand).
In general you don’t want to longboard – but it’s very good to have some options prepared for when you expect the enemy want to longboard you. These examples are specifically against opponents you expect to stay as much back as possible: In either configuration you’re pretty close to the enemy under the circumstances.
All Nurglites are equal, but some Nurglites are more equal than others
All of your fighters are important for your game plan, and all of your models are – when inspired – great fighters in their own right. You will need all of them to win.
But there is a main man.
Sepsimus is your most important fighter, and most of your upgrades go on him. His biggest weakness is his accuracy, 2 hammers are often in the 50/50 range, so Virulent Blade for an attack dice re-roll is extremely clutch on him. With my Rimewyrm’s Bite deck, Up for the Fight helps as well of course.

Protect Sepsimus at all costs for as long as possible (so give him a defensive/survivability upgrade asap). Consider if you really need to charge him early in the round or not. Ghulgoch and Fecula, on the other hand, are more expendable. You don’t want to be willy-nilly with them, but sometimes early game you need to throw someone forward to, sure, get a hit in to start your inspiration-train, but also to draw the enemy fighters in for the counter punch. This is often Ghulgoch, but sometimes Fecula.
My round 1 will often consist of drawing a card activation 1, charging with Ghulgoch/Fecula activation 2 and 3, charging with Sepsimus activation 4. This can protect him somewhat round 1, when he is most vulnerable. If they come to you from the get-go and you’re not afraid of overextending, you can do 3x charge and then a charged-out attack with whoever’s in range, often Fecula.
If they’re super passive, you’ll have to just eat the loss of activation efficiency and walk forward. If you know they want to come forward eventually, but they’re trying to make you make the first move by drawing a card as well, try to wait them out – draw another card, why not (but I basically never draw three cards in a round. Wurmspat needs to engage or at the very least move up to engage next round).

Down with the sickness
Finally, we arrive at the conclusion: Why do I love Wurmspat? I love their toughness and how it opens up a unique playstyle in Warhammer Underworlds. I love the push-pull that is inherent to the warband: They have strong fighters and weak cards. My strategy is simple, but to execute it there are constant tactical dilemmas I need to consider and weigh up against each other: I want to get stuck in and grind my opponent down, but early game my fighters are quite fragile – I need to engage, but often not too fast. My surges are bad, so I need kills for my seed glory, and because of my fragile fighters in the early game I want to remove threats – but I also need to spread the damage out so my fighters can inspire: Very often you will be in situations where you have to decide if you want to let a wounded enemy fighter live in favour of wounding another to get closer to inspiration. I love how “round 0” – board choice, token placement, deployment – can be so important for this warband, and how it brings its own dilemmas. I love how I’m often on the back foot early game as warbands with better decks start racking in the glory while I stand there empty-handed, so I really have to go the distance to pull through.
There you have it! I hope this made you interested in trying out this trio of pusbags – I know I can’t wait to run them again. Glory to Nurgle (and to the [Shield])
Thanks to Wathlab, Mads and Mikkel for the deck discussions, to Leathanam for their feedback on the article and Fishmode for letting me ramble on and on. If you have any questions, I go by Anders on the various Discords.
Filthy. Sick. Straight Illin’. All these and more can be used to describe this article – thank you to Anders for sharing the love he has for this warband AND giving an incredibly in-depth record of how and why he made the choices he did, plus execution tips for playing them. Incredible stuff. The Wurmspat is a warband I had essentially written off in Nemesis and Anders has proved me (and so many others!) wrong. Bonus points for the great sub header titles throughout.
While there are a few Love Letters in the works, there is always room for more. I’d love to hear your thoughts about an older or lesser or weird warband/pairing, what drove you to fall in love with it, and how you’ve piloted it to success – and especially piloting it to fun. If you have a warband you’d love to wax poetic about and serenade the wider community, let me know! I’m always accepting new submissions at SpentGlory@gmail.com. Until next time, grab the warband you love, a couple friends, and Spend some Glory!


Leave a comment