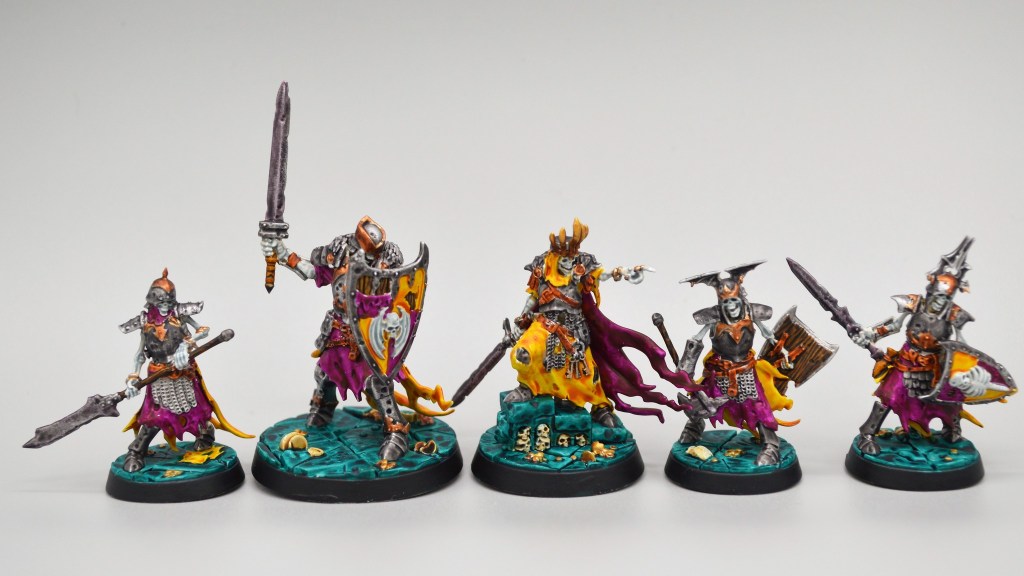
As I discussed in my previous article about Kamandora’s Blades, I was not able to go to Adepticon this year due to a family crisis. That said, I wrote this in advance and thought I’d share it anyway so you could get a look at another angle on Velmorn, some love for Edge of the Knife, and the new Raging Slayers plot with a new application.
Adepticon had a Grand Clash, yes, but it also had a one-day ‘Pods’ event put on by GW! For that event I was planning to go full silly and would have brought along the Sons of Velmorn with Edge of the Knife/Raging Slayers which works a heck of a lot better than you might expect. Let’s take a look at why, then cover the cards I brought so you can try it out for yourself.
Click here to check out other Deck Builds/Love Letters on Spent Glory
Why Velmorn EKRS?

First things first, I’ve been in love with Velmorn since his original release in first edition, and wrote extensively about that and prior tournament reports. Now that he’s back in second edition, I’ve been on the lookout for how to best use him again for old times’ sake.

Secondly, I went on record in the Underworlds Underground podcast as ‘not being scared to take RS to a competitive event’, even saying I was planning to this year. When Raging Slayers had the plot card redone in a rules update, it absolutely ruined what I had been cooking for Kamandora and I needed to find a new warband to apply it to.

Since RS now means you can turn any one success into a crit if you’re enraged, it works for Velmorn in the aggro approach. You have crit grievous on 3 of your fighters uninspired, and one inspired does too, so you can increase your damage output pretty significantly. Is it perfect? Heck no. Is a semi-casual one-day event a way for me to enjoy the King of warbands and meet my obligation to use RS competitively? Heck yes!
I decided to pair with Edge of the Knife because It gives me a few fun options with some higher score options compared to Blazing Assault. I start with 3 tempered fighters, can bring one back, and they’re almost guaranteed to Temper King Velmorn for me (and try to kill him while they’re at it) so I can access cool power cards and even take a run at Trial of the Tempered. I threw a deck together and was surprised to find how well it worked in practice.

The Evidence

So the wildest thing here is that my meme-tier aggro Velmorn went 5-3 in practice games, and I have totally legit and not at all cope excuses for the losses. The first came after 7 consecutive missed attacks to open that game. The second I hit only three attacks all game, often failing to drive back and bump off tokens even. The third I would have won despite again garbage dice luck; had I hit the last attack of the game I would have taken the win by 5 glory. A lot hinges on hitting an attack in the first few activations, but the limited evidence speaks for itself. Maybe this fool combo has juice after all. Maybe I just got lucky. Maybe would have even gotten lucky in the Adepticon Pods. Maybe Velmorn is the KING!
General Strategy

I know this sounds crazy but stay with me here: you charge King Velmorn immediately, at least if you have a reasonable target to start with. You want to get his Command Token up before you do any work with the little sons, and he should survive at least one hit back. The struggle is that 2 hammers isn’t a great profile, but you’ll be slapping 3 damage out if it lands, so pick a soft target and get the ball rolling. If he hits or the subsequent son does, he’s inspired to 2 shields. Even if they manage to hurt him, you’re probably becoming Tempered and are enjoying that anyway. If you have the reroll enraged defense domain, the Tempered minus dice ploy, or the enrage heal, you can keep him ticking along a little bit longer. I’ve played them in practice quite aggressively and gotten away with it, even winning in games where Velmorn goes down early. Worst case he pings the attacker on the way out with the new -and-improved Velmorn’s Curse and you’ve gotten somebody into kill range/tempered.

I built the deck to not really require enraging for many things, so later in the game you can avoid the condition if needed. Faulk keeps his crit grievous even when inspired so he likes it though, and everybody enjoys crits to overrun or prevent standfast. If you don’t have a positional need, go ahead and rage on, bone boys. I have tabled more opponents than I expected with this deck!
The deck’s objectives are super greedy so don’t stress if you don’t score them all, and don’t be afraid to throw cards out in the end phase or even focus in the right circumstances. The last little bit of advice I’d add is to read the room and use your Rise Again resurrect in the power step before they take Velmorn down for good. Several times I have thought ‘maybe they’ll miss, and I don’t want to lose my Command Token yet’, then lost both the Command Token AND the chance at bringing a son back. Be better than me.

Click here for a link to the deck on UnderworldsDB
Surge Objectives

Aggressive Defender – A excellent Surge even considering everybody is range 1. I like to set up a Treasure within charge distance and adjacent to a starting hex so I can open with this when possible. Considering you can score it with an overrun and you get free crits with the RS plot, it’s even simpler.
Behind Enemy Lines – this one can get a little tricky if drawn late, but it is yet another reason to put a treasure or two in enemy territory within reach. I charge a son onto it and hope he gets ignored, but I score this is pretty much every game eventually. You may consider not enraging whoever you’re using to try and score this (or using a ploy to drop the rage token after) so they stay on. Bonus points if you then roll a crit on defense with one of your Bulwarks and get a guard token! It’s also nice that it only has to be a feature token, so you can get it with Aqua Ghyranis or cover if that’s what’s available.
Best Foot Forward – the gameplan is charge and hit in enemy territory, and this fits right in. You have to hit which is a bummer but there are worse aggro surges out there.
Double Team – hit somebody while they’re flanked? That’s the goal anyway, and if the king is alive with a command token then you’ll qualify with the little sons; or just do it the old-fashioned way.
Immovable – you have three tempered fighters on 2 shield to open the game. Jedran and the King will get there and have the defense and health pool to absorb another attack. This scores unless the dice are horrendous (in which case you’re losing anyway) or they don’t attack you (in which case you’re probably winning anyway).
Power in Numbers – a little difficult to establish, note that it specifies move tokens though. You can charge into position and satisfy this condition, and as the underdog it’s actually pretty simple. Enrage pushbacks do throw a wrench in it, but in some games it takes no extra effort at all.
End Phase Objectives

Calm Before the Storm – a beautiful card that’s very challenging to counterplay in the rare case your opponent is even thinking about it. 3 fighters being 2 health means they usually die rather than take damage, and your fighters often being enraged and thus forced away means even if they tag you with a damaged fighter, you won’t end adjacent. Not a guarantee, but just about the easiest 2 glory end phase you’ll find in an aggro build.
No Contest – good chance I want your leader dead, and with crits bumping every fighter to 2-3 damage, three pings, and Haymaker, chances are I’ll get there eventually. Not being time-bound helps, and if it’s round 1 and out of reach I’m not sad to toss it for being only 1 glory.
Risky Position – have a tempered fighter in enemy territory in the end phase – If I can’t do this, I’m in a lot of trouble.
Trial of the Tempered – here’s one of the big 3 glory scores I took. Tempering my own team is pretty easy – I have 3 tempered to start, an upgrade for one big guy, and the opponent will do the other one for me. The hard part is tagging the enemy team depending on their composition, especially if this is drawn too early. I’m not devastated to discard it though because my glory potential in the deck is pretty high.
Unrelenting Massacre – a beautiful card that is a control piece to keep my opponent from doing the most optimal thing, and in most games still scores anyway for 3 huge glory.
Usurper – the dumbest card I took. The leader needed to have died thanks to an attack (so no pings) from a tempered fighter (sorry Jedran) this round specifically. I took it as a ‘maybe I’ll get lucky’, but it’s doable more times than you’d think. Again, the glory ceiling in the deck is high enough that you don’t have to score everything. Some games it will happen naturally anyway. If you’re customizing this deck for your own use, this is the first thing I would trade out.
Ploys

Death Throes – ‘please don’t kill the king just yet’ is how you should read this card. It’s also useful for helping to keep your last guy alive or score some positional things as they opt for a different target.
Fake Out! – This is an awesome card for a warband who wants to get slaying and raging and comes readymade with multiple tempered fighters. Bulwark helps you end adjacent to a fool on occasion too. If you’re the underdog, you have a pretty good chance to ping somebody (and you CAN kill them) and stagger them to boot for better odds to hit the finisher. I have assassinated several targets with this as the final tag, and you’re happy to see it at any phase of the game.
Honed Reflexes – a fantastic domain to have in round 1, a defensive reroll can keep your king alive a touch longer (especially if you haven’t inspired him yet and are still on 1 shield). This warband is already a tough nut to crack defensively, and this card does wonders to make that better.
Knife to the Heart – I committed to packing the pings, though this one is less fun than some others. You have to be enraged and then burn the token to do 1 damage to somebody but can’t kill them with it. You’re then also precluded from benefitting from enrage cards unless you can re-enrage the fighter with a neighbor’s charge (thanks, plot card update!). It’s still bonus damage and you’ll still find ways to use it, but a bit limiting.
Opportunity Strikes – Plus dice is always good, but it’s extra good when you’re uninspired and need to hit to cross that finish line. Restricted to tempered fighters, but you have some and will get more!
Power from Death – This card is great, because you will lose fighters and when you do, you’ll pick up more cards. I see the entirety of my deck in most games thanks to this card.
Sidestep – Auto-include. Get supporting fighters and hit, inspire, score, and show off your touchdown dance.
Synchronised Effort – a funky card that has tons of utility, though sometimes bricks. Get the king out of danger. Get Jedran into a flanking position to help; inspire him. Get a charged fighter swapped with a fresh one to plunge deeper into enemy lines. Move a bulwark-guard token fighter into a tastier position. You have lots of choice here, and 4 hexes is a long way. About half my games I don’t end up using it, but the times I do it almost always feels impactful.
Venting Strike – More plus dice, and this one not tied down to Tempered like Opportunity Strikes. Again, you have to lose the enrage token, but occasionally that’s what we want. Hard to leave at home when playing crash aggro like I am/
What Pain? – Do you need to give King Velmorn just a touch more health to keep him alive? Jedran taken out of kill range? Do you need to clear some damage to score Calm Before the Storm? Do you want to remove that pesky rage? For the low, low cost of 2 stagger tokens, you can so long as you’ve gotten to make a charge or two and enrage.
Upgrades

Agile – Defensive rerolls on 2-defense fighters are honestly kind of mean. This also stacks with Honed Reflexes in those cases, allowing you to reroll both dice. Make that a Bulwark fighter and you can fish for crits and get that guard token for the laugh of a century. I usually save this for King Velmorn, but it works on anybody in need.
Aggressive Ambusher – Cleave is a great effect, but sometimes you need ensnare. What if you could have both? In a warband that gets supporting fighters really easily thanks to Deadly Command and Bulwark preventing drive back, this was hard to pass up.
Dark Horse – Sometimes your opponent is too crafty to Temper Jedran for you. Sometimes they try their little hearts out and can’t get through your monster defense. Access power cards and scoring opportunities for the price of 1 glory.
Great Fortitude – Your big boys enjoy an extra hit of survivability, or even just a deterrent at the end game. Careful not to use this on a little son before you’ve score Trial of the Tempered, or if you also have a spare Dark Horse to give them.
Haymaker – YOSH this card is bonkers strong and bonkers fun. Bombs away!
Impervious – Picture poor King Velmorn on the ropes with 1-2 health left and your opponent lines up a cleave attack. Wouldn’t it be nice to say “oh hell naw”? You’re dang right it would.
Keen Eye – the biggest limitation this warband has is number of attack dice. 2 glory to fix that is a no-brainer.
Mobbed – While I still think it’s a travesty that this card is restricted, it’s pretty good and belongs in a deck like this. 50-100% accuracy increase is a must-have with this objective package – just make sure you have a friend nearby to trigger it! I have drawn this in round 3 with only Jedran left and been sad.
Parting Shot – incentive to leave somebody alone. A chance to temper another enemy. Put somebody in kill range (or just slay them now). Staggering for more inspiration/hitting power later. All gravy.
Stubborn to the Bone – Full disclosure; it has Jedran on the art, and he’s the fighter who gets it the most often. Keeping a fighter on a token or in a territory can help score cards, but also helps keep you around in a flanking position for accuracy and inspires. It also lets you keep swinging when charged out at the end of a round. It’s no panacea but it’s a solid card.
Cards That Didn’t Make the Cut

Aggressive Expansion – three in enemy is a tall order, and to have them all still enraged is too. It happens some games, but I didn’t want to feel like I had to keep everyone enraged and avoid using some power cards or feel bad when somebody got booped out with poor footing. Way too much work for 1 glory.
Coordinated Assault – not my favorite, but at least I don’t need to keep the rage tokens to the end phase. Being able to dish out extra tokens really helps with this, but it’s nigh-impossible to score in round 1 (or if the fight happens in my territory).
Into the Fire – this one was an edge case to include. On one hand, it can score easy enough with what I was already trying to do, and I can even use Synchronised Effort to force it. However, they want the King dead. He might not make it into enemy territory. It’s only 1 glory. I made some boneheaded plays trying to force it and then didn’t score it anyway.
Two-Pronged Assault – having two tempered fighters in enemy territory can be tough when I’m slow and poor footing exists, especially if the enemy also wants to dive into my zone. I tested this for a while and kept failing to achieve it when I had it in hand, even though it’s theoretically not that hard.
Sharpened Points – I wanted it, I really did. But Helmar the Hewer gets cleave inspired, and Aggressive Ambusher is a close enough yet more flexible choice for this pairing.
Murderlust – So the biggest struggle this deck has is missing an attack because you only have 2 attack dice into a 2 defense fighter. This is another source of +dice that can solve that problem all round long… if you miss on your first attack. And the fighter needed to be enraged. And then your friends get plus dice against that target only. When you’re slow that can be a really tough ask. I never tested it, but there were games I sat there looking at Synchronized Efforts thinking ‘yeah, that would have been much nicer about now’
Wrap

There you have it! The Gnarlwood’s Finest ride again, and this time they’re the ones taking skulls. Let me know what you think, and I would love to hear if you take it for a spin yourself.
Don’t forget that games are fun, but the people in your life matter most. Real life takes priority and you should never pass up the opportunity to do the right thing for the ones you love. I stayed home this time, but I still plan on going to Tacoma later this year and might have some actual Grand Clash battle reports down the road. Today all I have is a deck review, but it is what it is.
Whether you’re brave (or stupid) enough to take Raging Slayers to a competitive event or not, I hope you enjoy spending glory in the Spitewood.
Click here to check out other Deck Builds/Love Letters on Spent Glory


Leave a comment