
Priming your miniatures is one of the first things you do after you have finished assembly. It’s pretty important because of this fact alone – doing a bad job here will affect everything you do paint-wise afterward, and doing a good job will make the rest of the process easier. You can use a spray primer/rattlecan, do some airbrush priming, or use a brush on primer, and we will touch on those options below. But why, you foolish Fishmode, do I even have to prime in the first place? I hear you ask, and I empathize because I used to ask the same thing. I didn’t prime most of my models when I was a kid, and even a chunk of my earlier Underworlds models were just paint slapped onto the bare plastic. It can work, yes, but you will get a better effect if you prime, I promise.
Articles in this series:
The Benefits of The Hobby
Building Underworlds Models
Painting Supplies
Primer, and Why to Use It
Contrast/Speed Paint
Acrylic Paint
Miniature Basing
Lore, Novels, Art, and Fan Fiction
Making It Manageable
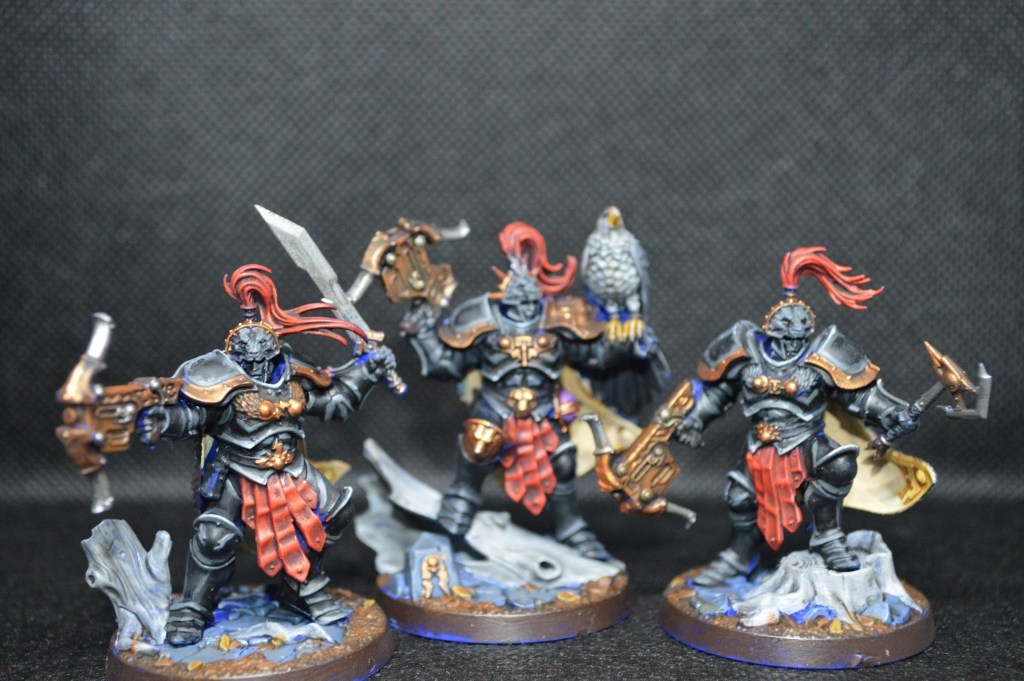
Above is a photo of my Farstriders, which I did not prime first. Check out all that blue shining through, all that paint rubbed off on high-touch surfaces, all the colored plastic visible in deeper areas my brush didn’t reach. Mm-mm-good. Why did this happen? The purest, easiest way to explain it is that bare plastic is a slippery beast. Like literally, your paints will bead up and form little droplets rather than smoothly spreading out over bare plastic. Primer paints are specially formulated to not only stick well to the bare plastic, but also create a (very slightly) rougher textured surface for your subsequent layers of paint to stick to. Unprimed minis have paint inconsistently applied across a surface, and capillary action/ surface tension draws paint out of the recesses. This means you can see the bare plastic in deeper parts of the mini, as well as the plastic through thinner paint coats, and the paint rubs off easier. Just peep those Farstriders again. When you’re working with colored plastics like we often do in Underworlds, this is even more of an issue.
No matter how you prime, you reduce all of these issues and make the process of painting easier as well. You definitely want to prime. But how do you do it? The first thing to do is choose your product – will you use the ever popular rattlecan spray primer, an airbrush primer, or a brush-on-by-hand primer? Let’s look at each in turn, starting with the spray cans since that’s what I use so I have the most to teach you, and it generally the most common.
Rattlecan/Spray Primer
The first thing to note is that you should NEVER prime indoors. This stuff is bad for you to breathe in, and also you’ll probably get paint on things, which is better to do outside where it matters less. Unfortunately, you’ll be outside in the elements, and spray paint is fickle when it comes to weather. Temperature and humidity (which combine to be something the pros call ‘dew point’) will alter how a spray paint works, and since we’re working with small, finely detailed items, variations in this performance will affect us a lot. If the air is too hot and/or dry, paint will start drying in the air between can and model. This means when it hits the model, some of it will be gritty, dusty, and, well, dried already. Your model might look rough and fuzzy, and it can hurt the final appearance pretty significantly. If it’s too cold and/or humid, the paint will not be dry at all and too runny when it hits the model, and the paint will flow into the recesses, filling in your details making things look smoothed over, as well as not really sticking to the raised surfaces as well, which was the whole point of priming.
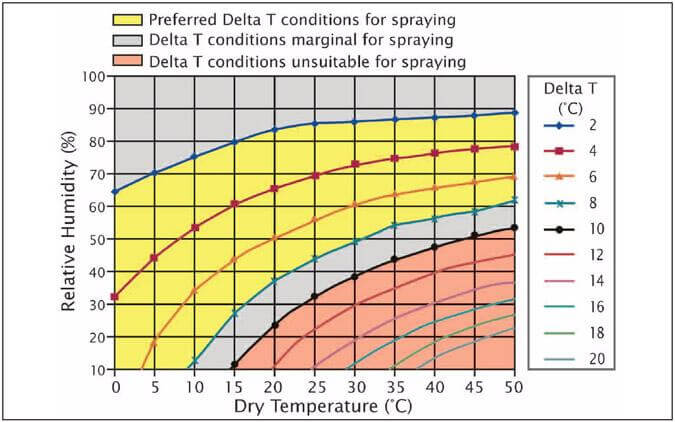
This means you need to wait for good weather. What does that mean? look below for the chart that I use as a reference. This chart comes from the Australian Government, and I originally found it on a painting FAQ from a yacht club forum. I don’t do boats, but you know the yacht rockers like the smooth spray finish on their toys the same as we do, so you can trust these numbers. Try to aim for anything in the yellow curve range, and if your local weather is rough, at least try to avoid the red area. Don’t spray when it’s raining or snowing, and probably avoid when it’s really windy too. If you want to REALLY nerd out about physics and stuff, check out this agricultural sprayers’ website that describes the concept and many more besides, which while generally intended for crops, has a delta-t section that translates to our uses too.
Once you have found the right weather window in the yellow band (or near enough), get outside and spray! Get a cardboard box or a cardboard sheet for your minis, and prime in an area you don’t mind some paint getting on the ground – so avoid a nice patio table and try the dirt or grass instead. Shake the can real good and read the can instructions for angle and distance etc. Generally, I try to spray from a good distance of at least ten inches and don’t spray on any one model for too long. You can sweep across several or do short half- second bursts on each one. You’ll need to hit multiple angles, so do a round on front, back, left and right sides, top down, then bottom. I lay the models on their front and then their back to get some under-spray coverage, allowing for a few minutes to dry in each position before moving them since I don’t want to rub paint with my fingers or have the cardboard take some off. Here’s a blog post by From the Warp that describes the physical act of spray priming with nice pictures.
There are a couple major spray primer brands – while I use the Citadel paints one it’s not necessarily nay better than the others. The nice part about citadel is the color perfectly matches citadel paints, so if you’re using those too then you know you’ll get the right tone. Army Painter and Vallejo also make quality ones specifically designed for models. You can find craft store brands like Rustoleum that will not get you the right results for minis – much like I stated in the supplies article, these cans have too much flow, take longer to dry, and will rough up and/or obscure details on your minis. Stick to miniature paints.
Airbrush Primer
Airbrushes allow you to prime as well with specially formulated primer paints. This is probably the ‘best’ finish you can get, and while it has a steep learning curve, it’s probably worth it if you want to become a high-end painter. I don’t know the first thing about it so I’ll hit you with some links to people who do instead.
Here’s Vince Venturella on video telling you how to do prime with an airbrush.
Here’s Angel Giraldez explaining how to use multiple Vallejo air primers, mixing, thinning, etc
Brush Primer
Maybe you don’t own an airbrush, and/or don’t want to use a rattlecan, or can’t because you live in a place where weather rarely permits it. Fortunately, you can also use brush primer, which you’ll paint on effectively the same was as an indiscriminate basecoat all over the model. You can use it indoors, it’s cheap, it doesn’t care about the weather, and you don’t need special tools to do it. The closest thing you’ll need to special is to just use a very big brush to mop it on – softer bristles like you’d find on makeup brushes help with this.
The goal is to make a textured surface paint can adhere to, so the quality isn’t as critical as it would be in the actual basecoat and highlight painting we will discuss in future articles. Main thing to focus on with a brush primer is make sure you get some on all parts of the model, but don’t worry about being really consistent with it, and try to avoid bubble formation. You can stab at the bubbles with the brush or tap the model on your desk to pop them with shock vibration. If you want, you can speed up the drying time with a hairdryer, but it’s not necessary if you’re willing to wait 24 hours before you get to the regular painting.
Some companies make mini painting primer, and a popular one is called Vallejo Surface primer (which I believe also works through an airbrush). You can also use Gesso, available at basically any craft store.
Major benefits of brush on primers are that you can use them anywhere, anytime, and they’re cheap, relatively speaking. They’re more environmentally friendly than rattlecans and easier to use than airbrushes. Downside is it can take a while, has a longer drying time, and a higher risk of overapplying and obscuring details.
Choosing a Primer Color
OK, so you’ve decided which type of product you’re going to use. Next issue you’ll have to tackle is what color to pick! Most, if not all priming products come in a white, black, and grey/neutral tone, and many also come in multiple colors like red, blue, or green. If you primarily will be using Contrast or speed paints to do the major components on the model, you’ll want to pick a lighter base color (my favorite is Wraithbone Citadel Spray) so that the colors shine through. Contrast over black is just going to look black with some tinting.
If you’re using other paint methods, try and visualize how you want the final model to loo, and what colors you’ll be working with to get there. If you’re aiming for a dark color/tint/impression overall, use a dark primer so that white doesn’t show through so much. If you’re aiming for a lighter effect, use a light primer so that you need fewer layers to cover up the dark undercoat. You could certainly prime with a color so that a lot of the ‘work’ is done for you – do you want your models to have green clothes, skin, or armor? green spray will get you a lot of the way there. Do paint green over the spray, though – primer alone will not look so great. But you’ll still have a lot less work to do if the base color is already on board.
For some more direct tips, check out From the Warp and their article on light colored primer and dark colored primer.
Advanced Priming Techniques

As an aside, there is a concept of ‘zenithal priming’ which is where you apply a dark primer, then lighter colors from a top-down angle. This gives the effect of a light source above the model and can help with the overall effect on your model when you get to painting. Here’s a video about how to do zenithal priming with spray cans by 52 painting and here’s an airbrush zenithal technique video from BlackJackLegacy
A similar concept that’s useful with any type of painting including contrast is known online as slap chop (and in art people circles as En Grisaille). The general idea is to prime a dark color, then drybrush or layer greys in lighter and lighter colors until white at the extreme top/edge. This gives the impression of shadow as a base layer, and then you can paint over this greyscale base with your preferred colors to get a stark highlighting effect. When using Contrast or speed paints, this makes a single layer of color do some really impressive things and can allow you to paint to a pretty good standard quite quickly. Here’s the Slap Chop step by step from the Reddit page Minipainting, with directions and links that should carry you through the process better than I can.
As an aside, I did own a SlapChop back in college. A one o’clock decision was made after I watched this fantastic musical remix but to my devastation and shame it actually is a trash product that did not improve my kitchen life whatsoever and was hard to clean – Vince lied to me?. Similarly, the Shake-weight was great as a joke but not actually useful for exercise. The ShamWow, however – now that’s a meme I would buy again.
Wrap
That’s the basic primer on priming base coats! Bottom line is priming is an important thing many beginners skip, overlook, or do poorly and it absolutely affects the final result on your models. Improve here and watch your final product improve quite quickly. Until next time, happy painting, and don’t forget to spend your glory!





Leave a Reply